
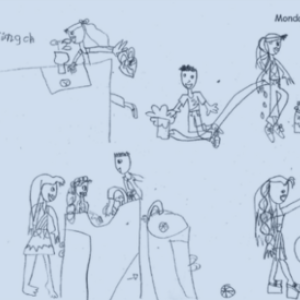
Using a design portfolio allows students to be engaged in an authentic opportunity to resolve a design challenge. Students can use their design portfolio as a self-assessment tool as they reflect on their learning and how their ideas have changed and developed during a unit.
Monitoring students’ design portfolios allows you to identify students’ non-scientific ideas, find evidence of students’ learning and plan future learning activities in science, design technologies, and literacy.
A design portfolio is organised to facilitate the dynamic, reiterative nature of the design process and supports students’ skills in design thinking, processes and production:
- Investigating and defining
Students identify with the design challenge and use this stage to explore and review the design brief. They identify critical factors for success. Students define the task by reviewing the design brief and specifying the design criteria for their solution. They identify appropriate materials and processes to use. - Generating and designing
Students plan for, document and record their ideas about how they could make an effective product or solution. - Producing and implementing
Students explore proposed solutions to develop their capabilities for selecting appropriate materials. Prototypes are designed and created. Evaluating Students record their evaluation of their prototype, product or solution and the processes involved. They reflect upon their learning. - Collaborating and managing
By working in collaborative teams students are able to communicate and compare their ideas with one another, build on one another’s ideas, discuss and debate these ideas, revise and rethink their reasoning.
Each stage of the design portfolio is described below and aligns to Australian Curriculum: Design and Technologies.
Using a design portfolio
Provide students with a dedicated notebook, or folder, to which new pages can be added during the design process.
- When introducing a design portfolio to students emphasise the importance of including pictorial representations as well as written entries. Entries can include narrative, poetry and prose as students represent their ideas in a range of styles and forms.
- Explain to students that they will use their design portfolio to keep dated records of their observations, ideas and thoughts about all activities, adding them to the appropriate section.
- Use a large project book or A3 paper in a large ring binder to make a class design portfolio. This can be used at all year levels to model design portfolio entries.
- Make time to use the design portfolio in each lesson. Provide opportunities for students to plan procedures and record predictions and their reasons for predictions before an activity.
- Provide guidelines in the form of questions and headings and facilitate discussion about recording strategies, such as note-making, lists, summaries, tables and concept maps. Use the class design portfolio to show students how they can modify and improve their recording strategies.
- Refer students to display charts, pictures, diagrams, word walls and phrases about the topic displayed around the classroom. Revisit and revise this material during the unit. Explore the vocabulary, visual texts and ideas that have developed from the unit, and encourage students to use them in their design portfolio.
- Use the design portfolio to assess student learning in science, design and technologies, and literacy. For example, during the Launch phase, use design portfolio entries for diagnostic assessment as you identify students’ prior knowledge. This allows you to take account of students’ existing ideas when planning future learning experiences.
- Discuss the importance of entries in the design portfolio during the Act phase. Demonstrate how the information in the design portfolio will help students develop literacy products, such as posters, brochures, letters and oral or written presentations.
Design thinking, processes and production
Investigating and defining
Students record information from their explorations which might assist them through the design process. Students have the opportunity to:
- recognise the design challenge.
- investigate materials and designs used in commercial situations to examine existing ideas and meet new ones.
- describe and name how the examples explored relate to their design challenge.
- describe what they have learned during exploratory investigations and how they could apply it to their design.
- Students record the design brief and develop a list of design criteria and the materials needed to make their product or solution. It includes:
- the design brief.
- the design criteria.
- a list of options against design criteria and a materials list.
- what to explore to inform the design process.
- articulate the critical factors for the success of the design, to inform development of the design criteria.
Generating and designing
Students:
- conduct some simple tests to compare their initial ideas for meeting the design brief.
- gather information to make informed decisions about their designs.
- develop a plan and write a procedure for producing the product.
- draw an annotated design sketch.
Producing and implementing
Students collect ideas about how they will make their designed product or solution. This includes diagrams and ideas, including steps in the procedure, and is where students:
- produce a prototype according to design considerations and criteria.
- prepare a presentation.
Evaluating
This is where students record ongoing evaluation that occurs throughout the science inquiry. It includes evaluation of materials, designs, ideas and processes, and is an opportunity for students to:
- make dated chronological entries as they reflect on their learning throughout the inquiry, including diagrams, sketches, tables and graphs.
- evaluate against the criteria.
- evaluate the design process and products to determine ideas for improvement.
- record new learning and reflect on their progress throughout the inquiry, including self-assessment.
- compare ideas and findings with initial predictions and reasons and provide evidence that supports their ideas, reasons and reflections.

Here's where you'll find:
- Deep dives into high impact teaching practices
- Discussion questions for you to explore with your colleagues
- Links to related lessons in our teaching sequences
Using a glossary to support science vocabulary development
Create a class glossary as a growing bank of descriptions to support students to understand and use new vocabulary.
A glossary is a list of terms that relate to a particular subject matter or topic. Each term is accompanied by a description or explanation, and where appropriate a diagram or other representation, within the context of the subject. A glossary entry is generally more descriptive than a dictionary definition.
Creating a class glossary can be used to:
- elicit students’ prior understanding of subject-specific terms
- develop a growing bank of descriptions to help students understand and use new words in written and oral tasks
- support students’ understanding of scientific descriptions and explanations
- develop the strategy of using word sources as a real-life, valuable investigative research strategy.
Using a class glossary
- Introduce a term and discuss what students think it means within the context of the science topic. Possible strategies include students connecting the word to a feature or aspect of the topic, and students using the word in a spoken sentence to explain topic, concept or context.
- Create a shared understanding of the term and record it in the class science journal or as part of the word wall.
- Introduce the conventional technical meaning of the term when appropriate for students learning (i.e. after they have begun exploring the phenomenon).
- Encourage students to practise using the terms in the glossary in order to become familiar with them. Students may wish to amend a description of a word after becoming more familiar with how it is used in a particular context. This may occur when writing, talking or making annotations to diagrams.
- Integrate the glossary across all curriculum areas where appropriate. For example, in a literacy lesson discuss various meanings for the term.
- The glossary could be a part of the science journal or the word wall for a particular unit.
Note: It is important to ask students for ‘descriptions’ of the terms rather than ‘definitions’. ‘Definitions’ are often viewed as fixed and unchangeable, whereas ‘descriptions’ support students to see that ideas can change as their understanding develops.
Here's where you'll find:
- Deep dives into high impact teaching practices
- Discussion questions for you to explore with your colleagues
- Links to related lessons in our teaching sequences
Using a science journal throughout inquiry
A science journal is a record of observations, experiences and reflections. It contains a series of dated, chronological entries. It can include written text, drawings, measurements, labelled diagrams, photographs, tables and graphs.
Using a science journal provides an opportunity for students to be engaged in a real science situation as they keep a record of their observations, ideas and thoughts about science activities. Students can use their science journals as a useful self-assessment tool as they reflect on their learning and how their ideas have changed and developed during a unit. Monitoring students’ journals allows you to identify students’ alternative conceptions, find evidence of students’ learning and plan future learning activities in science and literacy.
Keeping a science journal supports students to experience and understand how scientists work, and aligns to descriptions in the Australian Curriculum: Science and Australian Curriculum: English.
Using a science journal
- Provide each student with a notebook for their science journal or use a digital format. Tailor the type of journal to fit the needs of your students. Explain to students that they will use their journals to keep a record of their observations, ideas, and thoughts about science activities. Emphasise the importance of including pictorial representations as well as written entries.
- Use a large project book, A3 paper, or interactive whiteboard to make a class science journal. This can be used at all year levels to model journal entries. With younger students, the class science journal can be used more frequently than individual journals or could take the place of individual student journals.
- Make time to use the science journal in each lesson. Provide opportunities for students to plan procedures and record predictions, and their reasons for predictions, before an activity. Use the journal to record observations during an activity and reflect afterward, including comparing ideas and findings with initial predictions and reasons. It is important to encourage students to provide evidence that supports their ideas, reasons, and reflections.
- Provide guidelines in the form of questions and headings and facilitate discussion about recording strategies, such as note-making, lists, tables, and concept maps. Use the class science journal to show students how they can modify and improve their recording strategies.
- Science journal entries can include narrative, poetry, and prose as students represent their ideas in a range of styles and forms.
- In science journal work, you can refer students to display charts, pictures, diagrams, word walls, and phrases about the topic displayed around the classroom. Revisit and revise this material during the unit. Explore the vocabulary, visual texts, and ideas that have developed from the science unit, and encourage students to use them in their science journals.
- Use the science journal to assess student learning in both science and literacy. For example, during the Launch phase, use journal entries for diagnostic assessment as you determine students’ prior knowledge. Science journals are also valuable for self-assessment and peer-assessment.
- Discuss the importance of entries in the science journal during the Act phase. Demonstrate how the information in the journal will help students develop literacy products, such as posters, brochures, letters, and oral or written presentations.
Here's where you'll find:
- Deep dives into high impact teaching practices
- Discussion questions for you to explore with your colleagues
- Links to related lessons in our teaching sequences
Using a TWLH chart to document inquiry
Primary Connections has developed an adaptation of the KWL chart. A TWLH chart is a learning tool used to elicit students’ prior knowledge by asking what students Think they know, determine questions students Want to know answers to, document what has been Learned, and How students know they’ve learned.
A learning tool commonly used in classrooms is the KWL chart. It is used to elicit students’ prior Knowledge, determine questions students Want to know answers to, and document what has been Learned.
Primary Connections has developed an adaptation called the TWLH chart.
T - ‘What we think we know’ is used to elicit students’ background knowledge and document existing understanding and beliefs. It acknowledges that what we ‘know’ might not be the currently accepted scientific understanding.
W - ‘What we want to learn’ encourages students to list questions for investigation. Further questions can be added as students develop their understanding.
L - ‘What we learned’ is introduced as students develop explanations for their observations. These become documented as ‘claims’.
H - ‘How we know’ or ‘How we came to our conclusion’ is completed at the same time as the third column (L) and encourages students to record the evidence and reasoning that lead to their new claim, which is a key characteristic of science. This last question requires students to reflect on their investigations and learning and to justify their claims.
As students reflect on their observations and understandings to complete the third and fourth columns, ideas recorded in the first column should be reconsidered and possibly confirmed, amended, or discarded, depending on the investigation findings.
Tips:
- The TWLH chart could be used to scaffold students’ representations of their developing understanding. In their science journal, students representing current thinking based on evidence they’ve gathered during hands-on investigations.
- Sort students’ ideas into rows to categorise them by sub-topic on the TWLH chart. This is useful for tracking the change in conceptual understanding over time. E.g. sub-topics when learning about natural disasters could be volcanoes, earthquakes, tsunamis etc. Sub-topics when learning about eucalypts could be seeds, habitats, animals, life cycles, etc. See samples below.
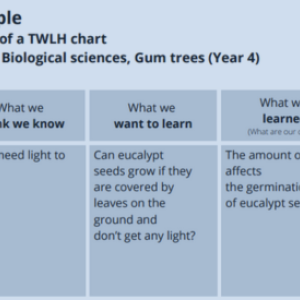
Sample
1 row of a TWLH chart
Topic: Biological sciences, Biological sciences (year 3)
| What we think we know | What we want to learn | What we learned (what are our claims) | How we know (what is our evidence, and where did our data come from) |
| Seeds need light to grow. | Can eucalypt seeds grow if they are covered by the leaves on the ground and don't get any light? | The amount o flight affects the germination of eucalypt seeds. | No seeds germinated from eucalypt seeds that were covered by leaves. Six seeds germinated from the eucalypt seeds that weren't covered by leaves.* |
*The TWLH chart tracks learning through inquiry. In doing so it is a living record, co-created with students, and may demonstrate evidence of lingering alternative conceptions worthy of further interrogation, questioning and investigation. This is a great way to support students’ questioning and thinking like scientists.
Discuss with your colleagues
One of the challenges in a classroom is to encourage all students (even the quiet students) to ask science questions for the ‘What do we WANT to learn’ section of the TWLH chart.
- Discuss how you could encourage students to participate in the completion of this section of the TWLH chart.
- Complete the T and W sections of a TWLH chart for how to encourage students to ask science questions in the classroom.
- Read the Cultivate a questioning culture in the classroom section of the Primary Connections Pedagogical Toolbox.
- Complete the ‘What we LEARNED’ and ‘HOW we know’ section of the TWLH chart.
Here's where you'll find:
- Deep dives into high impact teaching practices.
- Discussion questions for you to explore with your colleagues.
- Links to related lessons in our teaching sequences.
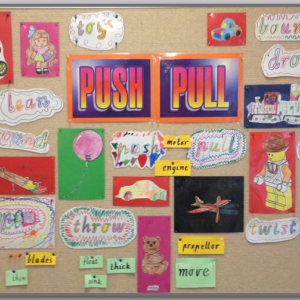
Using a word wall to support student explanations
Support student development of vocabulary related to a particular topic, and provide a reference for class discussions.

Using word walls
A word wall is an organised collection of words and images displayed in the classroom. It supports the development of vocabulary related to a particular topic and provides a reference for students. The content of the word wall can be words that students see, hear and use in their reading, writing, speaking, listening and viewing. Creating a class word wall, including words from different dialects and languages, aligns to descriptions in the Australian Curriculum: English.
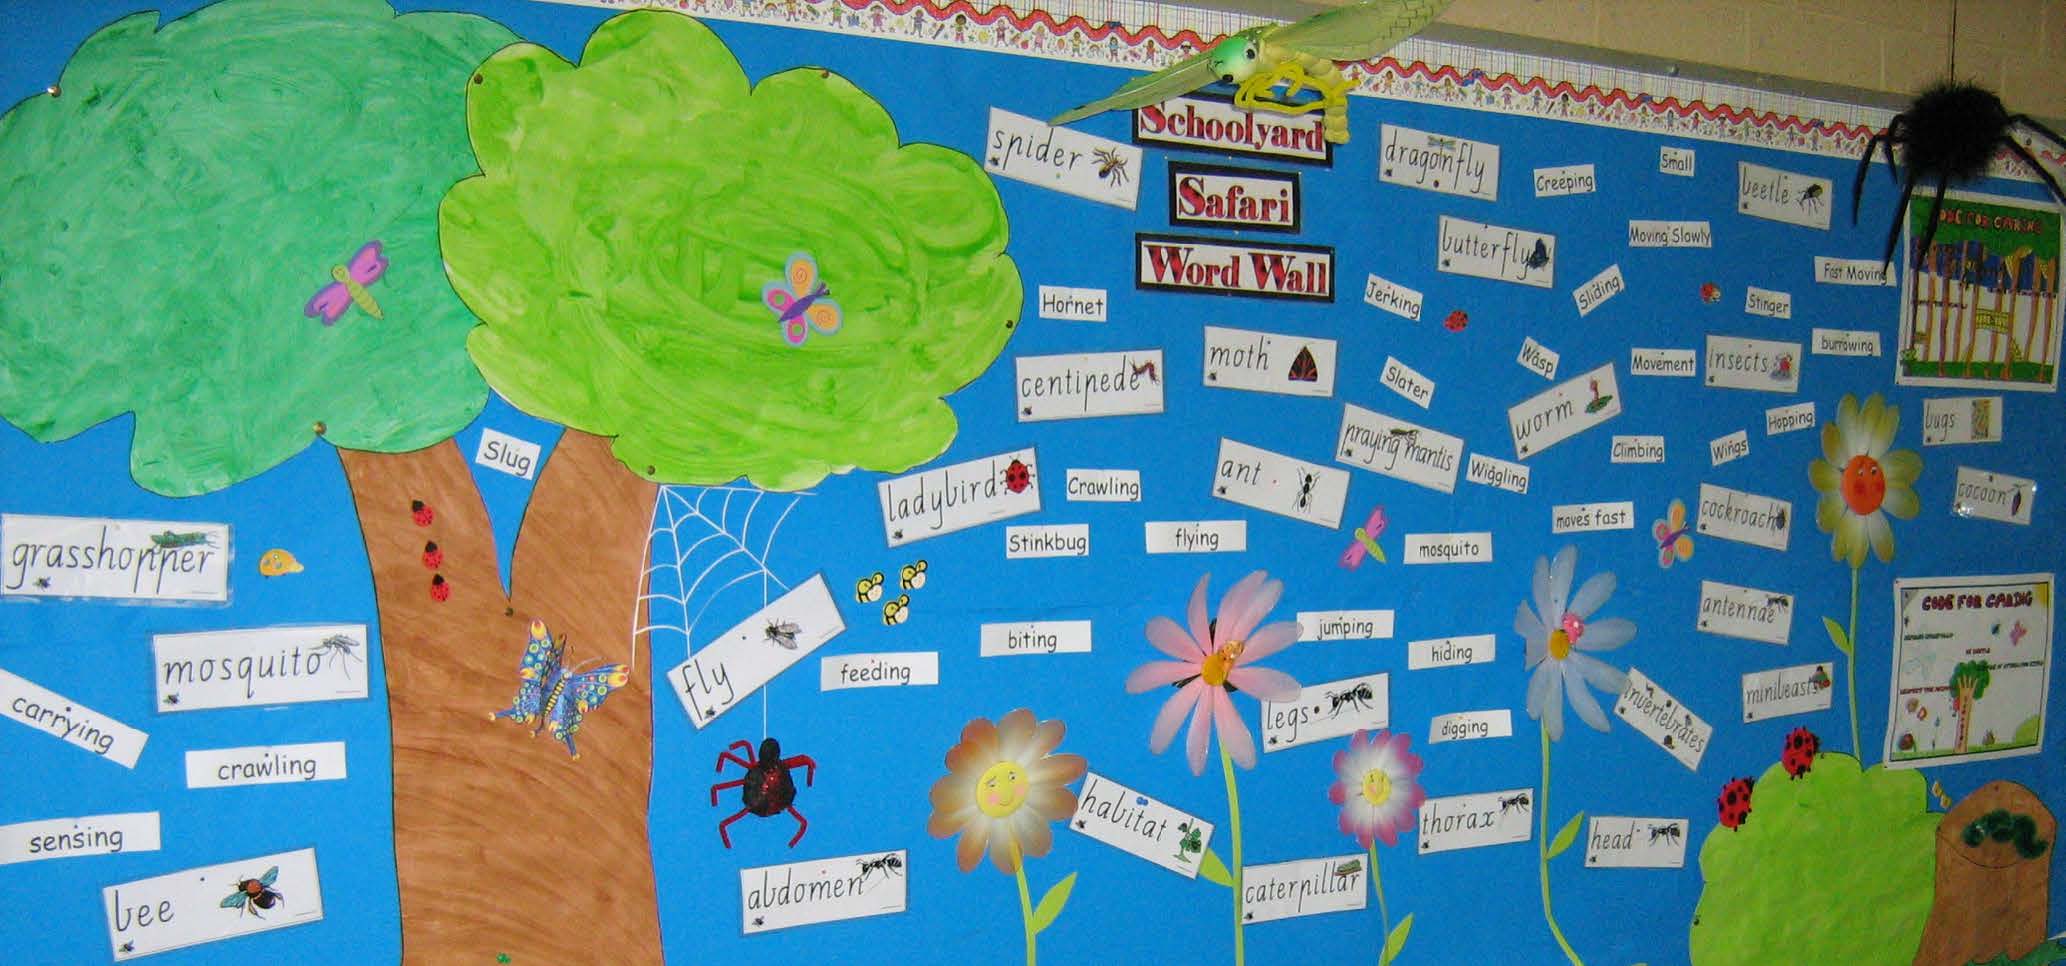
A word wall for a Biological sciences teaching sequence.
Purpose
The purpose is for students to be exposed to a print-rich environment that supports their ;science and literacy experiences.
A word wall can be used to:
- support science and literacy experiences of reading, viewing, writing and speaking
- provide support for students during literacy activities across all key learning areas
- promote independence in students as they develop their literacy skills
- provide a visual representation to help students see patterns in words and decode them
- develop a growing bank of words that students can spell, read and/or use in writing tasks
- provide ongoing support for the various levels of academic ability in the class
- teach the strategy of using word sources as a real-life strategy.
Organisation
Position the word wall so that students have easy access to the words. They need to be able to see, remove and return word cards to the wall. A classroom could have one main word wall and two or three smaller ones, each with a different focus, for example, high frequency words.
Choose robust material for the word cards. Write or type words on cardboard and perhaps laminate them. Consider covering the wall with felt-type material and backing each word card with a self-adhesive dot to make it easy for students to remove and replace word cards.
Word walls do not need to be confined to a wall. Use a portable wall, display screen, shower curtain or window curtain. Also, consider creating word cards in shapes that align with the themes or sub- concepts within the unit.
Organise the words on the wall in a particular way; alphabetically, or in word groups or groups suggested by the unit topic, for example, words for a life cycles unit might be organised under headings, such as ‘Plant life cycle’ and ‘Animal life cycle’, words for a geology unit might be organised under headings such as ‘landscapes’, ‘soil’, ‘rock cycle’
Invite students to contribute words from different languages to the word wall. Group words about the same thing, for example, different names of the same piece of clothing on the word wall so that students can make the connections. Identify the different languages used, for example, by using different-coloured cards or pens to record the words.
Implementation
- Limit the number of words to those needed to support the science and literacy experiences in the classroom.
- Add words gradually, and include images where possible, such as drawings, diagrams, photographs, or artefacts. Increase the number of words on the word wall as students are introduced to the scientific vocabulary of the unit.
- Consider putting a date on words to track the class’ use of the term at a particular point of science inquiry.
- Encourage students to interact with the word wall. Practise using the words with students by reading them and playing word games. Refer to the words during science and literacy experiences and direct students to the wall when they need a word for writing. Encourage students to use the word wall to spell words correctly.
Use the word wall with the whole class, small groups and individual students during literacy experiences. Organise multi-level activities to cater for the individual needs of students.
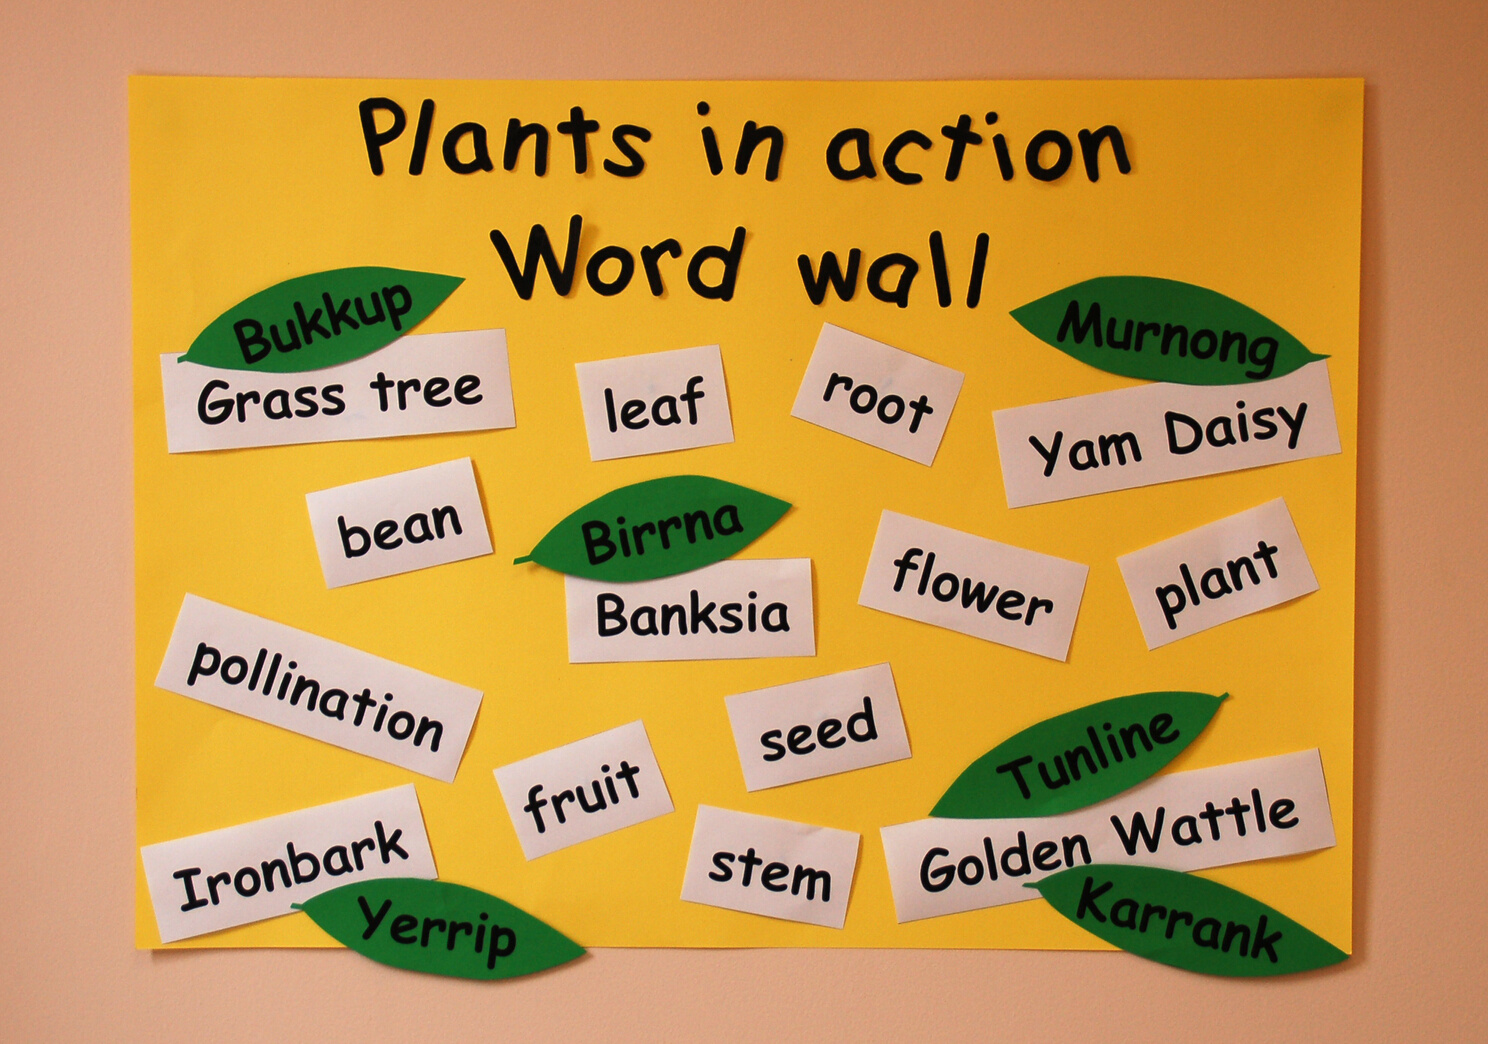
A word wall for the Year 3 Biological sciences.
Here's where you'll find:
- Deep dives into high impact teaching practices
- Discussion questions for you to explore with your colleagues
- Links to related lessons in our teaching sequences
Using word loops to support scientific literacy
A word loop is a tool that helps students to clarify the relationship between words and terms, symbols, representations and definitions and how these contribute to a whole topic or concept.
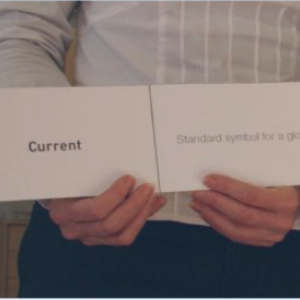
What's a word loop?
Word loops provide students with an opportunity to develop a deeper understanding of the scientific vocabulary associated with a topic. As students actively use the language of scientific ideas and concepts, their knowledge, understanding and confidence are enhanced.
A word loop is an activity that can be used when students are familiar with the vocabulary associated with the scientific ideas and concepts in the unit. Word loops can be developed from word walls or class science ‘chat-boards’. They involve matching words with their descriptions. The number of words can be increased during the unit with additional cards added as more words are introduced. Word loops can be used as a ‘concept check’ activity at the beginning of a lesson, as a consolidation learning activity or at the end of a lesson as a reflection or assessment activity.
Word loops use a series of cards that have a description on the right-hand side and a scientific word or symbol on the left-hand side. The aim of the activity is to form a loop in which matching pairs of descriptions and words or symbols are made—similar to a game of dominoes.
How to use word loops
- Distribute word loop cards so each student or team has at least one card.
- The teacher, or nominated student/s, starts the activity by reading aloud the statement on the right-hand side of their card, for example, ‘A ray diagram needs these to show the direction light travels’.
- The student/s who has the matching word or symbol on the left-hand side of their card indicates that they have the answer and reads it aloud, for example, ‘Arrows’.
- The student/s with the matching word or symbol card moves to stand on the left-hand side of the person who read the matching description. That student then reads the description on the right-hand side of their card to continue the word loop.
- This process continues until all the pairs have been matched up and the loop is complete. When finished a circle is formed—if not, an incorrect match has been made.
Teacher tools
Here's where you'll find:
- Deep dives into high impact teaching practices
- Discussion questions for you to explore with your colleagues
- Links to related lessons in our teaching sequences
Using graphing to support development of Science Inquiry Skills
A graph is a representation; it represents and summarises information so that patterns and relationships can be identified. Understanding the conventions of constructing and using graphs is an important aspect of scientific literacy.
Graphing
During a scientific investigation, observations and measurements are made and measurements are usually recorded in a table. Graphs can be used to organise the data to identify patterns, which help answer the research question and communicate findings from the investigation.
Once you have decided to construct a graph, two decisions need to be made:
- What type of graph? and
- Which variable goes on each axis of the graph?
Picture graph
Picture graphs support students in the transition from using physical representations to representing information using symbols or pictures in columns. The symbols or pictures must be the same size.
Table A shows the results recorded for an investigation of the types of small animals found in different environments. This information is represented in Graph A by using one small picture for each animal in Table A.
Table A: Number of small animals near the play equipment
| Types of small animals | Number of small animals |
| ant | 5 |
| worm | 3 |
| snail | 2 |

Graph A:
Number of small animals near the play equipment
In the graph, each picture might also represent a number of animals, for example, 1 picture = 5 animals found.
Analysis
Analysis of Graph A shows that different numbers of small animals were found near the play equipment. Students could compare graphs of different environments to determine which environments suit which animals. For example, if lots of ants were found in the garden, near the play equipment and in the lunch area, students might conclude that ants can live in lots of places in the schoolyard. If ants were only found in the garden, students might conclude that the ants prefer a garden habitat because they aren’t found in other places.
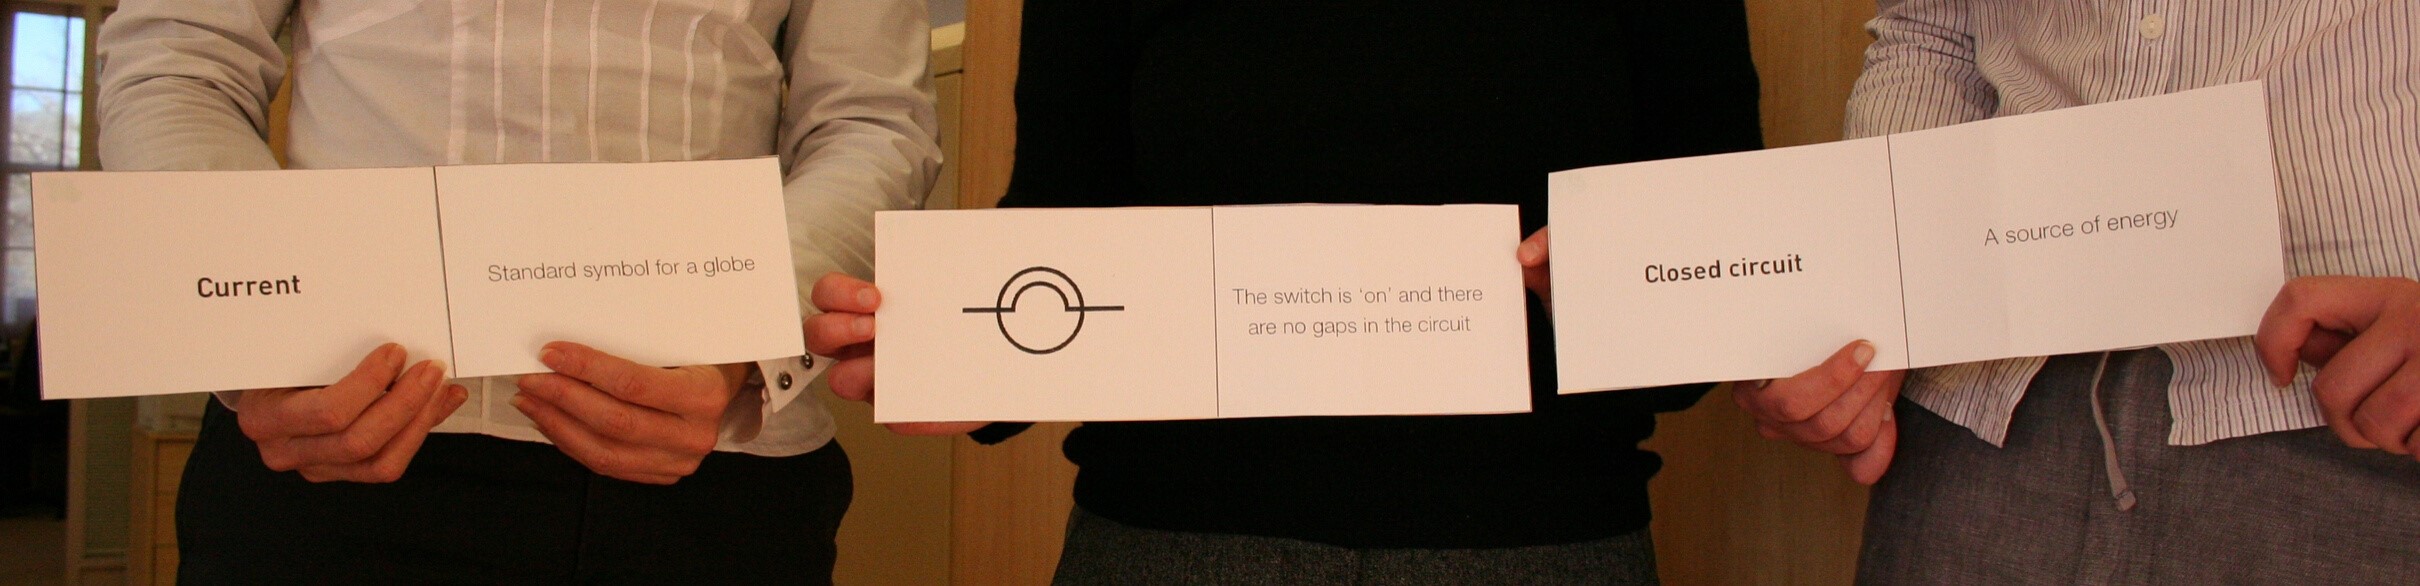
Column graph
Where data for one of the variables are in categories (that is, we use words to describe it, for example, earthquake location) a column graph is used. Graph B below shows how the results of an investigation of the effect of material type on the amount of light that passes through it (data in categories) have been constructed as a column graph.
Table B: The effect of material on the amount of light that passes through
| Material | Amount of light |
| plastic sheet | all |
| bubble wrap | almost all |
| tissue paper | most |
| paper | not much |
| cardboard | none |
| foil | none |
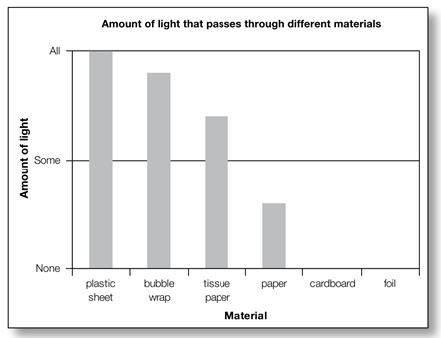
Graph B:
The effect of material on the amount of light that passes through
Analysis
Analysis of Graph B shows that the amount of light that passes through materials changes according to the type of material. This is because the more transparent or translucent the material is, the more light can pass through it.
Which variable goes on each axis?
It is conventional in science to plot the variable that has been changed on the horizontal axis (X axis) and the variable that has been measured/observed on the vertical axis (Y axis) of the graph.
Graph titles and labels
Graphs have titles and each variable is labelled on the graph axes, including the units of measurement. The title of the graph is usually in the form of ‘The effect of one variable (the thing we are changing/ independent variable) on the other variable (the thing we are measuring or observing/dependent variable)’. For example, ‘The effect of material on the amount of light that passes through.’
Steps in analysing and interpreting data
Analysing and interpreting data is a fundamental part of the scientific process and helps students draw conclusions from the data they have collected. See samples of analysis underneath both Graphs A and B above.
Step 1 — Organise the data (for example, construct a graph) so you can see the pattern in data or the relationship between data for the variables (things that we change, measure/observe or keep the same).
Step 2 — Identify and describe the pattern or relationship in the data.
Step 3 — Explain the pattern or relationship using science concepts. Questioning for analysis Teachers use effective questioning to assist students to develop skills in interrogating and analysing data represented in graphs.
Questioning for analysis
Teachers use effective questioning to assist students to develop skills in interrogating and analysing data represented in graphs.
For example:
- What is the story of your graph?
- Does the data in your graph reveal any patterns?
- Is this what you expected? Why?
- Can you explain the pattern?
- Why did this happen?
- What do you think the pattern would be if you continued the line of the graph?
- How certain are you of your results?
Here's where you'll find:
- Deep dives into high impact teaching practices
- Discussion questions for you to explore with your colleagues
- Links to related lessons in our teaching sequences
Biological science conceptions
The biological sciences involve the study of living things, their interdependence and interaction in the environment. The ongoing process of evolution has led to a diverse range of living things that have forms and features that make them suited to their environment. This results in biological systems that are interdependent with each other and their environment.
Core concepts
When exploring the natural world, the wide expanse of knowledge leads us to develop the big ideas or core concepts of science. Teachers and students can use these to explain and make predictions about a range of related phenomena in the natural world. Through the curriculum, these concepts are introduced and developed according to the age and stage of the students.
| A diverse range of living things have evolved on earth over hundreds of millions of years; this process is ongoing | Biological systems are interdependent and interact with each other and their environment | The form and features of living things are related to the functions that their body systems perform | |
| F | Observe external features of plants and animals and describe ways they can be grouped based on these features | Concept not covered at this year level | Observe external features of plants and animals and describe ways they can be grouped based on these features |
| Y1 | Concept not covered at this year level | Identify the basic needs of plants and animals, including air, water, food and shelter and how the place they live meet those needs | Concept not covered at this year level |
| Y2 | Biological sciences not covered at this year level | Biological sciences not covered at this year level | Biological sciences not covered at this year level |
| Y3 | Compare characteristics of living and non-living things and examine the differences between the life cycles of plants and animals | Concept not covered at this year level | Compare characteristics of living and non-living things and examine the differences between the life cycles of plants and animals |
| Y4 | Concept not covered at this year level | Explain the roles and interactions of consumers, producers and decomposers within a habitat and how food chains represent feeding relationships | Concept not covered at this year level |
| Y5 | Examine how particular structural features and behaviours of living things enable their survival in specific habitats | Concept not covered at this year level | Examine how particular structural features and behaviours of living things enable their survival in specific habitats |
| Y6 | Concept not covered at this year level | Concept not covered at this year level | Investigate the physical conditions of a habitat and analyse how the growth and survival of living things is affected by changing physical conditions |
This section is about core concepts and alternative conceptions:
- The core concepts of science are framed by the six overarching ideas identified by ACARA.
- Addressing alternative conceptions in the core concepts requires teachers to plan discussions and investigations that allow students to question their prior assumptions and understanding of the core concepts and key ideas.
Diverse range of living things
Alternative conceptions
A diverse range of living things have evolved on earth over hundreds of millions of years; this process is ongoing.
This list of alternative conceptions is not meant to be comprehensive, but instead aims to provide a starting point.
Alternative conception | Accepted conception |
| Fire/sun/cars are living things. | Living things need to reproduce (not cars/sun). Living things also need water (not fire). |
| Non-living is the same as dead. | Dead things were ‘once living’. Non-living things were never living. |
| The particles in an animal are living. | Particles do not reproduce or need water to ‘survive’. Cells are the smallest living thing. |
| Seeds are non-living. | Seeds need water, can grow, reproduce, require gases, produce waste etc. |
| Plants do not move. | Plants grow or tilt their leaves towards the sun. Carnivorous (fly trap) plants can move to trap insects. Roots grow downwards. |
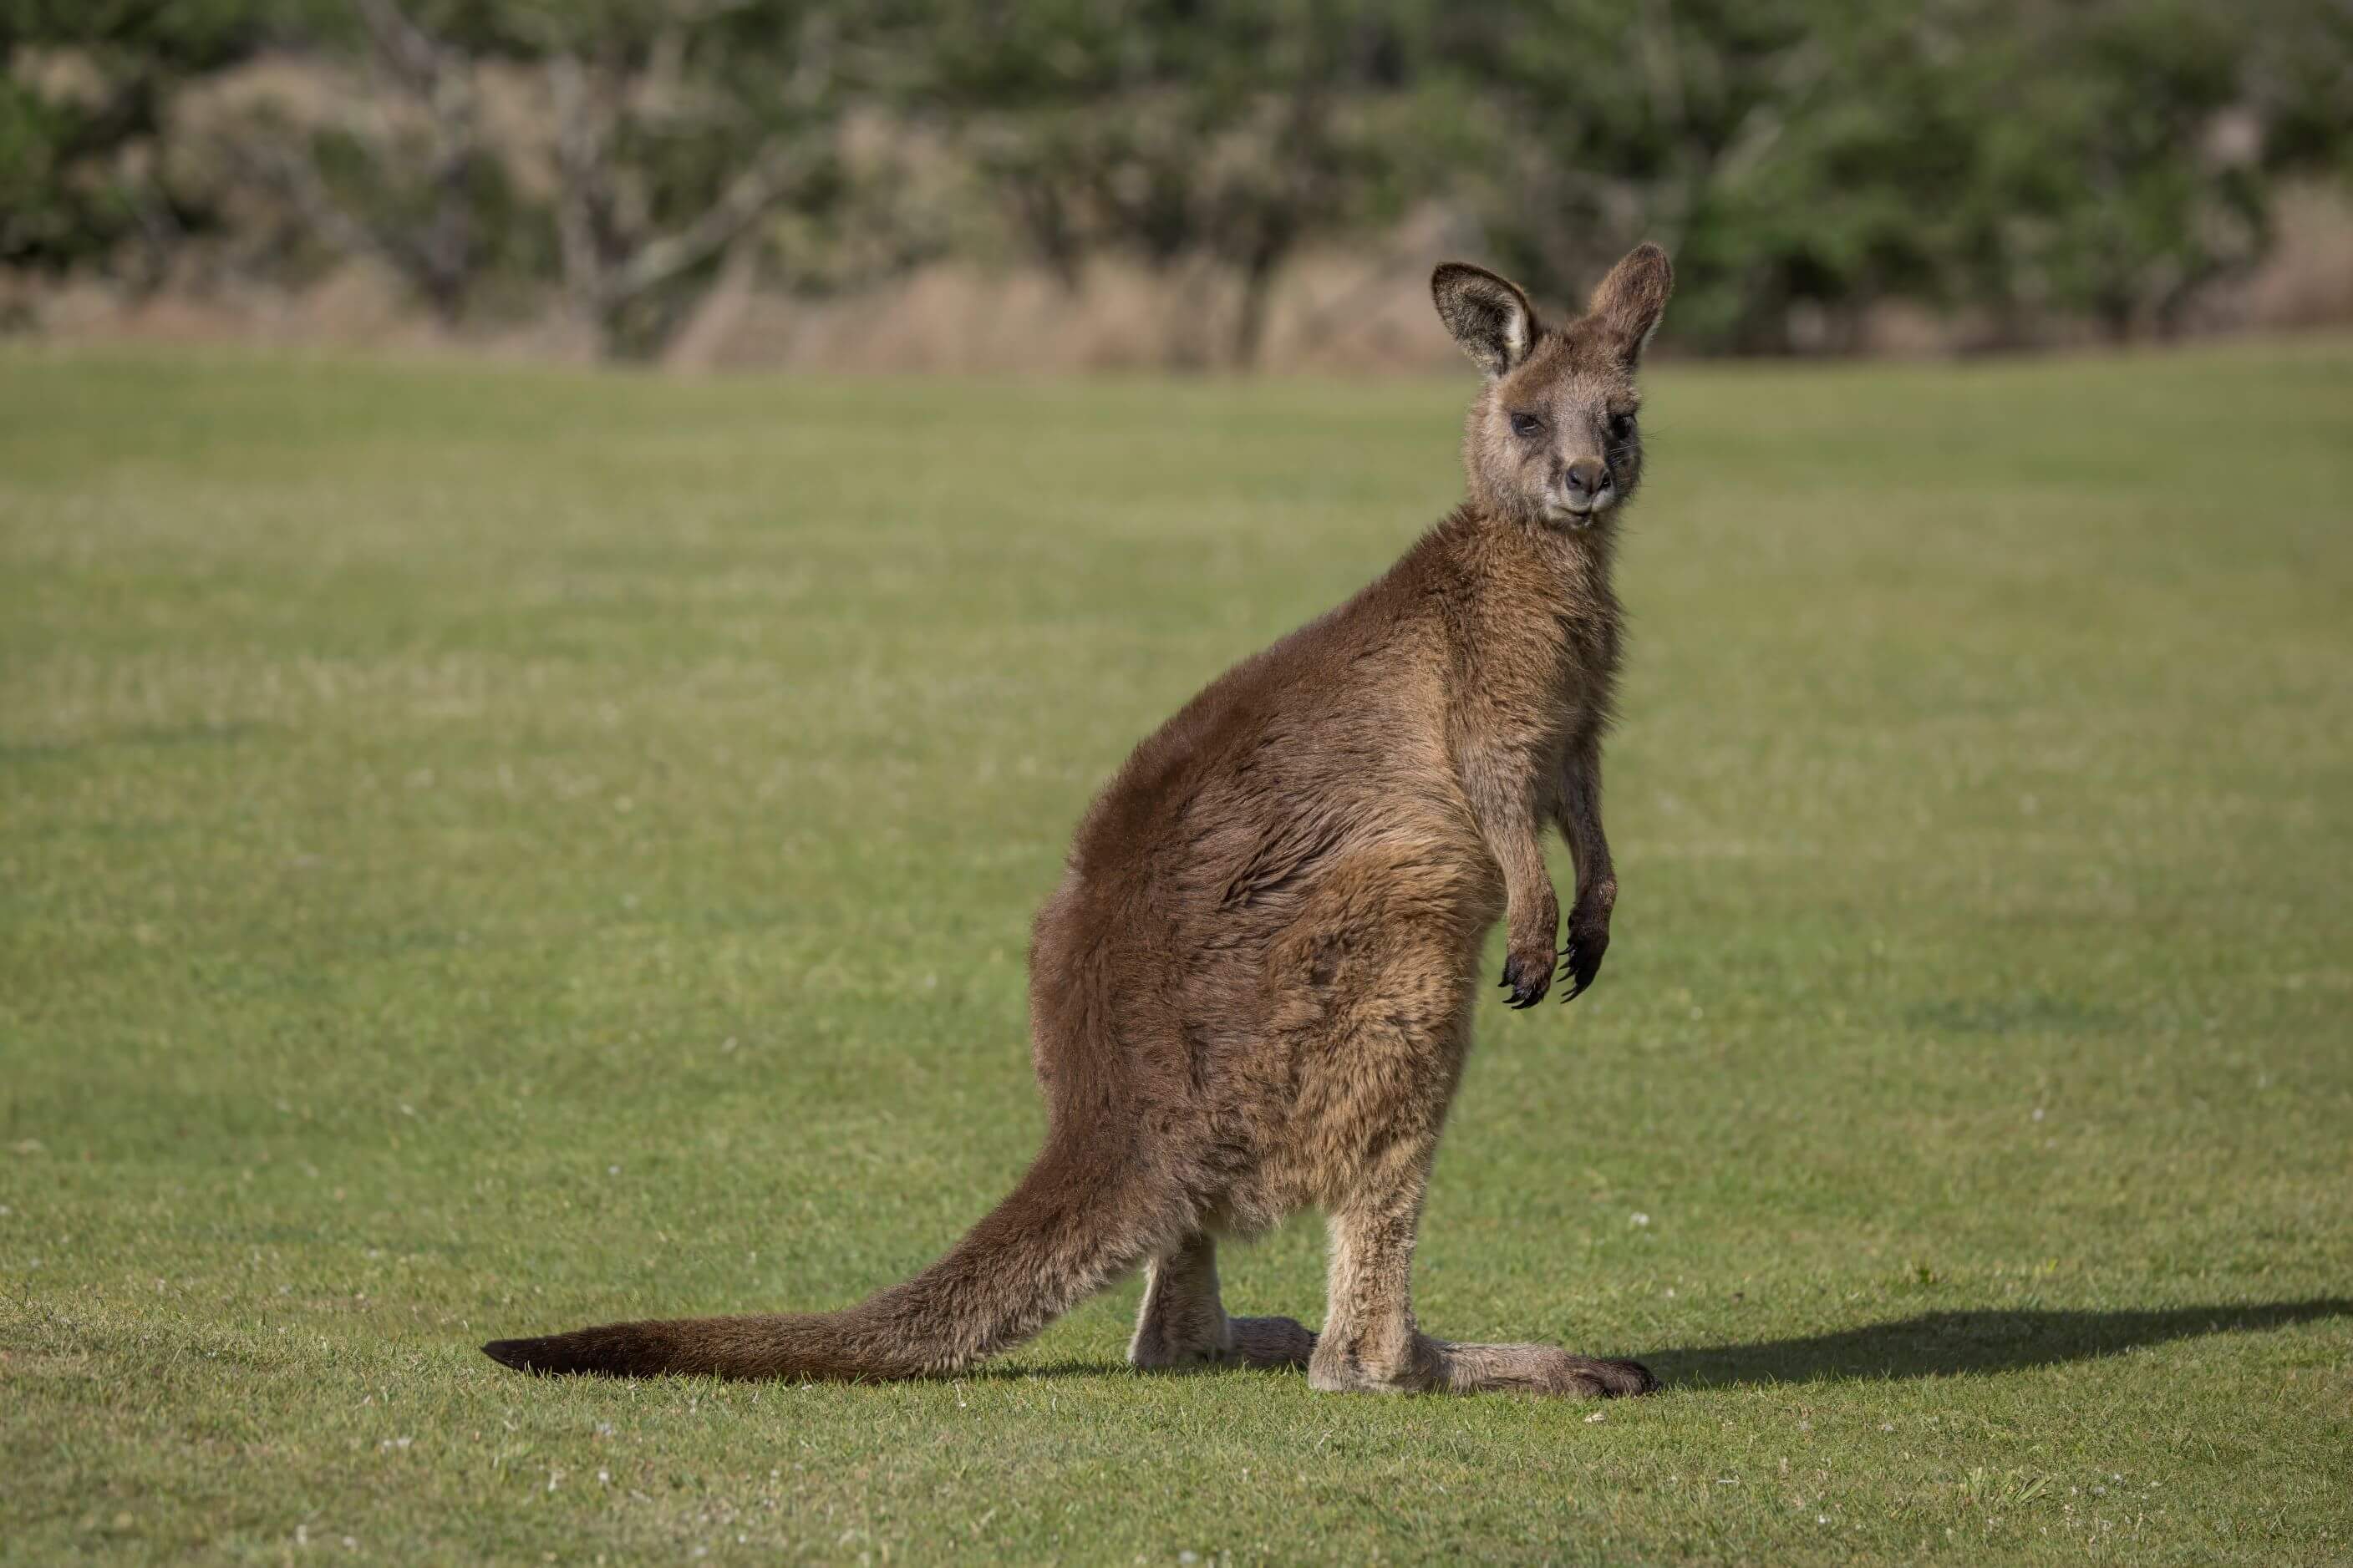
| All animals can move independently from one place to another. | Animals need to eat their food/nutrients and most can move independently in reaction to their environment. Animals are multicellular; their cells are different to plant cells. Some underwater organisms (sea anemone) have animal cells and appear fixed in place like a plant. |
| All living things have a brain. | Plants are living things and do not have a functioning brain. |
| All living things need oxygen to survive. | Many microorganisms grow in environments that do not have oxygen. They will exchange other gases. |
| Animals live on land. | There are many animals that live in water. |
| Humans evolved from apes. | Humans have common ancestors with apes that have evolved into different species over time. |
| Organisms adapt to suit their environment. | Adaptations are a result of the survival and reproduction of the individuals in a species that are most suited to their environment. This process can take many generations. (Species adapt, not individual organisms.) |
| Fungi are plants | Fungi (like yeast and mushrooms) are unable to photosynthesise like plants. They are classified in a different Kingdom. |
| All bacteria make you sick | While some bacteria can cause illness, we rely on many types of bacteria to help us digest food and fight disease. |
| Living things grow because their cells get bigger. | Living things grow because the cells reproduce. |
References
AITSL. (n.d.). Resource. AITSL. https://www.aitsl.edu.au/tools-resources/resource/dispelling-scientific-misconceptions-illustration-of-practice
Allen, M. (2019). Misconceptions in Primary Science 3e. McGraw-hill education (UK).
Ideas for Teaching Science: Years 5-10. (2014, April 14). Resources for Teaching Science. https://blogs.deakin.edu.au/sci-enviro-ed/years-5-10/
Pine, K., Messer, D., & St. John, K. (2001). Children's misconceptions in primary science: A survey of teachers' views. Research in Science & Technological Education, 19(1), 79-96.
Redhead, K. (2018). Common Misconceptions. Primary Science Teaching Trust. https://pstt.org.uk/resources/common-misconceptions/
University of California. (2022, April 21). Correcting misconceptions - Understanding Science. Understanding Science - How Science REALLY Works... https://undsci.berkeley.edu/for-educators/prepare-and-plan/correcting-misconceptions/
This section is about core concepts and alternative conceptions:
- The core concepts of science are framed by the six overarching ideas identified by ACARA.
- Addressing alternative conceptions in the core concepts requires teachers to plan discussions and investigations that allow students to question their prior assumptions and understanding of the core concepts and key ideas.
Biological systems are interdependent
Alternative conceptions
Biological systems are interdependent and interact with each other and their environment.
This list of alternative conceptions is not meant to be comprehensive, but instead aims to provide a starting point.
Alternative conception | Accepted conception |
| Plants make energy. | Plants use the light energy from the sun to photosynthesise and generate chemical energy. |
| Plants get their food/energy from the ground. | Plants obtain water from the ground (and trace nutrients) but use the water and carbon dioxide in sunlight to produce glucose and oxygen (photosynthesis). |
| Rotting matter returns energy to the soil. | Rotting is usually a result of decomposition by bacteria and fungi breaking down the material to obtain energy. They produce waste matter (lower energy molecules). |
| Plants take in all the substances they need to grow through their roots. | Plants obtain water and trace nutrients through their roots. Gases (carbon dioxide and oxygen) are obtained by all parts of the plant (including leaves). |
| Plants take in carbon dioxide and release oxygen. | In sunlight, plants take in carbon dioxide and release oxygen. When there is no light, photosynthesis cannot occur and plants still undergo cellular respiration (use oxygen and produce carbon dioxide). |
| Animals at the end of the food chain need less energy (because there are fewer of them). | Animals at the end of a food chain tend to be fast-moving and require more energy to maintain and move. |
| Energy transfer in a food chain is 100% efficient. | The energy gained from eating is used for movement, tissue repair, and growth. Each link in a food chain tends to pass on 10% of the previous organism. |
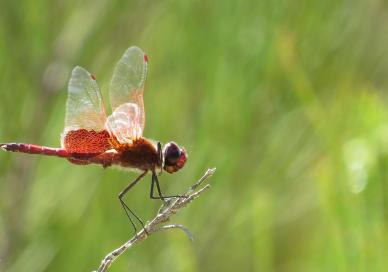
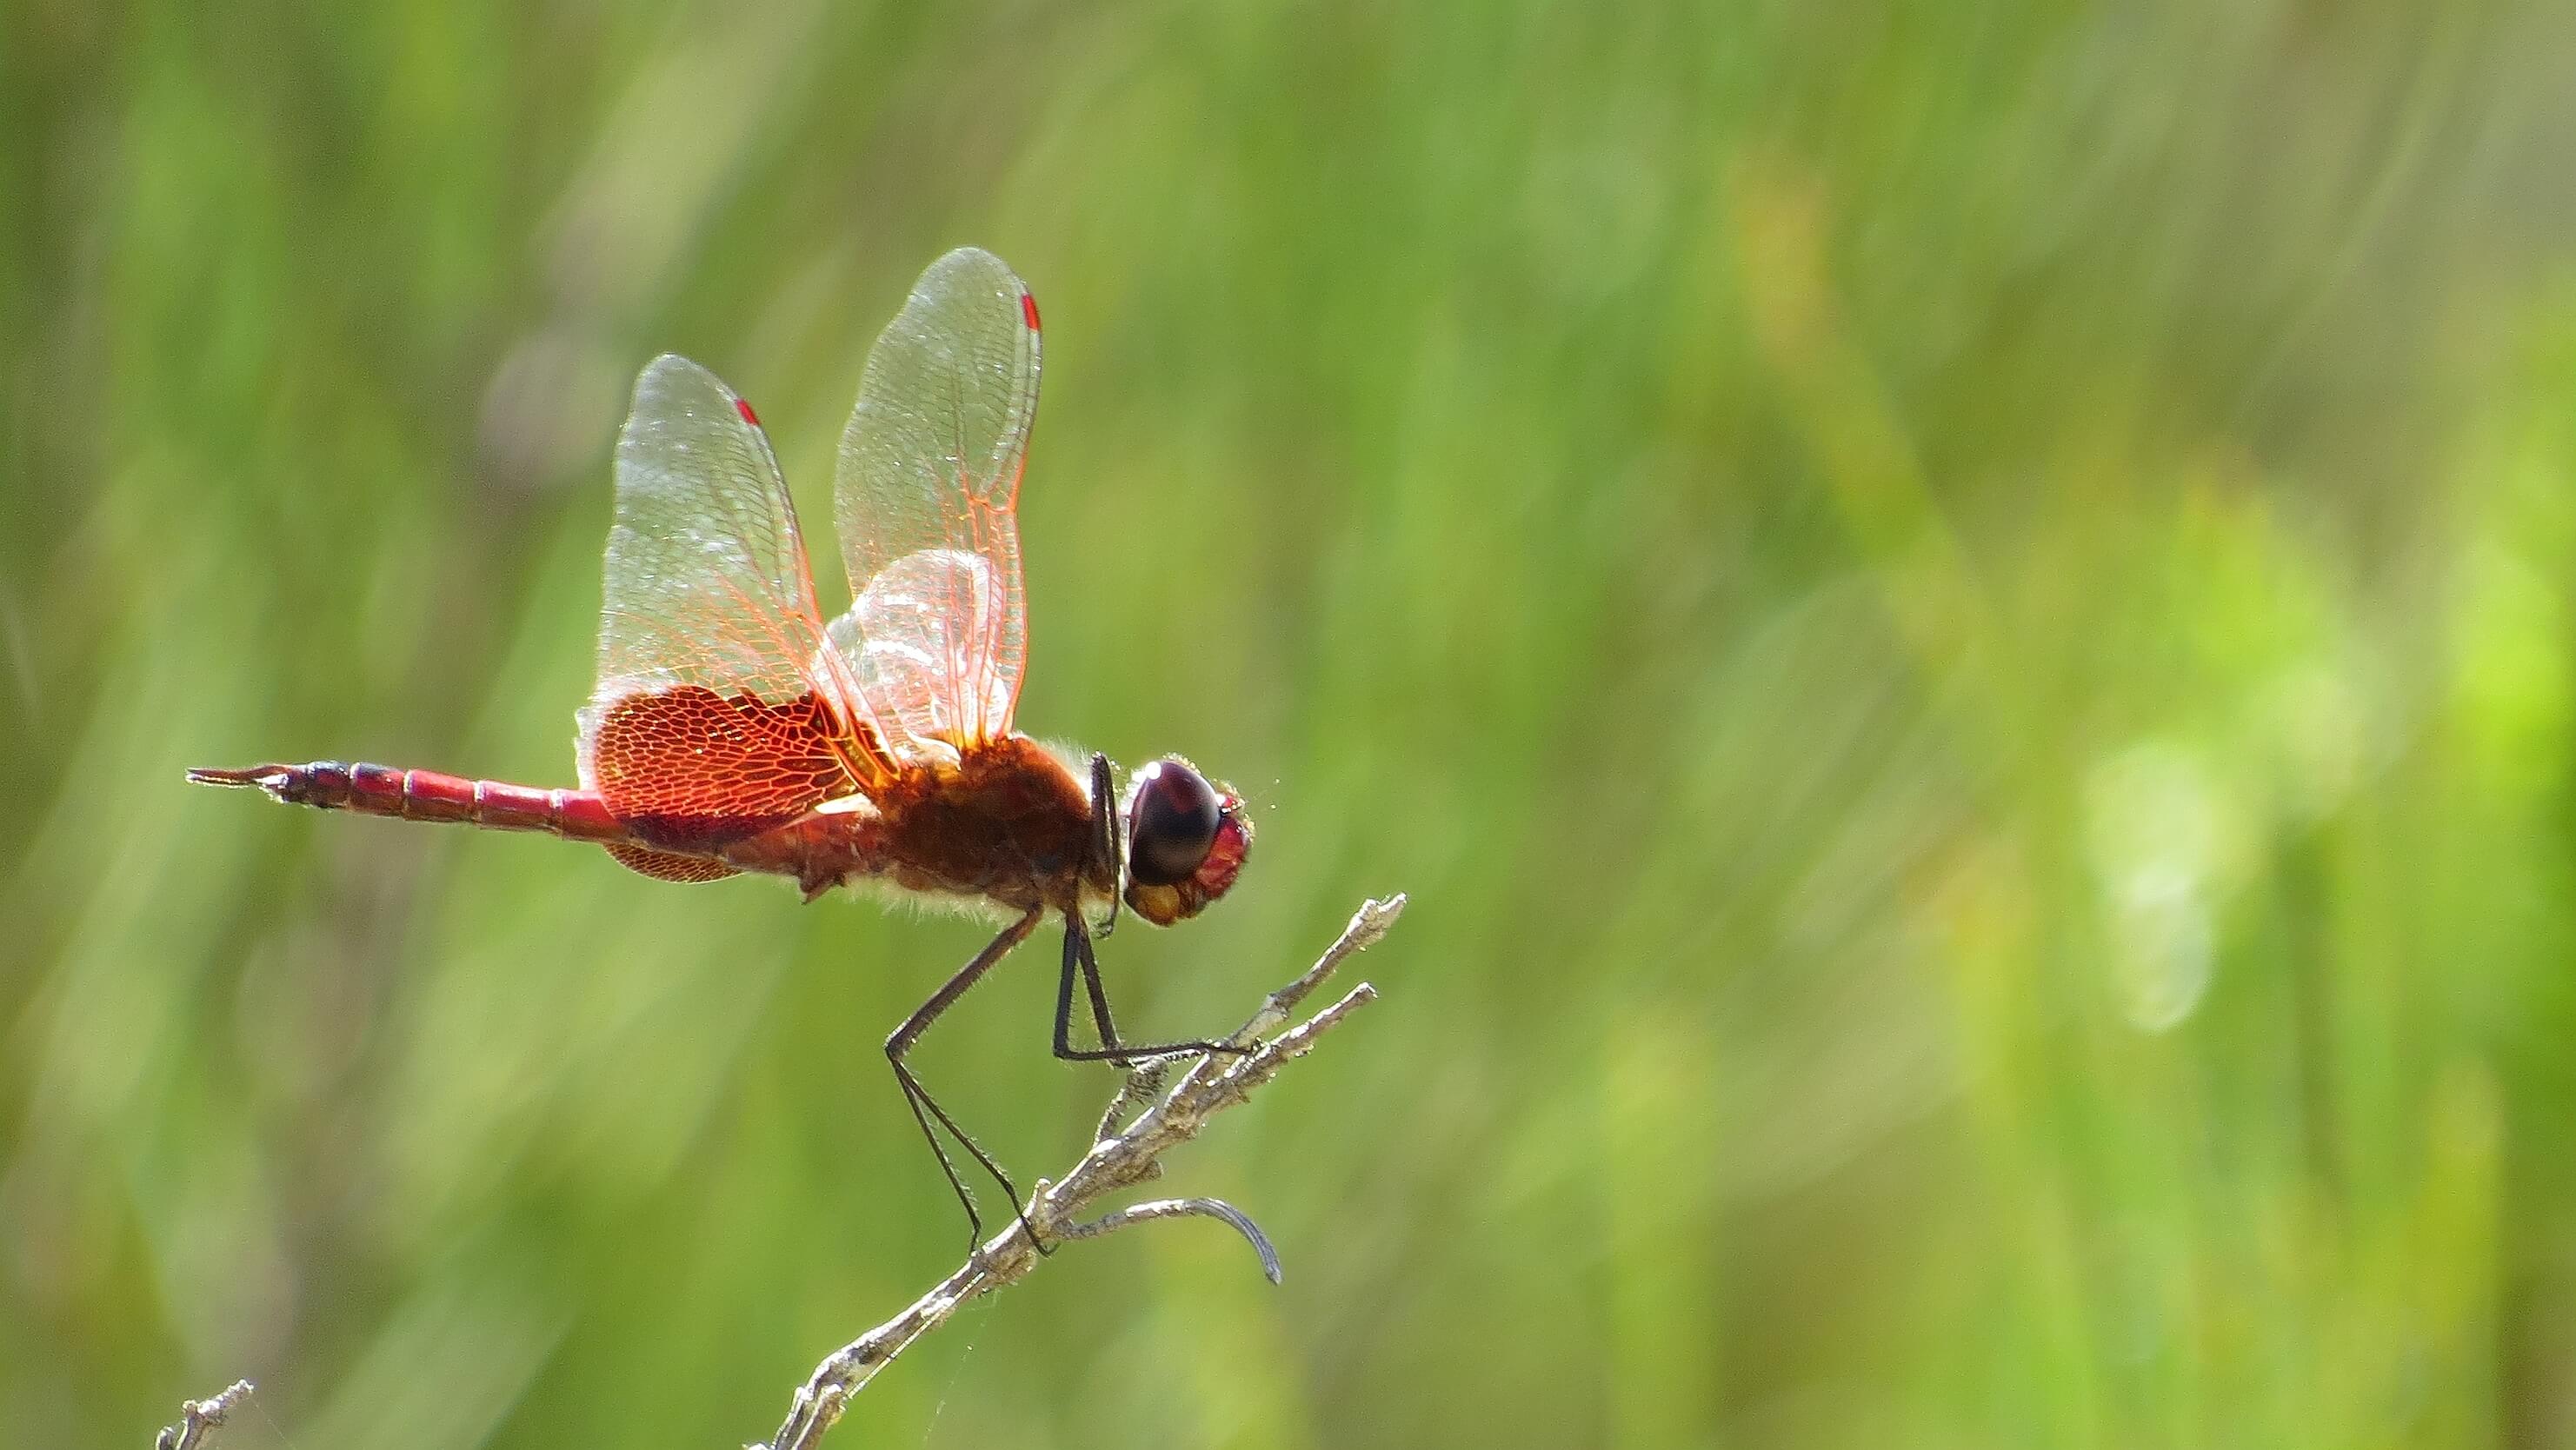
| Top predators are always large animals. | Owls in a forest or dragonflies in a pond can be the top predator. |
| Decomposers are not important. | Decomposers help recycle matter in the environment by breaking down dead organisms. |
| Invasive species are always non-native. | While many invasive species come from other countries, some species become invasive if their natural environment changes, such as when their predator is removed. |
| All organisms in an environment are equally important. | Some species in an environment (keystone species) can contribute to the health of many other species. |
References
AITSL. (n.d.). Resource. AITSL. https://www.aitsl.edu.au/tools-resources/resource/dispelling-scientific-misconceptions-illustration-of-practice
Allen, M. (2019). Misconceptions in Primary Science 3e. McGraw-hill education (UK).
Ideas for Teaching Science: Years 5-10. (2014, April 14). Resources for Teaching Science. https://blogs.deakin.edu.au/sci-enviro-ed/years-5-10/
Pine, K., Messer, D., & St. John, K. (2001). Children's misconceptions in primary science: A survey of teachers' views. Research in Science & Technological Education, 19(1), 79-96.
Redhead, K. (2018). Common Misconceptions. Primary Science Teaching Trust. https://pstt.org.uk/resources/common-misconceptions/
University of California. (2022, April 21). Correcting misconceptions - Understanding Science. Understanding Science - How Science REALLY Works... https://undsci.berkeley.edu/for-educators/prepare-and-plan/correcting-misconceptions/
This section is about core concepts and alternative conceptions:
- The core concepts of science are framed by the six overarching ideas identified by ACARA.
- Addressing alternative conceptions in the core concepts requires teachers to plan discussions and investigations that allow students to question their prior assumptions and understanding of the core concepts and key ideas.
Form and features of living things
Alternative conceptions
The form and features of living things are related to the functions that their body systems perform.
This list of alternative conceptions is not meant to be comprehensive, but instead aims to provide a starting point.
Alternative conception | Accepted conception |
| Plants take in all the substances they need to grow through their roots. | Plants obtain water and trace nutrients through their roots. Gases (carbon dioxide and oxygen) are obtained by all parts of the plant (including leaves). |
| All animals can move independently from one place to another. | Animals need to eat their food/nutrients and most are able to move independently in reaction to their environment. Animals are multicellular; their cells are different from plant cells. Some underwater organisms (sea anemone) have animal cells but are stationary like a plant. |
| Animals live on land. | There are many animals that live in the water. |
| Living things adapt by changing to suit their environment. | Adaptations are a result of survival and reproduction of the individuals in a species that are most suited to their environment. This process can take many generations. (Species adapt, not individual organisms.) |
| All features of living things are adaptations. | While most features are adaptations that improve survival, some are a result of previous ancestors. An example of this is wisdom teeth in humans. Adaptations provide a selection/survival advantage for an organism. |
| All animals have four legs and fur. | Reptiles (scales) and insects (>4 legs) are animals. |
| All animals have skeletons. | Animals are broken into two main groups. Vertebrates all have an internal spinal cord that is usually surrounded by a ‘backbone’. The second group is invertebrates, many of which (insects and spiders) have an external skeleton. Some animals (jellyfish) do not have any skeletons. |
| Spiders are insects. | Both spiders and insects (ants etc) belong to the group of invertebrates. Ants and other insects belong to the class ‘Insecta’ while spiders belong to the class ‘Arachnida’. |
| Fruit is grown for us to eat. | Fruit is grown around a plant's seeds to attract animals that will spread the seeds over a wide area. |
| Plants have flowers and stems. | Flowering plants have organs (flowers, leaves, stems, and roots). Other plants (ie conifers and mosses) do not have typical flowers. |
| Pollination is the same as seed dispersal. | Pollination is a mechanism for plants to use sexual reproduction and provide for variation in the species. Seed dispersal allows seeds to spread over a wider area and prevent competition between plants. |
| Plants have flowers to attract insects. | Flowers provide opportunity for the pollen (sperm equivalent) to travel to the ovum (egg). Insects or birds are attracted to aid this process. |
| Plants make nectar so that bees can make honey. | Nectar is produced by plants to attract insects, birds or bats. As insects travel from flower to flower, they transfer pollen and support the sexual reproduction of the plant. |
| All flowers are the same. | Each flowering plant produces a flower that is unique. |
| Only leaves photosynthesise. | Some non-woody green stems can photosynthesise. |
| The life cycle is the same as a reproductive cycle. | Some animals only have a single reproductive cycle and therefore this will be the same as their life cycle. Other animals have more than one reproductive cycle in the life span. |
References
AITSL. (n.d.). Resource. AITSL. https://www.aitsl.edu.au/tools-resources/resource/dispelling-scientific-misconceptions-illustration-of-practice
Allen, M. (2019). Misconceptions in Primary Science 3e. McGraw-hill education (UK).
Ideas for Teaching Science: Years 5-10. (2014, April 14). Resources for Teaching Science. https://blogs.deakin.edu.au/sci-enviro-ed/years-5-10/
Pine, K., Messer, D., & St. John, K. (2001). Children's misconceptions in primary science: A survey of teachers' views. Research in Science & Technological Education, 19(1), 79-96.
Redhead, K. (2018). Common Misconceptions. Primary Science Teaching Trust. https://pstt.org.uk/resources/common-misconceptions/
University of California. (2022, April 21). Correcting misconceptions - Understanding Science. Understanding Science - How Science REALLY Works... https://undsci.berkeley.edu/for-educators/prepare-and-plan/correcting-misconceptions/
This section is about core concepts and alternative conceptions:
- The core concepts of science are framed by the six overarching ideas identified by ACARA.
- Addressing alternative conceptions in the core concepts requires teachers to plan discussions and investigations that allow students to question their prior assumptions and understanding of the core concepts and key ideas.
Deep connected learning tools
The ability to question ideas, challenge perceptions and reach consensus is an important part of developing a deep connected understanding of science.
Every student comes to the classroom with a set of experiences that influence their thinking and how they understand the world. While some of these ideas might align with scientifically accepted thinking, many students may hold at least some alternative conceptions about scientific ideas. These alternative conceptions can be the result of preconceptions, intuitive theories, misinformation, or simply a limited exposure to, and opportunities to think deeply about, a phenomenon. The casual use of ‘scientific language’ in everyday speech can mean that some words develop different meanings over time, which can also contribute to the development of students’ alternative conceptions.
Alternative conceptions can limit new learning in a classroom if they remain unidentified, so the first step in any science teaching sequence should enable their identification.
One of the main components of the Launch phase, the Elicit routine, provides the first opportunity to do this. This provides teachers with an opportunity to plan an experience and discussion questions that encourage students to identify their current ideas and to examine them for accuracy. Knowing the alternative conceptions to expect allows for better planning and deep-connected learning experiences.
This is not the only time teachers should be paying attention to students' understanding of particular concepts. The Integrate routine during each Inquire phase provides opportunities for students to make their learning visible and for teachers to encourage students to question their understanding as they integrate their new knowledge.
Once identified, consider if the alternative conception could be used to prime new thinking by creating a bridge of examples for the new concept. Alternatively, present students with experiences during the next Inquire phase that challenge their current perceptions. This can be a useful opportunity to discuss how scientific ideas may change when new evidence is presented.
The ability to question ideas, challenge perceptions, and reach consensus is an important part of developing a deep connected understanding of science.
In the following video, teachers discuss why it’s important to anticipate potential alternative conceptions (referred to as misconceptions), and how they address them in the classroom.


Biological science conceptions
The biological sciences involve the study of living things, their interdependence and interaction in the environment. The ongoing process of evolution has led to a diverse range of living things that have forms and features that make them suited to their environment. This results in biological systems that are interdependent with each other and their environment.
Physical science conceptions
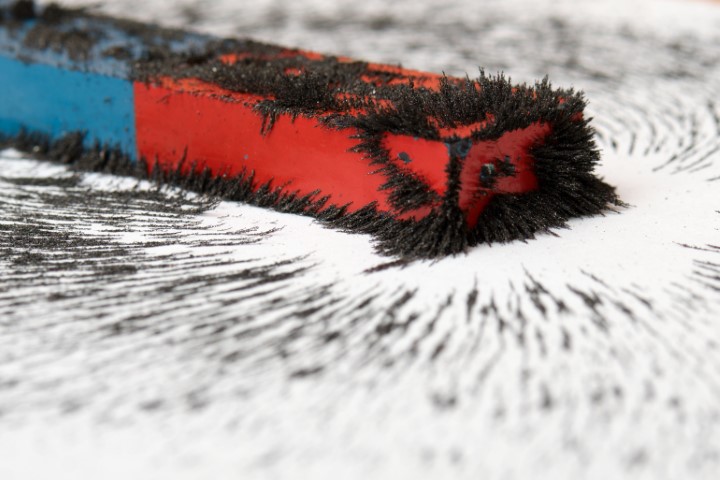
The physical sciences involve the study of forces and motion, and matter and energy. How an object moves is influenced by a range of contact forces (friction) and non-contact forces (magnetic, gravitational and electrostatic). Energy can come in many forms (heat, light, sound, electricity) and can be transferred between objects or transformed from one form to another.

Earth and space science conceptions
The Earth and Space sciences involve the study of the dynamic interdependent nature of Earth’s systems and how it is part of a larger astronomical system. Interactions between Earth’s systems and astronomical systems can be explored over a range of time scales.

Chemical science conceptions
The chemical sciences involve the study of the composition and properties of substances. This involves classifying substances, exploring physical changes (changes of state or dissolving) and how chemical changes result in the production of new substances.
Science content
Want to explore primary science concepts in more depth? We break down the big ideas for each science strand.


Physical sciences big ideas
The physical sciences involve the study of forces and motion, and, matter and energy. How an object moves is influenced by a range of contact forces (friction) and non-contact forces (magnetic, gravitational, and electrostatic). Energy can come in many forms (heat, light, sound, electricity) and can be transferred between objects or transformed from one form to another.

Earth and space sciences big ideas
The Earth and Space sciences involve the study of the dynamic interdependent nature of Earth’s systems and how it is part of a larger astronomical system. Interactions between Earth’s systems and astronomical systems can be explored over a range of time scales.
Biological sciences big ideas
The biological sciences involve the study of the diverse range of living things, their interdependence on each other, and their interactions in the environment.

Chemical sciences big ideas
The chemical sciences involve the study of the composition and properties of substances. This involves classifying substances, exploring physical changes (changes of state or dissolving), and how chemical changes result in the production of new substances.