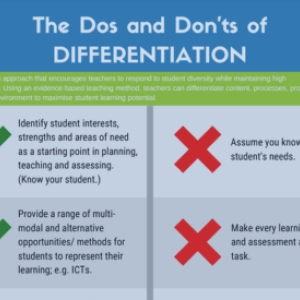
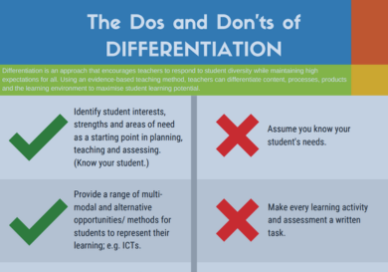
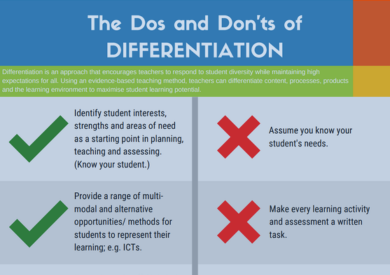
Differentiation is an approach that encourages teachers to respond to student diversity while maintaining high expectations for all. Using an evidence-based teaching method, teachers can differentiate content, processes, products and the learning environment to maximise student learning potential.
Use
- Refer to The Dos and Don’ts of DIFFERENTIATION infographic and check in formally or informally to reflect on teaching practice.

Discuss with your colleagues
- What are the different learning needs of students in your classroom?
- What strategies do you currently use for these students?
- How do you evaluate the success of these strategies to improve the student's learning?
Reference
AITSL. (2017). In the Classroom - Differentiation. AITSL. https://www.aitsl.edu.au/teach/improve-practice/in-the-classroom/differentiation

Here's where you'll find:
- Deep dives into high impact teaching practices.
- Discussion questions for you to explore with your colleagues.
- Links to related lessons in our teaching sequences.
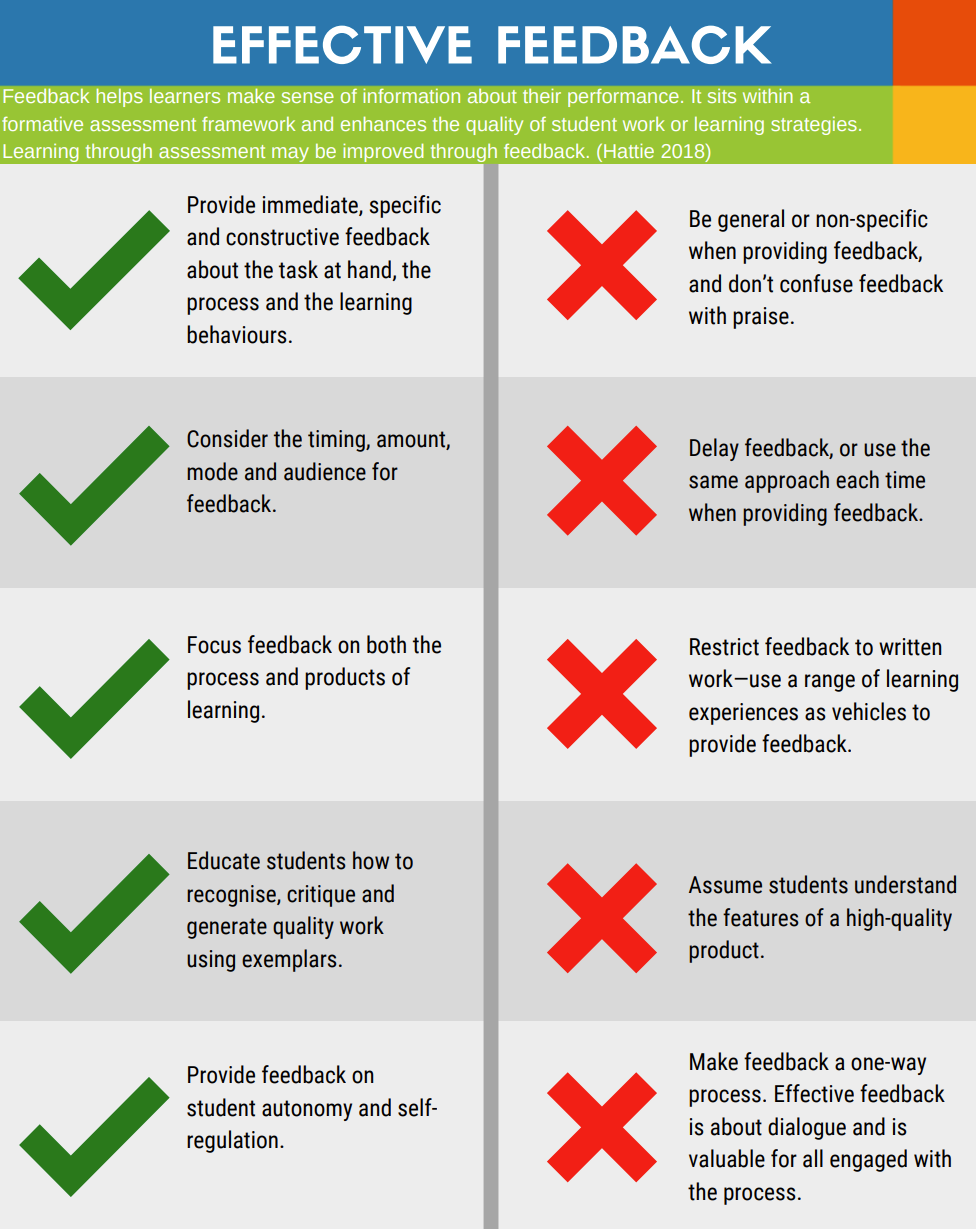
Feedback helps learners make sense of information about their performance. It sits within a formative assessment framework and enhances the quality of student work or learning strategies. Learning through assessment may be improved through feedback. (Hattie 2018)
Use
- Refer to The Dos and Don’ts of FEEDBACK infographic and check in formally or informally to reflect on teaching practice.
Here's where you'll find:
- Deep dives into high impact teaching practices.
- Discussion questions for you to explore with your colleagues.
- Links to related lessons in our teaching sequences.
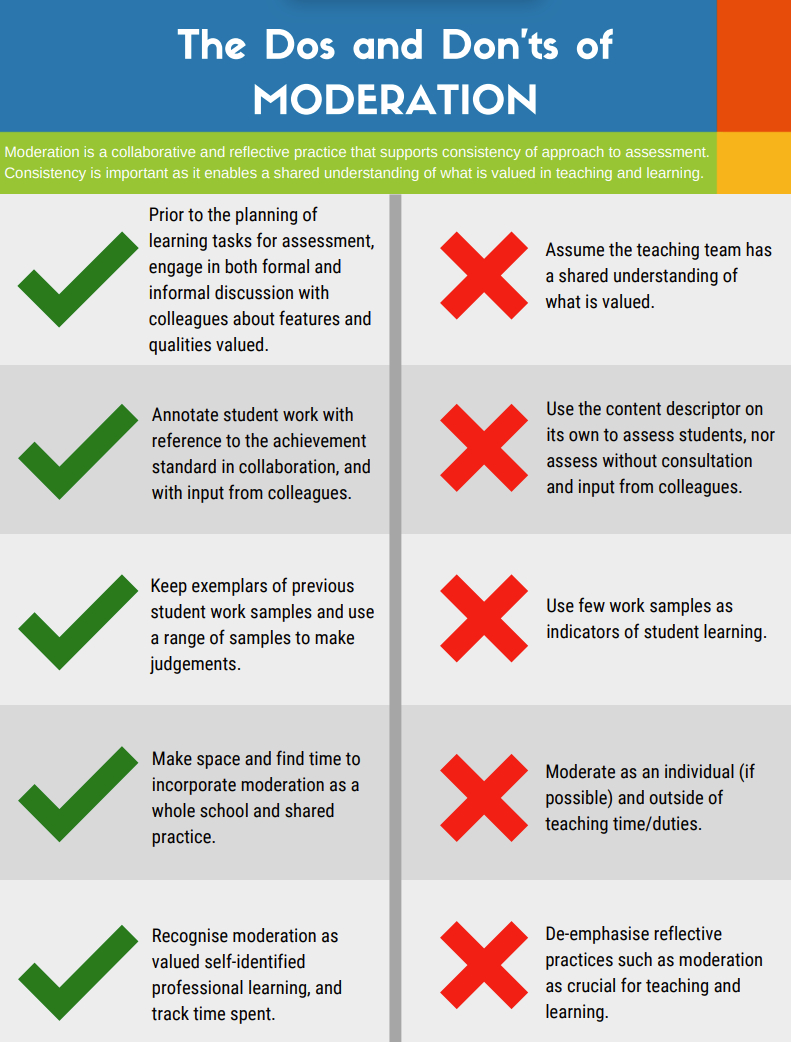
Moderation is a collaborative and reflective practice that supports consistency of approach to assessment. Consistency is important as it enables a shared understanding of what is valued in teaching and learning.
Use
- Refer to The Dos and Don’ts of MODERATION infographic and check in formally or informally to reflect on teaching practice.
Here's where you'll find:
- Deep dives into high impact teaching practices.
- Discussion questions for you to explore with your colleagues.
- Links to related lessons in our teaching sequences.
Investigation planner
An investigation planner is a scaffold that supports students to plan, conduct, record and represent data and information.
An investigation planner is a scaffold that supports students to plan, conduct, record and represent data and information. The Primary Connections teaching sequences provide 'Resource sheets' that can be used for the Inquire phase investigations. The flexibility of the LIA Framework encourages teachers to develop new investigations to support student learning. The Investigation planner provides scaffolding for teachers and students to plan for fair and accurate testing.
Teacher tools
Here's where you'll find:
- Deep dives into high impact teaching practices
- Discussion questions for you to explore with your colleagues
- Links to related lessons in our teaching sequences
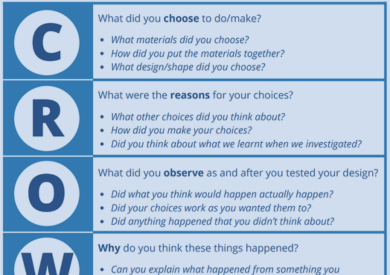
CROWN
CROWN is an argumentation tool. It supports students to communicate plans for, and critical evaluation of, designed solutions that meet present or future needs.
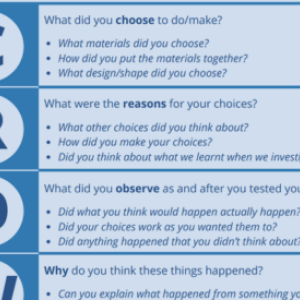
The CROWN strategy supports teachers by structuring discussions around prototypes that students have designed and tested. It encourages students to reflect and use evidence-based claims and reasoning to explain the results of their prototype tests. It prompts them to think of changes they might make to their design and why they would make those changes. It can be used with students from Foundation to Year 6.
Here's where you'll find:
- Deep dives into high impact teaching practices
- Discussion questions for you to explore with your colleagues
- Links to related lessons in our teaching sequences
Providing formative feedback
Formative feedback is a tool that supports student development of high-quality science literacy representations and guides student learning.
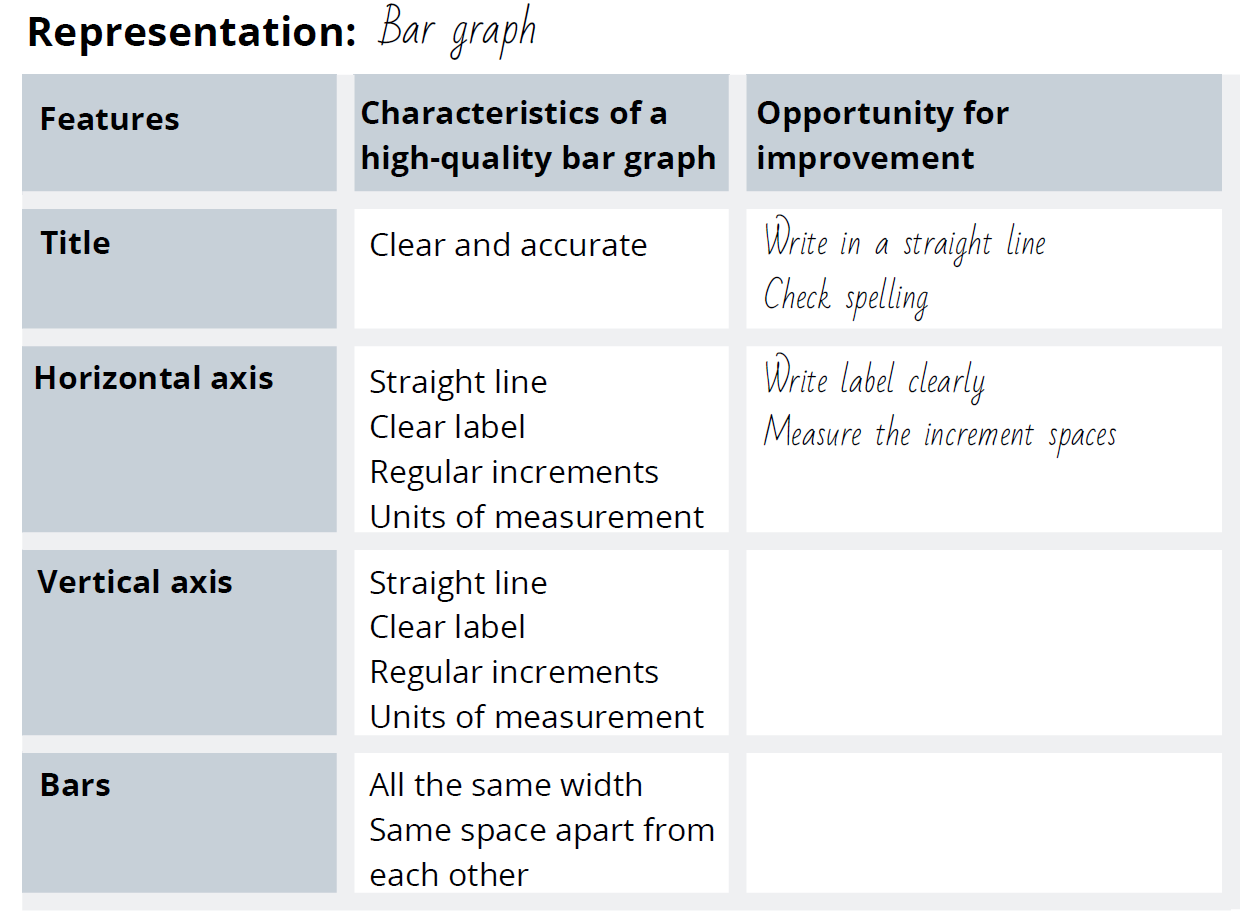
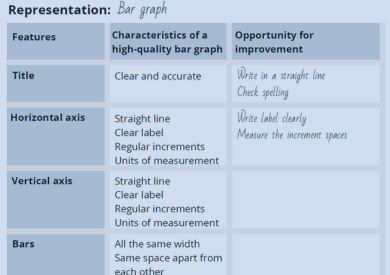
A quality matrix is a tool that can be used for formative feedback and supports the development of high-quality science literacy representations including graphs, tables, or labelled drawings. It can be used by teachers and as student self and peer assessment.
Research shows clarity and feedback mechanisms have a significant impact on student learning (Hattie, 2023). Feedback supports students to identify what progress looks like, and what they can try next. Using formative feedback, students and teachers can progress to close gaps between current and desired learning.
A quality matrix can be created by the teacher or co-created with students to engage them in a discussion of what constitutes a high-quality representation. It identifies learning expectations, documents student achievement and provides a scaffold to provide feedback specific to the task.
Supporting learning
A quality matrix may be adjusted to suit individual student needs. For example, in a labelled diagram, scale may be shown using photographs of familiar objects or graduated to more formal measurement, and scaffold literacy by providing labels as appropriate.

In practice
- Consider completing the first and second columns as a whole class to come to an agreement about the features of a high-quality representation.
- Differentiate by supporting small groups of students or individual students an opportunity to complete a quality matrix that is targeted at their learning needs.
- Complete the third column with individual students during formative assessment conversations, or use it to record observations of student’s work.
Discuss with your colleagues
- What activities could you use this approach with your students?
- What support would you need to trial this in your classroom?
- Is there an age or stage that this approach would/should not be used? Justify your reasoning.
References
Hattie, J. (2023). Visible learning: The sequel: A synthesis of over 2,100 meta-analyses relating to achievement. Routledge.
Feedback. (2017). AITSL. Retrieved June 18, 2024, from https://www.aitsl.edu.au/teach/improve-practice/feedback#tab-panel-4
Here's where you'll find:
- Deep dives into high impact teaching practices.
- Discussion questions for you to explore with your colleagues.
- Links to related lessons in our teaching sequences.
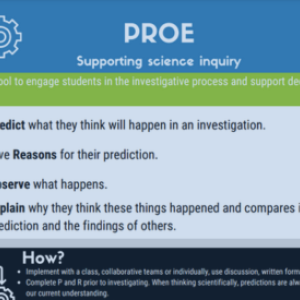
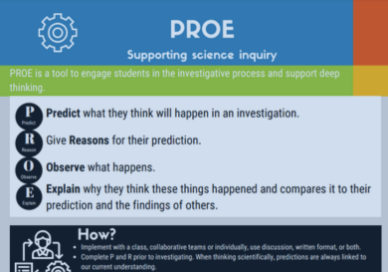
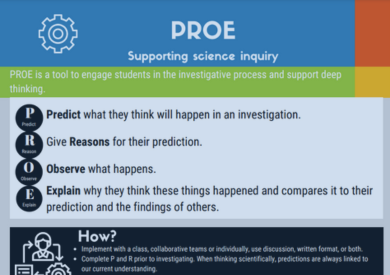
PROE
PROE is a tool to engage students in the investigative process and support deep thinking.
PROE
PROE (Predict, Reason, Observe, Explain) is a tool to engage students in the investigative process and support deep thinking. It allows teachers to monitor students thinking, ask questions, and provide feedback to guide inquiry. Students are encouraged to provide argumentation and justification skills when providing their reasoning or explanations as part of this process. It can be used with a class, collaborative teams, or individually.
Before the investigation
- Predict: a prediction is an expected result based on past experience.
- Reason: this is the opportunity to provide the reasons or evidence on which students may be basing their prediction. This might include providing an example that is similar to the current investigation.
During the investigation
- Observation: use senses or measurements to identify what is happening during the investigation.
After the investigation
- Explain: is an opportunity for students to explain why they think these things happened and compare it to their prediction and the findings of others.
Discuss with your colleagues
- Compare the PROE approach to the 'Investigation planner'. Identify and describe the similarities and differences.
- Describe the circumstances in which the PROE might be more appropriate to use.
- How would omitting the 'Reasoning' change this activity?
Here's where you'll find:
- Deep dives into high impact teaching practices.
- Discussion questions for you to explore with your colleagues.
- Links to related lessons in our teaching sequences.
Learning through inquiry tools
Science inquiry involves the use of a variety of pedagogical tools to engage students as they question and predict; plan and conduct; process, model, and analyse; evaluate, and communicate their understanding of the science.
As one of the three strands in the Australian Curriculum Science, Science Inquiry involves students questioning and generating ideas that can become predictions and hypotheses that can be investigated. The investigations can take many forms depending on the age and stage of the students, including experimental testing, fieldwork, modelling, and simulations. Each of these requires students to select and plan the most appropriate approach, collect and analyse the data, and evaluate and communicate evidence-based claims.
Select the Pedagogical tool that is most appropriate for your students and the investigation they will be completing.


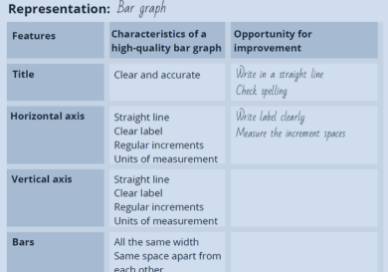


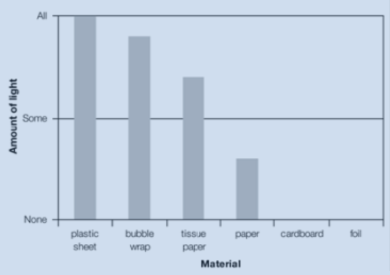
Using graphing to support development of Science Inquiry Skills
A graph is a representation; it represents and summarises information so that patterns and relationships can be identified. Understanding the conventions of constructing and using graphs is an important aspect of scientific literacy.

Using word loops to support scientific literacy
A word loop is a tool that helps students to clarify the relationship between words and terms, symbols, representations and definitions and how these contribute to a whole topic or concept.
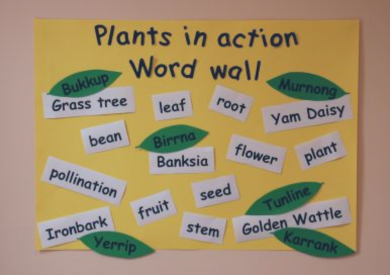
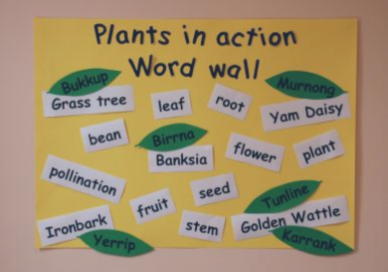
Using a word wall to support student explanations
Support student development of vocabulary related to a particular topic, and provide a reference for class discussions.

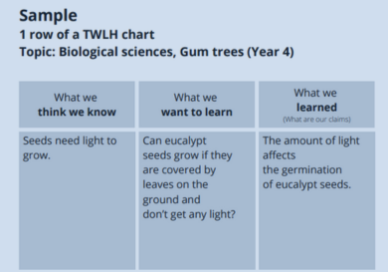
Using a TWLH chart to document inquiry
Primary Connections has developed an adaptation of the KWL chart. A TWLH chart is a learning tool used to elicit students’ prior knowledge by asking what students Think they know, determine questions students Want to know answers to, document what has been Learned, and How students know they’ve learned.
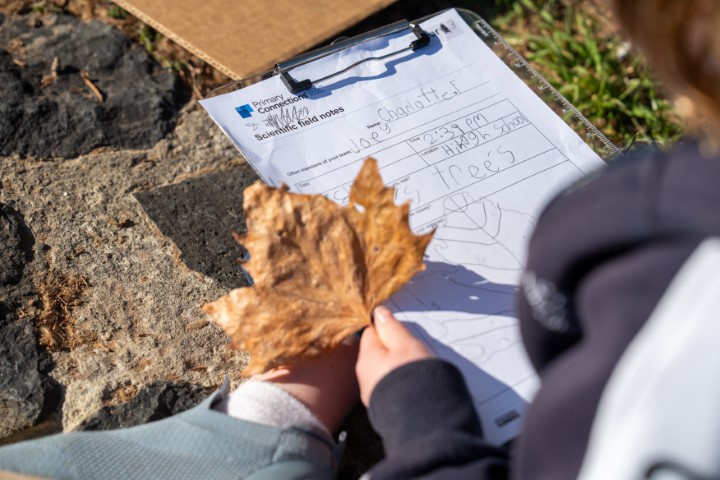
Using a science journal throughout inquiry
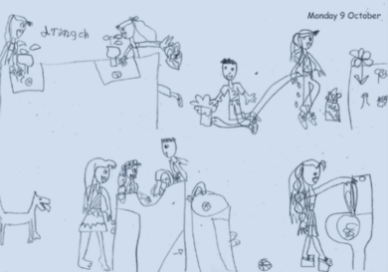
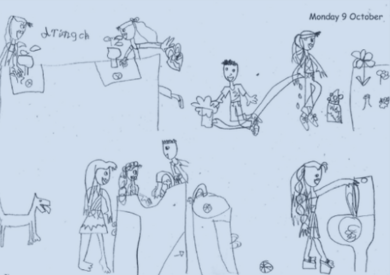
A science journal is a record of observations, experiences and reflections. It contains a series of dated, chronological entries. It can include written text, drawings, measurements, labelled diagrams, photographs, tables and graphs.
Using a glossary to support science vocabulary development
Create a class glossary as a growing bank of descriptions to support students to understand and use new vocabulary.
Using a design portfolio throughout science inquiry
A design portfolio is a record of observations, experiences and reflections that provides evidence of the design process and insights of design thinking. It might include a series of dated entries, written text, drawings, sketches, labelled diagrams, graphic designs, photographs, tables and graphs. It includes the design brief and information to assist students to develop design criteria and to evaluate products.
Supporting students to write questions for investigation
Scientific inquiry and investigation are focused on and driven by questions.
Facilitating evidence-based discussions
Argumentation is at the heart of what scientists do: they pose questions, make claims, collect evidence, debate with other scientists and compare their ideas with others in the field.
Facilitating collaborative learning
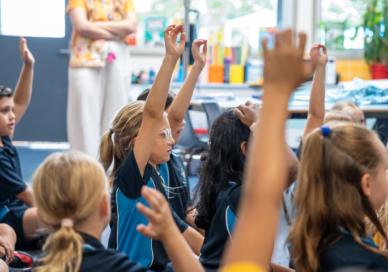
Students working in collaborative teams is a key principle of the Primary Connections approach.
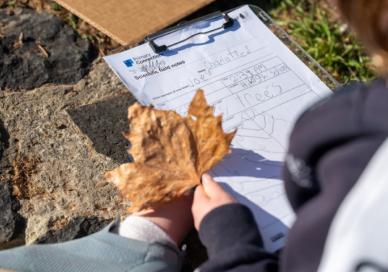
Conducting fair test investigations
Scientific investigations involve posing questions, testing predictions, collecting and interpreting evidence, and drawing conclusions and communicating findings. When scientists plan and conduct a fair test investigation it is to answer a question or test a prediction. Students emulate this in the classroom as they continue to develop their science inquiry skills.
PROE
PROE is a tool to engage students in the investigative process and support deep thinking.
Providing formative feedback
Formative feedback is a tool that supports student development of high-quality science literacy representations and guides student learning.
CROWN
CROWN is an argumentation tool. It supports students to communicate plans for, and critical evaluation of, designed solutions that meet present or future needs.
Investigation planner
An investigation planner is a scaffold that supports students to plan, conduct, record and represent data and information.
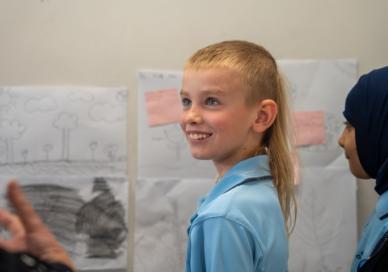
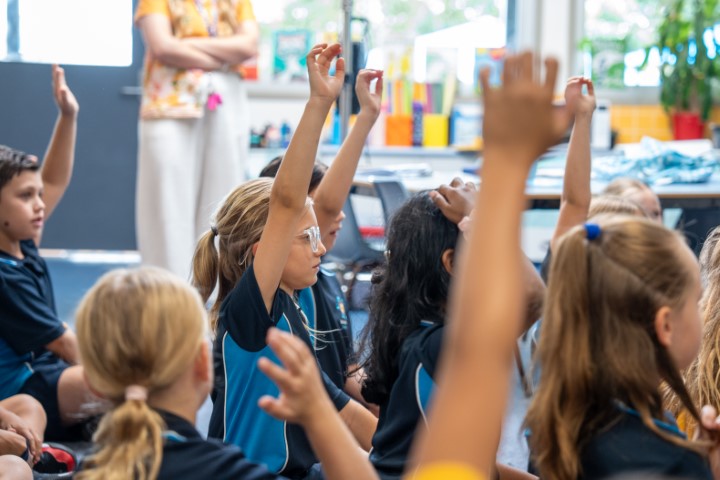
Differentiation, feedback and moderation
Assessing and responding to students' learning needs is the core business of teaching. Read our Dos and Don'ts for differentiation, feedback and moderation.
Gallery walk
A gallery walk is a collaborative discussion strategy that provides an opportunity for feedback: student to student, and teacher to student.
Cultivating a questioning culture
Students’ questions can be expressions of their existing knowledge, reasoning, assumptions, doubts, curiosity and wonder, and interest and motivation to learn.
Mystery box
The mystery box activity is designed to support students’ understanding of how scientists base their conclusions on available evidence in the form of observations.
Representing in science
Learning science involves understanding how to interpret and use multimodal representations of phenomena: diagrams, 3D models, photographs, tables and graphs, and chemical or mathematical equations.

The Q-matrix
The Q-matrix presents a series of question stems that can be used to generate useful questions.
Question Formulation Technique
The Question Formulation Technique outlines four steps for students to generate, refine, and select useful questions.
Cumulative listing
Cumulative listing is a fast and efficient way to collate responses from a group.
Conducting fair test investigations
Scientific investigations involve posing questions, testing predictions, collecting and interpreting evidence, and drawing conclusions and communicating findings. When scientists plan and conduct a fair test investigation it is to answer a question or test a prediction. Students emulate this in the classroom as they continue to develop their science inquiry skills.
Scientific investigations involve posing questions, testing predictions, collecting and interpreting evidence, drawing conclusions, and communicating findings. When scientists plan and conduct a fair test investigation it is to answer a question or test a prediction. Students emulate this in the classroom as they continue to develop their science inquiry skills.
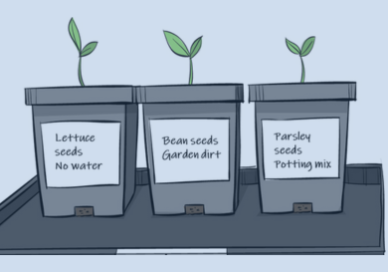
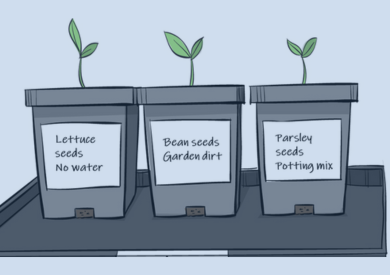
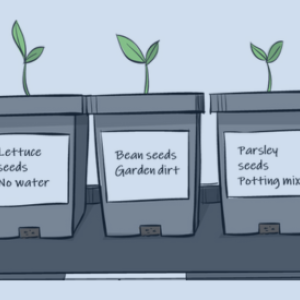
Planning a fair test
All scientific fair tests involve variables. Variables are things that can be changed (independent), measured/observed (dependent), or kept the same (controlled) in an investigation.
When planning a fair test investigation, to make it fair, we need to identify the variables.
By planning for and conducting a fair test, students can make claims about how the variable they have changed in their investigation may have affected what is being measured and/or observed.
To support students to identify variables and to use those variables to inform their planning of a fair test, we suggest this handy mnemonic ‘Cows Moo Softly’. This helps students remember the letters C, M, and S, representing the three types of variables in a fair test:
Cows: Change one thing (independent variable)
Moo: Measure what happens (dependent variable) and
Softly: keep the other things (controlled variables) the Same.
For example:
To answer the question ‘Does frozen water always cause a bottle to explode?’ students could investigate whether the amount of water in the bottle affects whether the bottle explodes.
Students could:
| CHANGE | the amount of water in the bottle | Independent variable |
| MEASURE/OBSERVE | whether the bottle explodes | Dependent variable |
| KEEP THE SAME | the type of bottle, the initial temperature of the water, the shape of the bottle, the colour of the bottle, the temperature of the freezer into which the bottle is put, how long the bottles are put in the freezer. | Controlled variables |
For younger year levels, students could:
- follow or suggest steps that allow them to identify the variable that was changed, the outcome that was observed, and the variables that were controlled.
- specify the values of the controlled variables.
- use provided tables and organisers to present their data.
- with guidance compare their observations.
- start using scientific language.
For older year levels, students could:
- pose questions that identify the different variables.
- explain the link between controlling variables and repeatable investigations.
- identify and describe the risks.
- organise and represent the data.
- describe the patterns and trends in the data.
- identify if the measuring equipment is working correctly.
- identify any errors that were made.
- describe what could have been done to correct the errors.
Experienced students could:
- explain why the measured outcome answers the question (valid experiment).
- identify if there is an accurate outcome expected.
- describe the reason for repeating the experiment multiple times (precision).
Note: When choosing variables to ‘keep the Same’ we sometimes make decisions on variables that we think will affect the outcome as it is not always feasible to keep everything the same. For example, scientists might prioritise keeping the temperature of and duration of time in the freezer over having bottles that are the same colour or have the same writing on them. Sometimes additional investigations are needed to test these assumptions and this can inform worthwhile discussions with students.
Here's where you'll find:
- Deep dives into high impact teaching practices
- Discussion questions for you to explore with your colleagues
- Links to related lessons in our teaching sequences
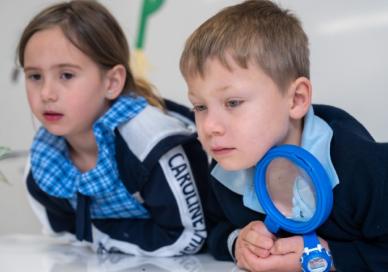
Facilitating collaborative learning
Students working in collaborative teams is a key principle of the Primary Connections approach.

The Primary Connections approach to collaborative learning in science is grounded in research and trialled in classrooms across Australia. Students engaged in collaborative learning observe and consider multiple perspectives, take on different roles in investigations, and contribute to rich evidence-based discussions.
When students are given regular opportunities to work together, they can develop effective collaborative learning skills. Developing these skills takes time. Teachers are encouraged to group students in ways that provide opportunities to experience a range of roles and responsibilities.
By working in collaborative teams students:
- communicate and compare their ideas with one another
- build on one another’s ideas
- discuss and debate these ideas
- revise and rethink their reasoning
- present their team's understanding through multi-modal representations.
The development of these collaborative skills aligns to descriptions in the Australian Curriculum: English, and to the Australian Curriculum General Capability ‘Personal and Social Capability’.
Australian Council for Educational Research (ACER) about Collaborative Learning (2021) reiterates that it can benefit students in the following ways:
- Enhanced cognitive development
- Encourages students to be more explicit when articulating their ideas and questions
- Students practise justifying their responses and ideas
- Increases opportunities to reflect, and increases awareness of their learning.
ACER’s research aligns with the approach Primary Connections recommends - assigning roles and responsibilities for each student, and suggesting that teachers facilitate collaborative learning groups only when the task is enhanced by working collaboratively when compared to working individually. The ACER paper goes into detail about assessing collaboration skills, including a guiding framework (Figure 1, on page 3).
Here's where you'll find:
- Deep dives into high impact teaching practices
- Discussion questions for you to explore with your colleagues
- Links to related lessons in our teaching sequences
Team structure
The first step towards supporting students to work collaboratively is to organise team composition, roles and skills. Consider the following suggestions when planning for collaborative learning:
- Assign students to teams rather than allowing them to choose partners.
- Vary the composition of each team.
- Give students opportunities to work with others who might be of a different ability level, gender or cultural background.
- Keep teams together for two or more lessons so that students have enough time to experience working together successfully.
- If you cannot divide the students in your class into teams of three (years 3-6), form two teams of two students rather than one team of four. The smaller the group size, the more optimal for learning.
- Keep a record of the students who have worked together as a team so that by the end of the year each student has worked with as many peers as possible, or encourage students to keep records in their science journals.
Team roles
It is recommended that students are assigned roles within their team (see suggestions below). Each team member has a specific role but all members share leadership responsibilities. Each member is accountable for the performance of the team and should be able to explain how the team obtained its results. Students are therefore encouraged to support their team members to fulfill their role. It is important to rotate team roles regularly so that all students have an opportunity to develop a range of skills.
In F - Year 2, teams consist of two students: Manager and Speaker. In Year 3 - Year 6, teams consist of three students: Director, Manager and Speaker.
To identify student roles, each member of the team could wear something that indicates their role, such as a wristband, badge, or colour-coded peg or sticker. This makes it easier for you to identify the role of each student and it is easier for the students to remember what they and their team mates should be doing.
Suggested roles:
Manager
The Manager is responsible for collecting and returning the team’s equipment. The Manager also tells the teacher when equipment is damaged or broken. All team members are responsible for clearing up after an activity and getting the equipment ready to return to the equipment table.
Speaker
The Speaker is responsible for asking the teacher or another team’s Speaker for help. If the team cannot resolve a question or decide how to follow a procedure, the Speaker is the only person who may leave the team and seek help. The Speaker shares any information they obtain with team members. The teacher may speak to all team members, not just to the Speaker. The Speaker is not the only person who reports to the class; each team member should be able to report on the team’s results.
Director (Year 3-Year 6)
The Director is responsible for making sure that the team understands the team investigation and helps team members focus on each step. The Director is also responsible for offering encouragement and support. When the team has finished, the Director helps team members check that they have accomplished the investigation successfully. The Director provides guidance but is not the team leader.
Team skills
The Primary Connections approach focuses on social skill development that will support students to work in collaborative teams and communicate more effectively.
Students could practise the following team skills throughout the year:
- Move into your teams quickly and quietly
- Speak softly
- Stay with your team
- Take turns
- Perform your role.
To help reinforce these skills, display enlarged copies of the team skills, team roles, and discussion skills in a prominent place in the classroom.
Here's where you'll find:
- Deep dives into high impact teaching practices
- Discussion questions for you to explore with your colleagues
- Links to related lessons in our teaching sequences
Tracking collaborative learning skills development
Primary Connections has developed the Working in teams self-assessment tool (WITSA). Used by students, WITSA is a tool that guides self-assessment and reflection of team activities. Students record the role they played in the team, rate their effectiveness in performing the role and their contribution to the team, and suggest areas for improvement.
This self-assessment, along with teacher observations, can support teachers to make informed decisions about future collaborative activities and provides a record of student personal growth when compared to Personal and Social Capability learning continuum.
Teacher tools
Here's where you'll find:
- Deep dives into high impact teaching practices
- Discussion questions for you to explore with your colleagues
- Links to related lessons in our teaching sequences
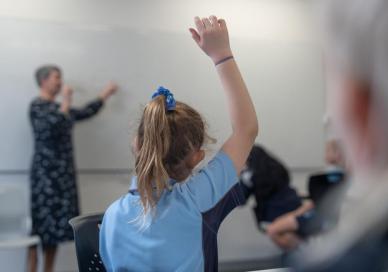
Facilitating evidence-based discussions
Argumentation is at the heart of what scientists do: they pose questions, make claims, collect evidence, debate with other scientists and compare their ideas with others in the field.

Facilitating discussions
In the primary science classroom, argumentation is about students:
- articulating and communicating their thinking and understanding to others.
- sharing information and insights.
- presenting their ideas and evidence.
- receiving feedback, and giving feedback to others.
- finding flaws in their own and others’ reasoning, based on evidence and data.
- reflecting on how their ideas have changed.
It is through articulating, communicating and debating their ideas and arguments that students are able to develop a deeper understanding of science and the way scientists think and work.
Establish norms
Introduce norms before starting a science discussion activity. For example:
- Listen when others speak
- Ask questions of each other
- Criticise ideas not people
- Listen to and discuss all ideas before selecting one
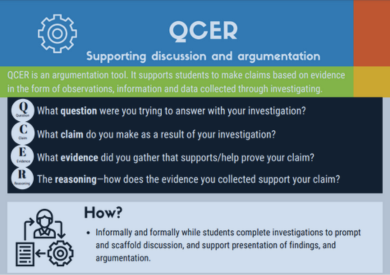
Claim, Evidence and Reasoning
In science, arguments that make claims are supported by evidence. Sophisticated arguments follow the QCER process:
Q – What question are you trying to answer? For example, ‘Does the number of bulbs in a circuit affect their brightness?’
C – The claim. For example, ‘The more bulbs in a circuit the duller the bulbs become’.
E – The evidence. For example, ‘When I increased the number of bulbs in a circuit the bulbs became duller each time another bulb was added’.
R – The reasoning. For example, ‘The more bulbs there are the harder it is for the electrical energy to flow. There is more resistance in the circuit.’
Encourage students to move from making claims only, to citing evidence to support their claims. Older students can develop full conclusions that include a claim, evidence and reasoning. This is an important characteristic of the nature of science and an aspect of scientific literacy. Using Science Question Starters (see tab) helps to promote evidence-based discussion in the classroom.
Discuss with your colleagues
- Identify an example of when you planned an opportunity for students to have an evidence-based reaction.
- Describe how you encouraged students to distinguish between and evidence and a claim.
- Describe how you could scaffold this process for students.
References
Resource. (2017). AITSL. Retrieved June 18, 2024, from https://www.aitsl.edu.au/tools-resources/resource/promoting-independent-learning-and-thinking-illustration-of-practice#tab-panel-3
Teacher tools
Here's where you'll find:
- Deep dives into high impact teaching practices.
- Discussion questions for you to explore with your colleagues.
- Links to related lessons in our teaching sequences.
Science Question Starters
Science Question Starters can be used to model the way to discuss a claim and evidence for students. Teachers encourage team members to ask these questions of each other when preparing their claim and evidence. They can also be used by peers during a whole class discussion when a team is presenting its results.
| Question type | Question starter |
|---|---|
| Asking for evidence | I have a question about __________. What is your evidence to support your claim? |
| Agreeing | I agree with __________ because __________. |
| Disagreeing | I disagree with __________ because _________. One difference between my idea and yours is __________. |
| Question further | I wonder what would happen if __________? I have a question about __________. I wonder why ___________. What caused __________? How would it be different if __________? |
Teacher tools
Here's where you'll find:
- Deep dives into high impact teaching practices.
- Discussion questions for you to explore with your colleagues.
- Links to related lessons in our teaching sequences.
Supporting students to write questions for investigation
Scientific inquiry and investigation are focused on and driven by questions.
Developing questions
Some questions lend themselves to scientific investigation, while others do not. Students often experience difficulty in developing questions for investigation.
This document explains the structure of questions and how they are related to variables in a scientific investigation. It describes an approach to developing questions for a fair test investigation and provides a guide for constructing investigable questions with your students.
Developing their own questions for investigation is an important skill in becoming a scientifically literate person, and gives students ownership of their investigation.
The structure of questions for investigation
The way that a question is posed in a scientific investigation affects the type of investigation that is carried out and the way information is collected.
Examples of different types of questions for investigation include:
- How does/do …?
- What effect does …?
- Which type of …?
- What happens to …?
Many science investigations involve variables. Variables are things that can be changed (independent variables), measured (dependent variables) or kept the same (controlled variables) in an investigation.
- The independent variable is the thing that is changed during the investigation.
- The dependent variable is the outcome that is affected by the independent variable, and is measured or observed.
- Controlled variables are all the other things in an investigation that could change but are kept the same to make it a fair test.
An example of the way students can structure questions for investigation is:
What happens to (dependent variable (M)) when we change (independent variable (C))?
For example, if students were exploring electricity, they might investigate the things (variables) that affect the brightness of a bulb might consider the number of bulbs and the length of the wires. The question for investigation could be:
Q1: What happens to the brightness of a bulb when we change the number of bulbs in a circuit?
In this question, the brightness of a bulb depends on the number of bulbs. The number of bulbs is the thing that is changed (independent variable) and the brightness of the bulb is the outcome that is measured or observed (dependent variable).
Q2: What happens to the brightness of a bulb in a circuit when we change the number of wires?
In this question, the brightness of a bulb depends on the number of wires. The number of wires is the thing that is changed (independent variable) and the brightness of a bulb is the outcome that is measured or observed (dependent variable).
Developing questions for investigation
The process of developing questions for investigation is to:
- Provide a context and reason for investigating.
- Pose a general focus question in the form of: ‘What things might affect (dependent variable)?’
For example, 'What things might affect an electrical circuit?' - Use questioning to elicit the things (independent variables) students think might affect the dependent variable, for example, the brightness of a bulb.
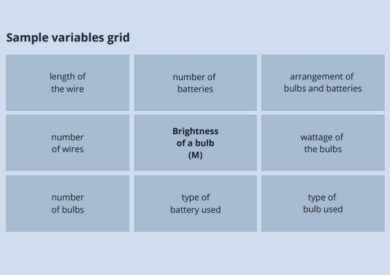
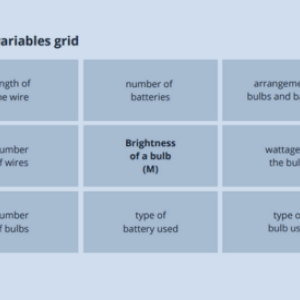
By using questions, elicit the things that students can investigate, such as the number of batteries, the length of the wires, the number of wires. These are the things that could be changed (independent variables), which students predict will affect the outcome that is measured or observed (dependent variable). List variables in a scaffold such as a Variables Grid (image below), agree on a variable to be changed (independent variable), and have students commit to keeping all other variables the same. - Each of the independent variables can be developed into a question for investigation. Use the question scaffold ‘What happens to ___________ when we change __________?’ to help students develop specific questions for their investigation.
For example, ‘What happens to the brightness of a bulb when we change the number of bulbs?’ or ‘What happens to the amount of energy generated by a fruit battery when we change the type of plant material used?’. - Ask students to review their question for investigation after they have conducted their investigation and collected and analysed their information.
Encouraging students to review their question will help them to understand the relationship between what was changed and what was measured in their investigation. It also helps students to see how the data and information they collected relate to their prediction.
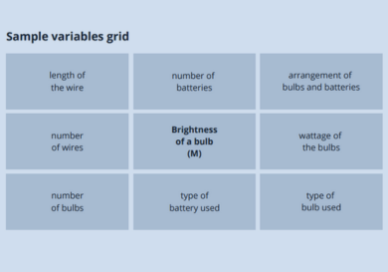
Sample variables grid
| length of the wire | number of batteries | arrangement of bulb and batteries |
| number of wires | Brightness of a bulb (M) | wattage of the bulbs |
| number of bulbs | type of battery used | type of bulb used |
Using a variables grid to generate questions for investigation
- Pose a general question. In the example above the question would be ‘What things might affect the brightness of a bulb?' Explain to students that in this investigation they will be measuring the brightness of a bulb. Record this and write ‘M’ for measured outcome in the middle cell
- As students suggest potential variables, note each one in a cell on the variables grid. Cells may be added or removed to suit the students and/or context.
- In consultation with students, determine the variable to be changed. Write ‘C’ in that cell. Write ‘S’ in every other cell to support students to commit to keeping other variables the same during the investigation.
- Use the information in the Variables Grid to complete the question for investigation- Using a variables grid to generate questions for investigation. What happens to [dependent variable] when we change [independent variable]?
Here's where you'll find:
- Deep dives into high impact teaching practices
- Discussion questions for you to explore with your colleagues
- Links to related lessons in our teaching sequences