Make it move!
View Sequence overviewStudents will:
- investigate how material can affect how far an object can slide.
- optionally determine a fair and accurate way to make informal measurements.
- measure and record how far an object slides when changing one variable.
Students will represent their understanding as they:
- participate in discussion to generate explanations, compare ideas and relate evidence to explanations about movement.
- use language to report on observations, e.g. the shiny object slid further.
In this lesson, assessment is summative.
Students working at the achievement standard (science inquiry) should have:
- made a prediction about which material might slide the furthest, supported by the evidence of their past experiences.
- contributed to the accurate recording of results, either by measuring the distance the object slid via streamer (or similar), or by contributing to the discussion about a fair way to measure in standard units.
- made a connection between their investigation and how material can affect how an object moves.
Refer to the Australian Curriculum content links on the Our design decisions tab for further information.
Whole class
Class science journal (digital or hard-copy)
2-3 objects of the same size and shape, made of or covered in different materials, that can be slid across a table. For example:
- wooden blocks placed inside noticeably different socks, e.g. thick-knit woollen socks, fine-knit socks, stockings.
- wooden blocks wrapped in different materials e.g. baking paper, foil, felt.
A table or other smooth, flat surface to slide objects across. Test the objects you are sliding to ensure you have a long enough area.
Demonstration copy of the Sliding investigation Resource sheet
Optional: Uniformly-sized handprint cutouts, created by printing multiple copies of the Hand measures Resource sheet and cutting around each handprint. Laminate if desired so they can be used again next lesson.
Optional: Streamers or similar for measuring distance informally
Each group
Optional: Objects that can be slid across a table, as described above
Optional: Uniformly-sized handprint cutouts as described above
Optional: Streamers or similar for measuring distance informally
Each student
Individual science journal (digital or hard-copy)
Optional: Sliding investigation Resource sheet
Lesson
Re-orient
Review the previous lesson and students’ findings about whether the shape of an object affected its ability to roll.
If students made any observations or comparisons about the materials the objects were made of, and how the materials affected the results, draw attention to these findings.
If not, display the items that were tested and discuss and compare the materials they are made of.
The Inquire phase allows students to cycle progressively and with increasing complexity through the key science ideas related to the core concepts. Each Inquire cycle is divided into three teaching and learning routines that allow students to systematically build their knowledge and skills in science and incorporate this into their current understanding of the world.
When designing a teaching sequence, it is important to consider the knowledge and skills that students will need in the final Act phase. Consider what the students already know and identify the steps that need to be taken to reach the level required. How could you facilitate students’ understanding at each step? What investigations could be designed to build the skills at each step?
Read more about using the LIA FrameworkIdentifying and constructing questions is the creative driver of the inquiry process. It allows students to explore what they know and how they know it. During the Inquire phase of the LIA Framework, the Question routine allows for past activities to be reviewed and to set the scene for the investigation that students will undertake. The use of effective questioning techniques can influence students’ view and interpretation of upcoming content, open them to exploration and link to their current interests and science capital.
When designing a teaching sequence, it is important to spend some time considering the mindset of students at the start of each Inquire phase. What do you want students to be thinking about, what do they already know and what is the best way for them to approach the task? What might tap into their curiosity?
Read more about using the LIA FrameworkExamining materials
Ask students to describe again the movement of rolling, and how it is different to sliding. Make an obvious mark on an object and watch that mark as the item slides across a surface. Define sliding with or for students as appropriate (moving smoothly along a surface whilst staying in contact with that surface).
Examine the different objects that students will slide across the table or other smooth surface, with a focus on the different materials they are made of/covered in. Allow students to feel and examine each material and describe how they look and feel. Construct (with guidance if needed) comparative statements about them such as, "The _____ is smoother that the _______".
Ask students if they think one objects will slide further than the other, and why they think that.
Pose the question: Will changing the material (of/on) an object affect how far it can slide across the surface of a table?
Using the demonstration copy of the Sliding investigation Resource sheet complete the Predict and Reason sections of the PROE (Predict, Reason, Observe, Explain), based on the earlier discussion and any new ideas students would like to add. You can support students with this by making connections between their previous experiences of using a slide, or sliding across a slippery floor.
Materials and friction
Why is it easier for some materials to slide than others?
When an object moves against a surface or in the air, it always experiences an opposite force called friction. Moving objects slow down because the force of friction pushes in the opposite direction to the motion and slows it to a stop.
When sliding along a surface, uneven ‘rough’ materials cause more friction because the microscopic bumps and valleys on the surface of the material interlock or adhere more to the surface, creating resistance to movement.
Surfaces that are smooth tend to slide more easily, because there are fewer bumps to ‘catch’ on a surface and create adhesion.
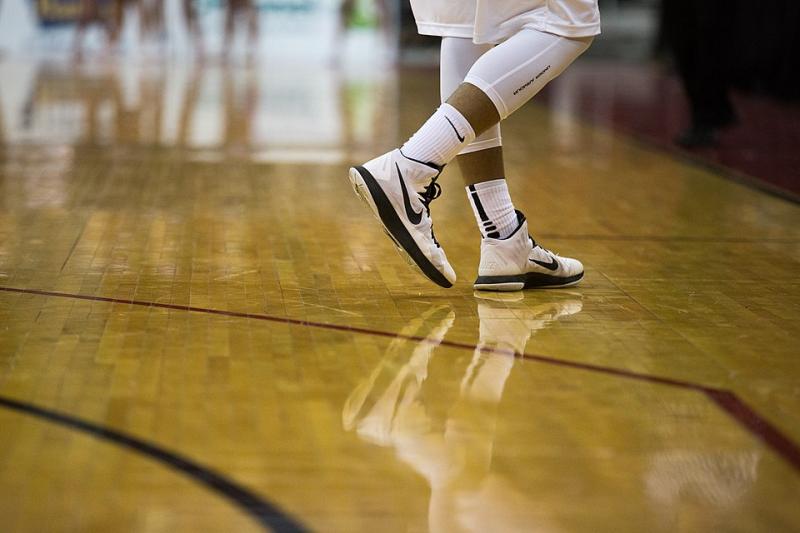
Some surfaces, such as rubber-soled shoes, have soft, flexible surfaces that can sink into any grooves that are present. This increases the friction being experienced. This is why rubber-soled shoes are used for playing basketball or netball. Their softer surface experiences high friction levels with the floor, preventing the player from slipping.
When an object moves against a surface or in the air, it always experiences an opposite force called friction. Moving objects slow down because the force of friction pushes in the opposite direction to the motion and slows it to a stop.
When sliding along a surface, uneven ‘rough’ materials cause more friction because the microscopic bumps and valleys on the surface of the material interlock or adhere more to the surface, creating resistance to movement.
Surfaces that are smooth tend to slide more easily, because there are fewer bumps to ‘catch’ on a surface and create adhesion.
Some surfaces, such as rubber-soled shoes, have soft, flexible surfaces that can sink into any grooves that are present. This increases the friction being experienced. This is why rubber-soled shoes are used for playing basketball or netball. Their softer surface experiences high friction levels with the floor, preventing the player from slipping.
The Inquire phase allows students to cycle progressively and with increasing complexity through the key science ideas related to the core concepts. Each Inquire cycle is divided into three teaching and learning routines that allow students to systematically build their knowledge and skills in science and incorporate this into their current understanding of the world.
When designing a teaching sequence, it is important to consider the knowledge and skills that students will need in the final Act phase. Consider what the students already know and identify the steps that need to be taken to reach the level required. How could you facilitate students’ understanding at each step? What investigations could be designed to build the skills at each step?
Read more about using the LIA FrameworkThe Investigate routine provides students with an opportunity to explore the key ideas of science, to plan and conduct an investigation, and to gather and record data. The investigations are designed to systematically develop content knowledge and skills through increasingly complex processes of structured inquiry, guided inquiry and open inquiry approaches. Students are encouraged to process data to identify trends and patterns and link them to the real-world context of the teaching sequence.
When designing a teaching sequence, consider the diagnostic assessment (Launch phase) that identified the alternative conceptions that students held. Are there activities that challenge these ideas and provide openings for discussion? What content knowledge and skills do students need to be able to complete the final (Act phase) task? How could you systematically build these through the investigation routines? Are there opportunities to build students’ understanding and skills in the science inquiry processes through the successive investigations?
Read more about using the LIA FrameworkHow far will it slide?
Discuss how the class will test whether different materials affect how far an object will slide across a table/surface.
With students, determine:
- What will be changed in the investigation (the material on the sliding surface).
- What will be measured in the investigation (the distance the object slides).
- What will stay the same in the investigation (the standing starting point when sliding the object, who slides the object, the surface/table etc.).
Each of the variables that need to be kept the same can be discussed as is appropriate for your students. In particular, it is likely that all students will want an opportunity to slide the objects across the surface of the table. This can be done if time and resources allow, however, measuring and recording the distance of each student’s attempts will take a significant amount of time. Consider if this is right to do in your context. Alternatively, you might allow all students the opportunity to slide the objects, but only record the measurements of one or a few students.
Next, determine a suitable way of measuring the distance of each slide. If your students are ready for complexity, the following steps describe a new measuring technique which will demonstrate the importance of using standard units of measurement. Alternatively, you may choose to use the streamer method from the previous lesson.
- Explain that you will begin with a ‘test’ slide. Mark a start line on a table or other smooth flat surface.
- Conduct the test slide and mark the final location of the object on the table/surface.
- Optional: Suggest counting how many ‘hands’ between the start line and final location and ask students if they think there might be any problems with this method.
- Select as many students as needed to place both hands on the table/surface to fill the distance between the start line and the object’s final location. Don’t give any direction as to how they might place their hands. Record this measurement.
- Next, select different students to measure the same distance by placing their hands in a row with each fingertip touching the bottom of the palm/wrist of the next hand. Record this measurement.
- Model critical thinking by wondering aloud if the measurements were fair and how to make them so. Discuss with students if the size of the hands would make a difference (small hands will allow for short measurements) or if the way the hands are placed (spread fingers measuring thumb to pinky can vary in how far they are spread each time) would change the measurement. Look at how the different way of placing the hands also affects the measurement.
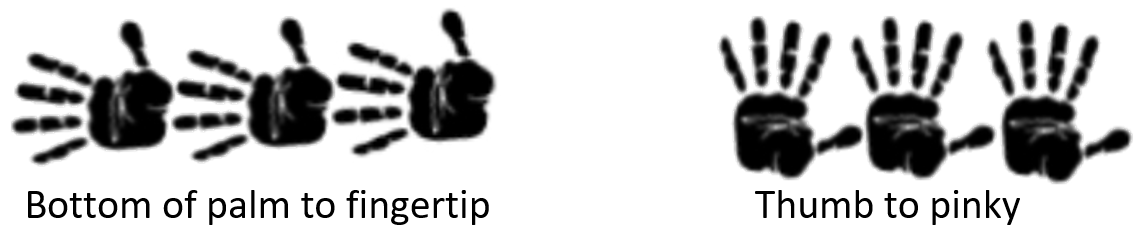
- Next, introduce standard ‘handprint measurements’ created using the Hand measures Resource sheet.
- Determine which direction you'll agree to use (bottom of palm to fingertip, or thumb to pinky).
- Measure the distance of the test slide with the handprint measurements and record it.
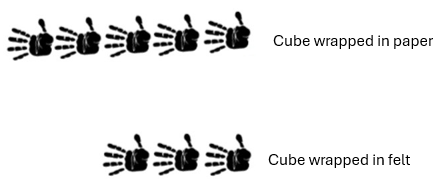
- Shuffle the handprint measurements around, measure the distance again, and record the measurement. It should be the same distance.
- Discuss and determine with students why using the handprint measurements is more accurate than using their own hands: the measurements are all the same size, so it’s more fair to compare them.
Use the appropriate measurement tool to complete the investigation as either a whole class, in collaborative teams with an adult or older student helper, or in collaborative teams that work independently if students are ready.
If investigating as a whole class, you may choose to:
- have only one student undertake the slides that are measured.
- measure the tests from multiple students.
- allow all students to slide and measure.
History of ‘hand’ measurements
How big is a hand?

In the past, a ‘hand’ was a unit of measurement based on the width of a human hand, typically the span of the palm, including the thumb. This measurement initially varied by individual and culture but became standardized in 1541 under King Henry VIII, who defined one hand as equal to 10.16 cm. This standardisation made the hand a reliable unit for measuring the height of horses, a practice that continues today. A horse’s height is still measured in hands, with each hand measuring 10.16 cm. For example, a horse described as 15.2 hands high is equivalent to 157.5 cm at the withers (top of the shoulders). While the hand unit is no longer widely used in other contexts, it remains an important measurement in the equestrian world.
In the past, a ‘hand’ was a unit of measurement based on the width of a human hand, typically the span of the palm, including the thumb. This measurement initially varied by individual and culture but became standardized in 1541 under King Henry VIII, who defined one hand as equal to 10.16 cm. This standardisation made the hand a reliable unit for measuring the height of horses, a practice that continues today. A horse’s height is still measured in hands, with each hand measuring 10.16 cm. For example, a horse described as 15.2 hands high is equivalent to 157.5 cm at the withers (top of the shoulders). While the hand unit is no longer widely used in other contexts, it remains an important measurement in the equestrian world.
The Inquire phase allows students to cycle progressively and with increasing complexity through the key science ideas related to the core concepts. Each Inquire cycle is divided into three teaching and learning routines that allow students to systematically build their knowledge and skills in science and incorporate this into their current understanding of the world.
When designing a teaching sequence, it is important to consider the knowledge and skills that students will need in the final Act phase. Consider what the students already know and identify the steps that need to be taken to reach the level required. How could you facilitate students’ understanding at each step? What investigations could be designed to build the skills at each step?
Read more about using the LIA FrameworkFollowing an investigation, the Integrate routine provides time and space for data to be evaluated and insights to be synthesized. It reveals new insights, consolidates and refines representations, generalises context and broadens students’ perspectives. It allows student thinking to become visible and opens formative feedback opportunities. It may also lead to further questions being asked, allowing the Inquire phase to start again.
When designing a teaching sequence, consider the diagnostic assessment that was undertaken during the Launch phase. Consider if alternative conceptions could be used as a jumping off point to discussions. How could students represent their learning in a way that would support formative feedback opportunities? Could small summative assessment occur at different stages in the teaching sequence?
Read more about using the LIA FrameworkWhat did we find out?
In this Integrate step, guide students to link their experiences during the investigation to the concepts about movement being explored. Through questioning and discussion, students should come to a consensus that:
|
Make a simple column graph for students by placing the streamers next to each other, or make a bar graph by placing the correct number of handprints from the end of the palm to the fingertip on a labelled axis.
Discuss and compare the results shown on the graph with students’ predictions made earlier in the lesson about which object might slide the furthest.
- Which object did you predict would be able to slide the furthest?
- Why did you think that?
- Which object travelled the furthest?
- Was your prediction the same as the result?
- Why do you think the ________ travelled the furthest?
Present students with the statement: objects made of different materials move in different ways. Ask students if they agree with this statement or not, and why. Ask students to draw on examples they have seen over the course of the sequence to support their ideas.
You might prompt their thinking with the following examples:
- think back to some of the objects passed around the circle in Lesson 1. Were they easy or hard to move in different ways, and why?
- consider the different movements made with the equipment used when students played the playground games.
- consider how far different objects rolled in the previous lesson, and if the material they were made of affected how far they rolled.
- consider how some materials were able to slide more easily than others.
Reflect on the lesson
You might:
- ask students to think about which other factors may influence how far something is able to slide.
- add to the class word wall any vocabulary related to materials, fair testing, investigations, etc.
- re-examine the intended learning goals for the lesson and consider how they were achieved.
- discuss how students were thinking and working like scientists during the lesson. Focus on the importance of having a fair and accurate way of taking measurements.