

Forces are fun
View Sequence overviewStudents will:
- observe and describe how changing the size of a push or pull force (its magnitude) affects how far an object travels.
Students will represent their understanding as they:
- contribute to discussions about the effects of forces of different strength.
- share ideas about how to represent different sizes of pushing forces.
- Optional: represent different sized pushing forces with arrows.
In this lesson, assessment is formative.
Feedback might focus on:
- students’ understanding of how the strength of a pushing force impacts the distance that something travels.
- students’ understanding that heavy objects need a bigger push to change their motion.
Whole class
Class science journal (digital or hard-copy)
1 x bean bag or similar to throw towards a target
1 x hula hoop or similar to act as a target
Stations where teams use a pushing force to move an item to targets set at three different distances. Set up one station per team (stations can be repeated). Stations should allow teams to experience different types of pushes that require different magnitudes of force, for example:
- throwing a bean bag to land inside a hula hoop.
- Requires bean bags and 3 x hoops per station.
- kicking a ball to reach a goal.
- Requires soccer balls and 3 x goals per station.
- rolling a heavier ball to cover a certain distance.
- Requires balls and 3 x ropes/string or masking tape to mark a line the ball must pass per station.
- hitting a ball to cover a certain distance.
- Requires balls, bats and 3 x ropes/string or masking tape to mark a line the ball must pass per station.
Optional: Digital camera to take photographs of students
Each student
Individual science journal (digital or hard-copy)
Lesson
The Inquire phase allows students to cycle progressively and with increasing complexity through the key science ideas related to the core concepts. Each Inquire cycle is divided into three teaching and learning routines that allow students to systematically build their knowledge and skills in science and incorporate this into their current understanding of the world.
When designing a teaching sequence, it is important to consider the knowledge and skills that students will need in the final Act phase. Consider what the students already know and identify the steps that need to be taken to reach the level required. How could you facilitate students’ understanding at each step? What investigations could be designed to build the skills at each step?
Read more about using the LIA FrameworkRe-orient
Review any activities from Lesson 1 that involved students using a pushing force to make something move over a distance, either by looking at the images from Lesson 1 or by replaying the activities.
- How did you make the objects move?
- What did you do if you had to make an object move a long distance? How was it different to moving an object a short distance?
- Did you find the activity difficult? Why? Why not?
The Inquire phase allows students to cycle progressively and with increasing complexity through the key science ideas related to the core concepts. Each Inquire cycle is divided into three teaching and learning routines that allow students to systematically build their knowledge and skills in science and incorporate this into their current understanding of the world.
When designing a teaching sequence, it is important to consider the knowledge and skills that students will need in the final Act phase. Consider what the students already know and identify the steps that need to be taken to reach the level required. How could you facilitate students’ understanding at each step? What investigations could be designed to build the skills at each step?
Read more about using the LIA FrameworkIdentifying and constructing questions is the creative driver of the inquiry process. It allows students to explore what they know and how they know it. During the Inquire phase of the LIA Framework, the Question routine allows for past activities to be reviewed and to set the scene for the investigation that students will undertake. The use of effective questioning techniques can influence students’ view and interpretation of upcoming content, open them to exploration and link to their current interests and science capital.
When designing a teaching sequence, it is important to spend some time considering the mindset of students at the start of each Inquire phase. What do you want students to be thinking about, what do they already know and what is the best way for them to approach the task? What might tap into their curiosity?
Read more about using the LIA FrameworkThrowing distance
Show students a bean bag and a target, such as a hoop, placed on the floor a distance away. Discuss the different ways you might use a throwing motion to push the bean bag into the air and land on the target.
Model student suggestions, making sure you use too much or too little force to actually land on the target. Ask students to identify what you might be doing wrong to keep missing the target.
Pose the question: How does the force on the bean bag change if I aim for a close target or a target faraway?
The Inquire phase allows students to cycle progressively and with increasing complexity through the key science ideas related to the core concepts. Each Inquire cycle is divided into three teaching and learning routines that allow students to systematically build their knowledge and skills in science and incorporate this into their current understanding of the world.
When designing a teaching sequence, it is important to consider the knowledge and skills that students will need in the final Act phase. Consider what the students already know and identify the steps that need to be taken to reach the level required. How could you facilitate students’ understanding at each step? What investigations could be designed to build the skills at each step?
Read more about using the LIA FrameworkThe Investigate routine provides students with an opportunity to explore the key ideas of science, to plan and conduct an investigation, and to gather and record data. The investigations are designed to systematically develop content knowledge and skills through increasingly complex processes of structured inquiry, guided inquiry and open inquiry approaches. Students are encouraged to process data to identify trends and patterns and link them to the real-world context of the teaching sequence.
When designing a teaching sequence, consider the diagnostic assessment (Launch phase) that identified the alternative conceptions that students held. Are there activities that challenge these ideas and provide openings for discussion? What content knowledge and skills do students need to be able to complete the final (Act phase) task? How could you systematically build these through the investigation routines? Are there opportunities to build students’ understanding and skills in the science inquiry processes through the successive investigations?
Read more about using the LIA FrameworkTarget practice
Set up a series of stations where students, working in teams/pairs, are challenged to use a pushing motion to move an object so that it reaches a target, with the targets set at three different distances (one close, one far, and one in the middle). Stations might involve students:
- hitting an object with their hand or a bat/paddle.
- rolling an object.
- kicking an object.
- throwing an object overarm and/or underarm.
Show students the stations and ask how they think they might reach the furthest target as opposed to the closest target.
- Which target is closer? Which one is further away?
- Do you think we need to do the same thing to reach all targets?
- What might you have to do to reach the target that is far away?
- What about the one that is closer?
- What might happen if our push is too small?
- What might happen if we use a big push?
- What could happen if we pull instead of push?
- How will you know if your push was big enough? Or too big?
- What do you think will happen if we use the same push for both targets?
- Which target will be easier to reach? Why?
- What do you think we will have to do differently?
Allow teams time to rotate through stations to ensure they have experienced different types of pushing motions.
Through trial and error, students explore the size of force needed to reach each target. Encourage students to use terms like “small push”, “medium push” or “large push” as they move each object to the identified target.
As you move around the room and observe teams, make sure students are focusing on the magnitude of their pushes by using the following prompts (and asking the questions included in Potential discussion prompts above):
- Show me a small push.
- Show me a large push.
- This push made the object travel farther/closer.
- It only moved a little way. Do you think it was a small/medium/large push?
- The object went farther this time. Do you think push was larger or smaller?
- How can you use what you learned with this throw/hit/roll/kick to make sure the next one reaches the target?
As students progress through different stations, they will develop the understanding that they need to use a larger pushing force to reach the furthest target.
Optional: Take photographs of students participating in the stations.
Force magnitude
What is force magnitude and what language are Year 1 students expected to use to describe it?
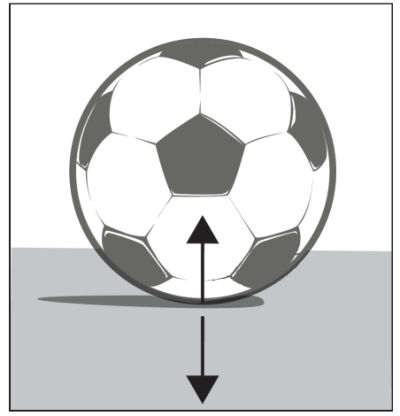
The magnitude of a force refers to its size—how big or small the push or pull is. Magnitude is measured in Newtons (N).
When forces are shown using arrows, the length of the arrow represents the magnitude. A longer arrow represents a stronger force, and a shorter arrow represents a weaker force. Forces are defined by their magnitude as well as their direction; you cannot fully describe a force without both. The direction of the arrow indicates the direction in which the force acts, and the arrow usually starts at the point where the force is applied.
The word “magnitude” is not necessarily appropriate nor required by students at this stage of development. For this reason, the term “size” has been used in the student activities. If you determine that the term magnitude is suitable for your students, it is recommended that it be used in conjunction with more familiar language to help students connect the term to its everyday meaning.
The magnitude of a force refers to its size—how big or small the push or pull is. Magnitude is measured in Newtons (N).
When forces are shown using arrows, the length of the arrow represents the magnitude. A longer arrow represents a stronger force, and a shorter arrow represents a weaker force. Forces are defined by their magnitude as well as their direction; you cannot fully describe a force without both. The direction of the arrow indicates the direction in which the force acts, and the arrow usually starts at the point where the force is applied.
The word “magnitude” is not necessarily appropriate nor required by students at this stage of development. For this reason, the term “size” has been used in the student activities. If you determine that the term magnitude is suitable for your students, it is recommended that it be used in conjunction with more familiar language to help students connect the term to its everyday meaning.
Trial-and-error method
What is the trial-and-error method and why is it valuable for students?

The trial-and-error method is especially valuable for younger students because it mirrors how some scientific investigations are initiated and allows them to utilise their current skills and understandings.
By testing ideas, observing what happens, and adjusting their approach, students learn that mistakes aren’t failures—they’re useful data.
This process helps them build curiosity, resilience, and critical thinking, while also reinforcing key scientific skills like making predictions, observing outcomes, and drawing simple conclusions. Using trial and error encourages students to actively engage with investigations and understand that scientific knowledge develops through questioning, exploration and refinement.
The trial-and-error method is especially valuable for younger students because it mirrors how some scientific investigations are initiated and allows them to utilise their current skills and understandings.
By testing ideas, observing what happens, and adjusting their approach, students learn that mistakes aren’t failures—they’re useful data.
This process helps them build curiosity, resilience, and critical thinking, while also reinforcing key scientific skills like making predictions, observing outcomes, and drawing simple conclusions. Using trial and error encourages students to actively engage with investigations and understand that scientific knowledge develops through questioning, exploration and refinement.
The Inquire phase allows students to cycle progressively and with increasing complexity through the key science ideas related to the core concepts. Each Inquire cycle is divided into three teaching and learning routines that allow students to systematically build their knowledge and skills in science and incorporate this into their current understanding of the world.
When designing a teaching sequence, it is important to consider the knowledge and skills that students will need in the final Act phase. Consider what the students already know and identify the steps that need to be taken to reach the level required. How could you facilitate students’ understanding at each step? What investigations could be designed to build the skills at each step?
Read more about using the LIA FrameworkFollowing an investigation, the Integrate routine provides time and space for data to be evaluated and insights to be synthesized. It reveals new insights, consolidates and refines representations, generalises context and broadens students’ perspectives. It allows student thinking to become visible and opens formative feedback opportunities. It may also lead to further questions being asked, allowing the Inquire phase to start again.
When designing a teaching sequence, consider the diagnostic assessment that was undertaken during the Launch phase. Consider if alternative conceptions could be used as a jumping off point to discussions. How could students represent their learning in a way that would support formative feedback opportunities? Could small summative assessment occur at different stages in the teaching sequence?
Read more about using the LIA FrameworkGoing further
In the following Integrate routine, students are guided to link their experiences with using a pushing force to reach a target with the science explored, that is the size of the pushing force affects how far an object will move. Through questioning and discussion, students should come to a consensus that:
|
Discuss the results of students’ investigations, including any patterns they noticed between them and what claims they might make as a result.
- What happened when you used a big push?
- What happened when you used a small push?
- Which push made the object go the furthest?
- What do you notice about big pushes?
- What do you notice about small pushes? Did anyone else see the same thing?
- Which object (comparing heavy and light objects) was the easiest to move?
- Which one was harder to move?
- What is the difference between these two objects?
- If we made the (light) object heavier, what would change?
- Did round objects move differently from flat ones?
By either looking at one of the photographs taken during the investigation or by drawing a diagram of students undertaking one of the activities, focus on how different sized pushes are recorded. Ask students how they might show that a stronger push made an object move further.
Explain that scientists use longer arrows to represent a larger push. Demonstrate this by drawing on the photograph or diagram, using a shorter arrow to show the force needed to reach a closer target, and a longer one to demonstrate the force needed to reach a target that is further away.
Optional: Students draw their own diagrams or label their own photographs to demonstrate the different strength of pushing forces required to reach targets set at different distances.
Reflect on the lesson
You might:
- add relevant vocabulary and images to the class word wall.
- discuss how students might use their experiences and what they’ve learned this lesson when designing their own activity.
- review the definitions of push and pull.
Representational challenge
What do I need to be aware of when looking at students’ representations?
In this part of the lesson, students are asked to represent forces acting on an object being moved using a pushing force by labelling a photograph or drawing.
When a student throws/rolls/pushes an object, they apply a force to the object to make it move. In simple terms, these movements involve pushes from the hand/foot that send an object away from the body. To support accuracy in student drawings, students should photograph or draw their hand or foot in contact with the object at any point during the push and indicate the direction of the push using an arrow.
Once the object leaves the hand, the applied force from the hand no longer determines the motion of the object and different representations of force would need to be shown. When the object leaves the hand, other forces (gravity and air resistance) act on the object.
- Gravity, as described scientifically by Isaac Newton, is the force that pulls objects toward the centre of the Earth, continuously acting on the object in the air, accelerating it downward. This downward motion is why all thrown objects eventually fall to the ground.
- As an object moves through the air, it also experiences air resistance, sometimes called drag. Air resistance is a type of friction force that acts in the opposite direction to the object’s motion. The amount of air resistance depends on the object’s size, shape, and surface area. For example, a crumpled ball of paper usually travels farther than a flat sheet of paper when thrown because it experiences less air resistance.
At this level, students might be aware of these forces to some extent, but are not required to represent or explain gravity or air resistance forces on photos or drawings in this activity.
The force applied as the hand touches the object to make it move can vary in strength. When thrown, the strength of this push affects how fast the object moves when it leaves the hand and the distance it will travel away from the person. A stronger push generally results in a faster throw, and a faster throw usually means the object will travel farther. The relative size of the different forces can be represented using arrows of different lengths.
One other factor that may affect the distance an object travels and how forces are represented is the weight, or mass, of the object. Heavier objects require more force to reach the same speed as lighter objects because they are harder to accelerate. However, heavier objects may be less affected by air resistance. Lighter objects are easier to accelerate but may slow down more quickly due to the effects of air resistance. This is why different balls, beanbags, or paper objects behave differently when thrown with similar effort.
In this part of the lesson, students are asked to represent forces acting on an object being moved using a pushing force by labelling a photograph or drawing.
When a student throws/rolls/pushes an object, they apply a force to the object to make it move. In simple terms, these movements involve pushes from the hand/foot that send an object away from the body. To support accuracy in student drawings, students should photograph or draw their hand or foot in contact with the object at any point during the push and indicate the direction of the push using an arrow.
Once the object leaves the hand, the applied force from the hand no longer determines the motion of the object and different representations of force would need to be shown. When the object leaves the hand, other forces (gravity and air resistance) act on the object.
- Gravity, as described scientifically by Isaac Newton, is the force that pulls objects toward the centre of the Earth, continuously acting on the object in the air, accelerating it downward. This downward motion is why all thrown objects eventually fall to the ground.
- As an object moves through the air, it also experiences air resistance, sometimes called drag. Air resistance is a type of friction force that acts in the opposite direction to the object’s motion. The amount of air resistance depends on the object’s size, shape, and surface area. For example, a crumpled ball of paper usually travels farther than a flat sheet of paper when thrown because it experiences less air resistance.
At this level, students might be aware of these forces to some extent, but are not required to represent or explain gravity or air resistance forces on photos or drawings in this activity.
The force applied as the hand touches the object to make it move can vary in strength. When thrown, the strength of this push affects how fast the object moves when it leaves the hand and the distance it will travel away from the person. A stronger push generally results in a faster throw, and a faster throw usually means the object will travel farther. The relative size of the different forces can be represented using arrows of different lengths.
One other factor that may affect the distance an object travels and how forces are represented is the weight, or mass, of the object. Heavier objects require more force to reach the same speed as lighter objects because they are harder to accelerate. However, heavier objects may be less affected by air resistance. Lighter objects are easier to accelerate but may slow down more quickly due to the effects of air resistance. This is why different balls, beanbags, or paper objects behave differently when thrown with similar effort.