Dig deep
View Sequence overviewStudents will:
- explore and describe what is in soil.
- discuss different components of soils.
Students will represent their understanding as they:
- complete the Exploring soil samples Resource sheet.
- present their findings verbally in teams.
Feedback might focus on:
- students’ identification of soil features. Are they able to recognise and describe multiple features such as sand, rock, decomposing and fresh leaves?
- students’ descriptions of soils they have observed in other places. For example, can they describe the difference between the soil in a vegetable garden to the soil next to basketball court or next to the classroom steps?
Whole class
Class science journal (digital or hard-copy)
3 buckets of soil, each sourced from a different location on the schoolgrounds or elsewhere. See Collecting soil samples for Lessons 2 and 3 in the Preparing for this sequence tab for advice on collecting soil samples for this and the subsequent lesson. Alternatively, soil can be studied in situ on the school grounds.
Demonstration copy of the Exploring soil samples Resource sheet
Dirt and soil samples used in Lesson 1
3 x transparent screw top jars (size approx. 500ml)
Each group
1 x cup for holding and transporting soil samples
Magnifying glass
A piece of white paper upon which to spread out the soil sample
1 x transparent screw top jar (size approx. 500ml)
Small plastic resealable bag to hold 2 tablespoons of soil
Access to water
Optional: Sieve
Optional: Pop-stick or spoon to separate soil features
Optional: Digital device for taking photos
Each student
Individual science journal (digital or hard-copy)
Exploring soil samples Resource sheet
Optional if conducting investigation in the field (i.e. while outside): a clipboard/book to rest the sheet on
Lesson
The Inquire phase allows students to cycle progressively and with increasing complexity through the key science ideas related to the core concepts. Each Inquire cycle is divided into three teaching and learning routines that allow students to systematically build their knowledge and skills in science and incorporate this into their current understanding of the world.
When designing a teaching sequence, it is important to consider the knowledge and skills that students will need in the final Act phase. Consider what the students already know and identify the steps that need to be taken to reach the level required. How could you facilitate students’ understanding at each step? What investigations could be designed to build the skills at each step?
Read more about using the LIA FrameworkRe-orient
Refer to any questions asked by students in Lesson 1 about soil and what is in soil (see the ‘W’ column of TWLH chart), for example: Why is some soil slippery when it’s wet?
Recall the previous lesson, focusing on the school map and soil locations recorded during the geology quest.
- Looking at the map from last lesson, where did we find soil?
- Why do you think soil is found/used in that part of the school grounds?
The Inquire phase allows students to cycle progressively and with increasing complexity through the key science ideas related to the core concepts. Each Inquire cycle is divided into three teaching and learning routines that allow students to systematically build their knowledge and skills in science and incorporate this into their current understanding of the world.
When designing a teaching sequence, it is important to consider the knowledge and skills that students will need in the final Act phase. Consider what the students already know and identify the steps that need to be taken to reach the level required. How could you facilitate students’ understanding at each step? What investigations could be designed to build the skills at each step?
Read more about using the LIA FrameworkIdentifying and constructing questions is the creative driver of the inquiry process. It allows students to explore what they know and how they know it. During the Inquire phase of the LIA Framework, the Question routine allows for past activities to be reviewed and to set the scene for the investigation that students will undertake. The use of effective questioning techniques can influence students’ view and interpretation of upcoming content, open them to exploration and link to their current interests and science capital.
When designing a teaching sequence, it is important to spend some time considering the mindset of students at the start of each Inquire phase. What do you want students to be thinking about, what do they already know and what is the best way for them to approach the task? What might tap into their curiosity?
Read more about using the LIA FrameworkWhat’s in soil?
Further discuss soil, including any samples students collected during the geology quest and other soils students have encountered.
- Do you think the soil in our schoolgrounds is the same as soil you would find in a desert/rainforest/cave? Why do you think that?
- Have you ever had soil stick to the bottom of your shoes? Does all soil stick to the bottom of your shoes?
- What is in soil?
- Is sand a type of soil? Why/Why not?
Ask students if they can think of a way to observe soil more closely so that we can answer these questions. Pose the question: What is in soil?
The Inquire phase allows students to cycle progressively and with increasing complexity through the key science ideas related to the core concepts. Each Inquire cycle is divided into three teaching and learning routines that allow students to systematically build their knowledge and skills in science and incorporate this into their current understanding of the world.
When designing a teaching sequence, it is important to consider the knowledge and skills that students will need in the final Act phase. Consider what the students already know and identify the steps that need to be taken to reach the level required. How could you facilitate students’ understanding at each step? What investigations could be designed to build the skills at each step?
Read more about using the LIA FrameworkThe Investigate routine provides students with an opportunity to explore the key ideas of science, to plan and conduct an investigation, and to gather and record data. The investigations are designed to systematically develop content knowledge and skills through increasingly complex processes of structured inquiry, guided inquiry and open inquiry approaches. Students are encouraged to process data to identify trends and patterns and link them to the real-world context of the teaching sequence.
When designing a teaching sequence, consider the diagnostic assessment (Launch phase) that identified the alternative conceptions that students held. Are there activities that challenge these ideas and provide openings for discussion? What content knowledge and skills do students need to be able to complete the final (Act phase) task? How could you systematically build these through the investigation routines? Are there opportunities to build students’ understanding and skills in the science inquiry processes through the successive investigations?
Read more about using the LIA FrameworkExamining soil
Students undertake an investigation to answer the question What is in soil? This investigation can be conducted in the field (i.e. outside the classroom), with samples collected from the school grounds and taken back to the classroom, or with samples supplied by the teacher in buckets.
If students are collecting or examining soil samples in situ in the school ground, first discuss why it is important not to dig too deeply when looking for samples: it can disturb plants and animals, it can expose the soil and cause it to get washed/blown away. Also discuss the importance of returning the area to its prior state as closely as possible, for example, replacing leaf litter covering soil.
SAFETY NOTE: Remind students not to taste or smell the soil and to wash their hands after handling soil for safety reasons.
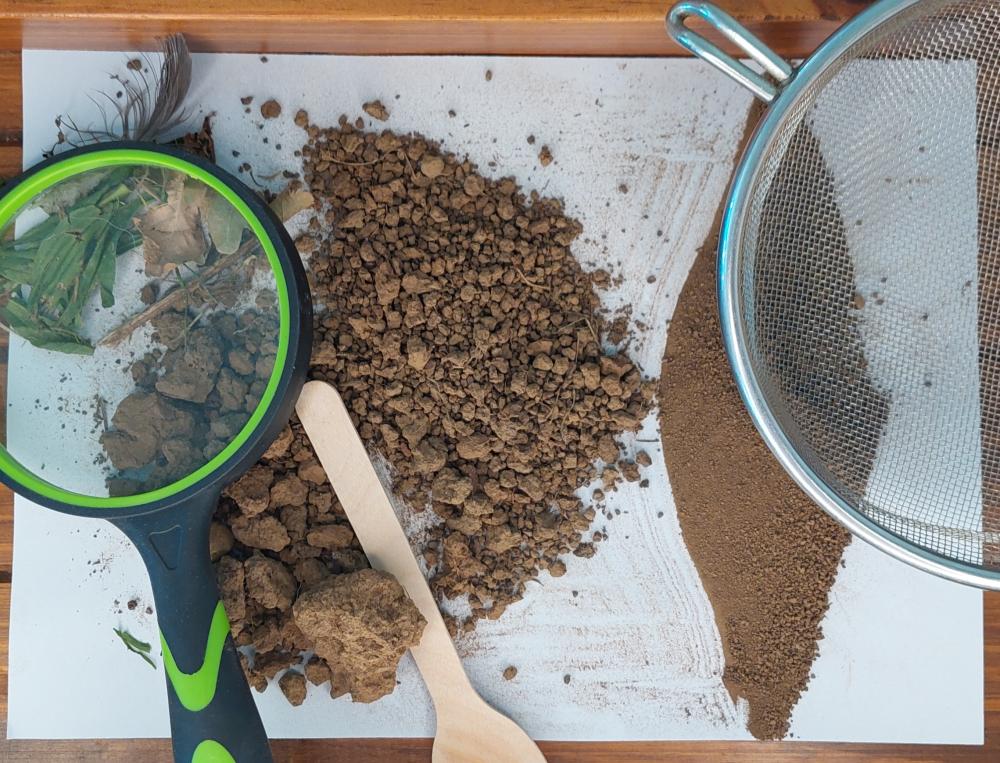
Model how to investigate a soil sample, and take notes on a demonstration copy of the Exploring soil samples Resource sheet as appropriate:
- Take a cup of soil.
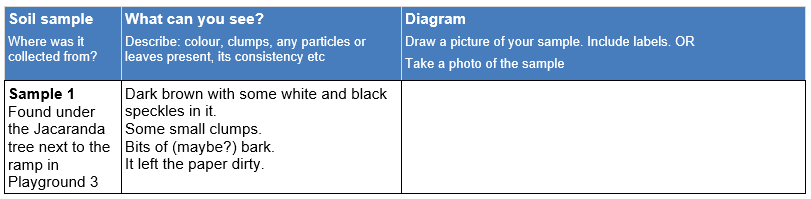
- Look at the soil and describe its characteristics/features (colours, clumps etc.) in as much detail as possible. For example: the soil is dark brown with some white and black speckles in it, with some small clumps and bits of what looks like bark.
- Spread out the soil on a piece of white paper and look for details, such as types of particles and leaves.
- Use the magnifying glass to look at particles closely.
- Rub the soil between your fingers to feel its consistency.
- Rub the soil onto the paper and listen to the sound it makes. Notice if it leaves a colour on the paper.
- Optional: Sieve the soil to separate particles according to size.
Ask students if they can think of other ways to investigate the soil.
Allow time for each team to:
- investigate the three soil samples.
- record results on Exploring soil samples Resource Sheet.
- return soils to the school grounds or bucket.
If the investigation was conducted in the field, collect a bucket of each soil type to use in later lessons.
Features and properties of soils
What is in soil?
Soil is the loose material that covers most of the Earth’s land surface. The aim of this lesson is for students to recognise that there are many different types of soils but all are made up of small particles of rocks and minerals, varying amounts of organic matter (humus and compost), water, and air.
The small particles are either sand, silt, or clay. The amount of sand, silt, or clay in a soil gives the soil its texture and determines how much air and water the soil can hold.
- Sand particles are relatively large, so sandy soil holds a lot of air and drains water freely. Sand makes the soil feel gritty.
- Silt particles are smaller than sand, so soil high in silt holds a moderate amount of water and air.
- Clay particles are the smallest, so clay-based soils hold a lot of water and little air. This can make it difficult for the roots of plants to take in oxygen. Clay makes the soil feel silky to the touch.
Loam is a combination of sand, silt, and clay and is the ideal soil for growing plants.
Humus (a Latin word meaning earth or ground) is the decomposed plant and animal matter in soil. It is important because it provides nutrients, contributes to water and air retention, and provides food and habitat for the microorganisms that live in the soil. Humus is stable, meaning it can't be decomposed any further. Organic matter that is still being broken down, or decomposing, is called compost.
Soil composition is different in different places. These differences can be seen in a very small distance, such as from one side of a garden or farm to the other, as well as from country to country. The differences depend on the type of rocky material and plant matter from which the soil was made and the kinds of organisms that live in, around, and on the soil.
Dirt is typically only made up of sand, clay or silt particles, but may also contain rocks. It is devoid of humus and compost, and because of this lacks the nutrients required for plant and animal life.
The Inquire phase allows students to cycle progressively and with increasing complexity through the key science ideas related to the core concepts. Each Inquire cycle is divided into three teaching and learning routines that allow students to systematically build their knowledge and skills in science and incorporate this into their current understanding of the world.
When designing a teaching sequence, it is important to consider the knowledge and skills that students will need in the final Act phase. Consider what the students already know and identify the steps that need to be taken to reach the level required. How could you facilitate students’ understanding at each step? What investigations could be designed to build the skills at each step?
Read more about using the LIA FrameworkFollowing an investigation, the Integrate routine provides time and space for data to be evaluated and insights to be synthesized. It reveals new insights, consolidates and refines representations, generalises context and broadens students’ perspectives. It allows student thinking to become visible and opens formative feedback opportunities. It may also lead to further questions being asked, allowing the Inquire phase to start again.
When designing a teaching sequence, consider the diagnostic assessment that was undertaken during the Launch phase. Consider if alternative conceptions could be used as a jumping off point to discussions. How could students represent their learning in a way that would support formative feedback opportunities? Could small summative assessment occur at different stages in the teaching sequence?
Read more about using the LIA FrameworkSharing about soil
Discuss and record teams’ findings in the class science journal as they share them.
- What did you notice?
- In what ways were the soils similar?
- In what ways were the soils different?
- Can you name any of the features in your soil?
- Sand, insects, leaves, clay etc.
- Can you think of other soils that you have seen that are different from the soils we’ve examined today?
- Why might it be useful to compare the soils?
- Why do you think scientists want to know about different types of soil?
- How could your findings help people in the community?
- They will know what to plant in certain places, or if things will grow in an area.
- Do you have any new questions about soil since doing this investigation?
- Think back to when we looked at the samples of dirt and soil last lesson. Would you add any observations to our list? What other ideas do you have now we've examined soil more closely?
- Show the samples if possible.
Mark the locations where the samples were taken on the school map if required, and label each sample with its date and location of collection. Discuss whether the varying locations would affect the features in each sample and how.
- How is this area of the school used?
- Does the way we use the area change the soil?
- For example: food scraps/compost is added to the kitchen garden; students run up and down the hill area a lot so the soil is really hard and dry; lots of stone gets kicked off the path into the area we took the soil sample.
- Do we think this soil has been here longer than the school, or has the soil been brought into the school grounds?
- How does soil improve our school grounds?
- Grow grass for playing on, grow trees for birds and possums to live in and provide shade, grow vegetables, plants look nice, and help keep the school grounds cool.
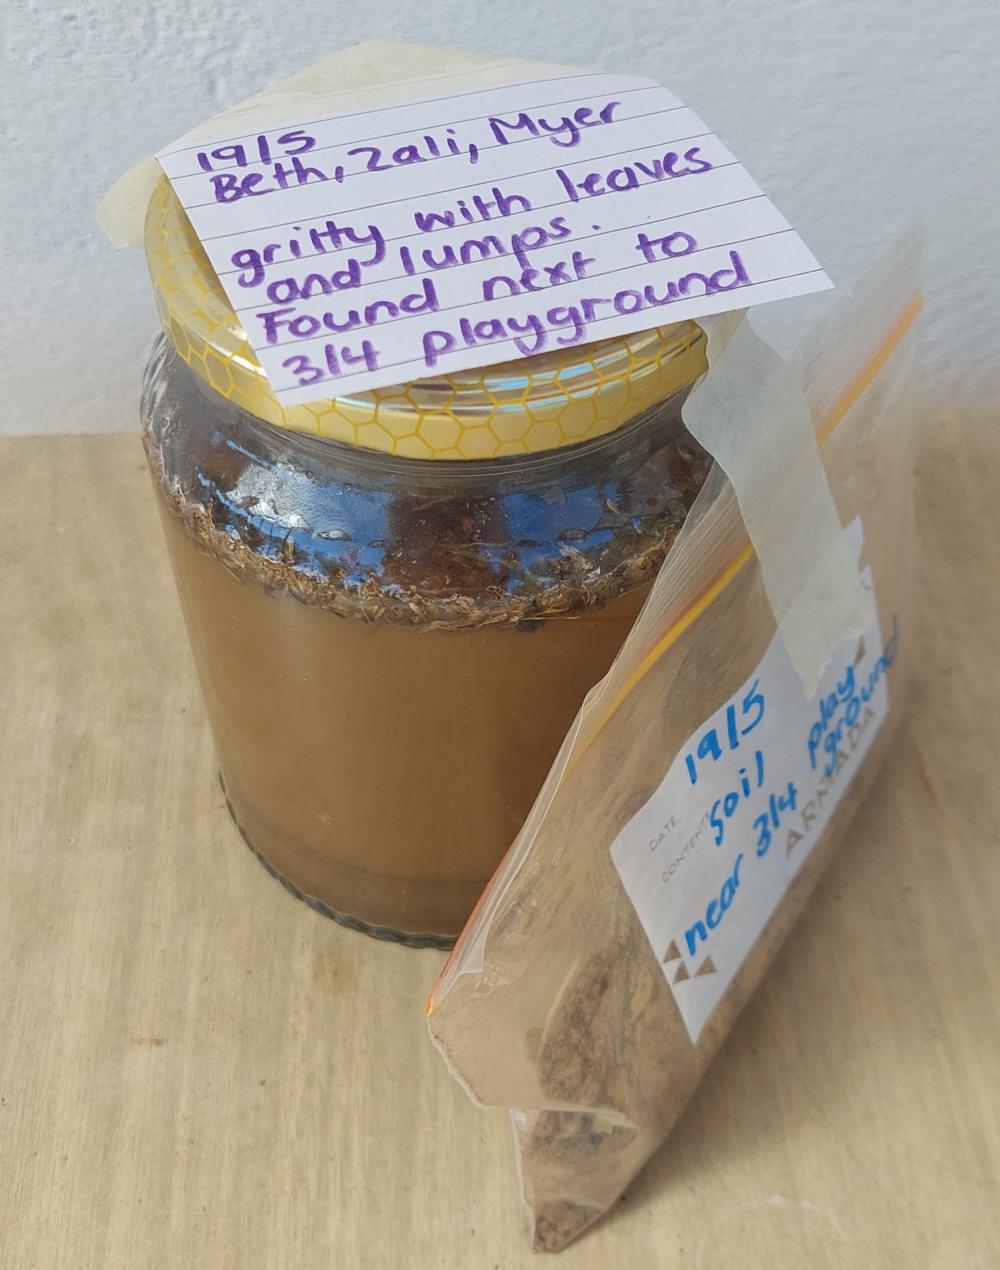
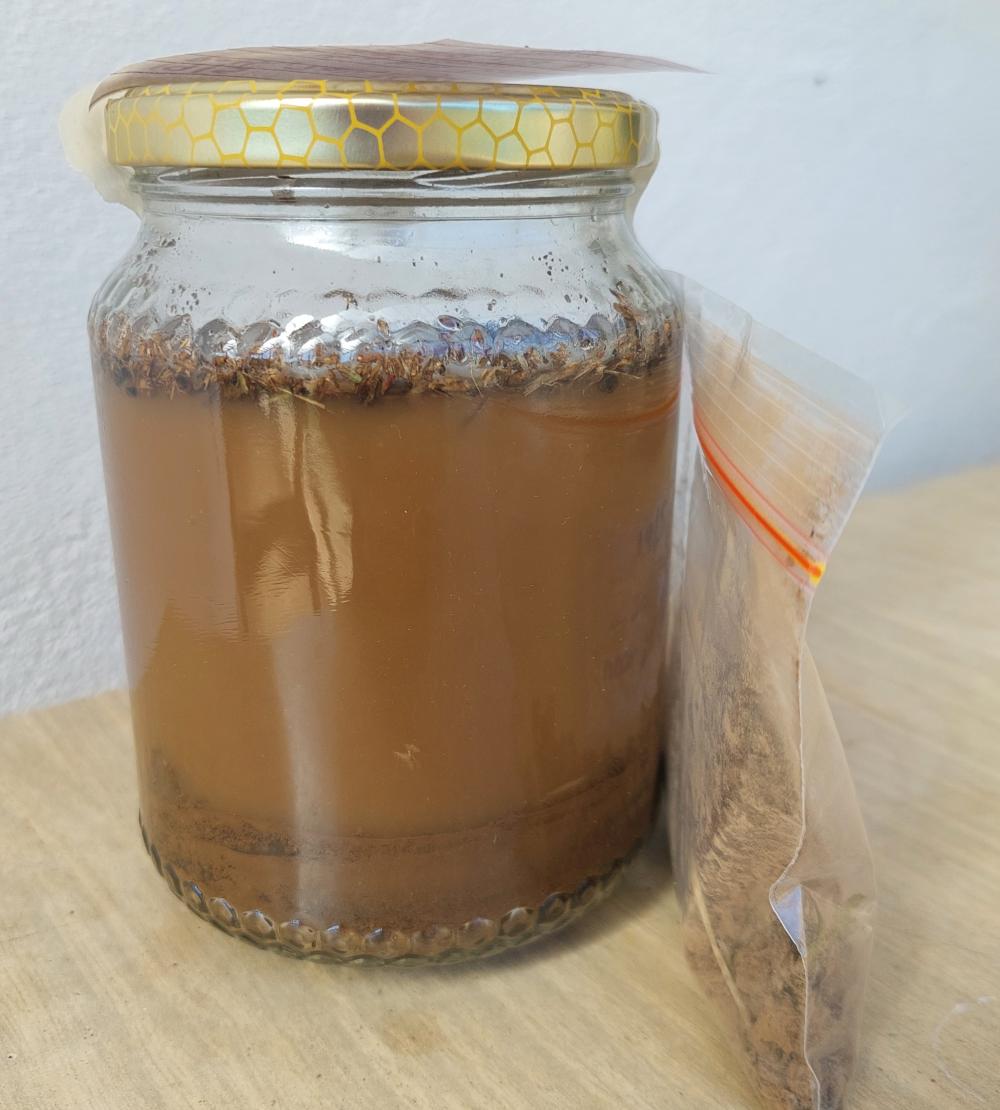
Preparing a soil profile
Explain that students will prepare a soil profile to be observed in the next lesson. The soil profiles will allow us to compare soils by measuring the different materials that settle into layers (mud, sand, leaves etc.).
Model creating a soil profile:
- Place 1 cup of one of the soils the class studied into a transparent screw-top jar.
- Place a few tablespoons of the same soil into a small plastic resealable bag. Label the bag and attach it to the jar using adhesive tape.
- Fill the jar with water (approximately 400 mL), leaving a small space at the top. Screw the jar closed.
- Add a label to the jar, including your name, a description of the soil used, and the date and location of collection.
Discuss with students:
- why labelling things accurately is important in scientific investigations.
- why the small sample in the plastic bag might be useful (to compare the wet soil with how it looked originally).
- what to change (soil), what to keep the same (water amount, time, temperature) and what to measure (layers) to make a test fair.
 |  |
Discuss how to work safely with glass in the classroom. Explain that students will be asked to make sure the lid is screwed on tightly and then gently shake their jars. Remind students to use two hands when shaking the jar and to stay away from tables and other hard furniture.
Each team creates their own soil profile jar using one soil type and jar provided.
Also, create one class set of all three different soil profiles examined during this lesson.
Students watch their jar as the soil settles for a couple of minutes and then describe in their science journal what they see. Ask students to leave their jars in a place where they will not be disturbed. The soil profiles will be examined in the next lesson, after they have settled. This could take up to two weeks depending on the soil type. It is ideal to wait at least 1 week before conducting Lesson 3—if the profile is not completely settled the water may still appear 'muddy'.
Reflect on the lesson
You might:
- review the TWLH chart. Record what students have learned and answer any questions.
- add to the class word wall vocabulary related to soil.
- re-examine the intended learning goals for the lesson and consider how they were achieved.
- discuss how students were thinking and working like scientists during the lesson. Focus on using senses (of sight, touch and hearing) for the soil investigation, along with accurately labelling samples and doing a fair test by only changing one thing (the soil type) in the soil solutions investigation.
- consider how what was explored about soil in this lesson relates to the task selected for the Act phase, or ask students to review and add to their list of ideas if negotiating a task with students during the course of the sequence.