Dig deep
View Sequence overviewStudents will:
- break apart and examine properties of the minerals in a model of a rock, including colour, lustre and tenacity.
- investigate the difference between gems, minerals, crystals and rocks.
Students will represent their understanding as they:
- complete the Model rock analysis Resource sheet.
- discuss how and why rocks and minerals can be changed by humans (for example breaking, shaping, polishing).
- record examples of how their lives would be different without minerals.
In this lesson, assessment is formative.
Feedback might focus on:
- students’ model rock analyses. Can students recognise that each ingredient represents a different mineral and that each of those minerals has its own properties such as colour, lustre, and tenacity?
Whole class
Optional: Microscope(s)
Demonstration copy of the Lustre and tenacity Resource sheet
Demonstration copy of the Model rock analysis Resource sheet
The video Gems, Minerals, Crystals & Rocks–What's the Difference? (3:31)
The video Inside of the Rock under the Microscope (1:04)
The video Using Rocks and Minerals (1:43)
The video In what ways do you interact with minerals in your daily life? (4:58)
Optional: Who am I? Resource sheet
Each student
Individual science journal (digital or hard-copy)
1 x model rock (see Preparing a model rock for analysis on the Preparing for this sequence tab)
1 x plate or A4 paper
1 x popstick/spoon
Magnifying glass
Model rock analysis Resource sheet
Lesson
The Inquire phase allows students to cycle progressively and with increasing complexity through the key science ideas related to the core concepts. Each Inquire cycle is divided into three teaching and learning routines that allow students to systematically build their knowledge and skills in science and incorporate this into their current understanding of the world.
When designing a teaching sequence, it is important to consider the knowledge and skills that students will need in the final Act phase. Consider what the students already know and identify the steps that need to be taken to reach the level required. How could you facilitate students’ understanding at each step? What investigations could be designed to build the skills at each step?
Read more about using the LIA FrameworkRe-orient
Recall the previous lesson, focusing on classifying rocks by observable features.
Review the meaning of the terms:
- rock
- mineral
- feature/characteristic
The Inquire phase allows students to cycle progressively and with increasing complexity through the key science ideas related to the core concepts. Each Inquire cycle is divided into three teaching and learning routines that allow students to systematically build their knowledge and skills in science and incorporate this into their current understanding of the world.
When designing a teaching sequence, it is important to consider the knowledge and skills that students will need in the final Act phase. Consider what the students already know and identify the steps that need to be taken to reach the level required. How could you facilitate students’ understanding at each step? What investigations could be designed to build the skills at each step?
Read more about using the LIA FrameworkIdentifying and constructing questions is the creative driver of the inquiry process. It allows students to explore what they know and how they know it. During the Inquire phase of the LIA Framework, the Question routine allows for past activities to be reviewed and to set the scene for the investigation that students will undertake. The use of effective questioning techniques can influence students’ view and interpretation of upcoming content, open them to exploration and link to their current interests and science capital.
When designing a teaching sequence, it is important to spend some time considering the mindset of students at the start of each Inquire phase. What do you want students to be thinking about, what do they already know and what is the best way for them to approach the task? What might tap into their curiosity?
Read more about using the LIA FrameworkWhat’s inside a rock?
Refer to any questions asked by students in Lesson 1 about minerals (‘W’ column of TWLH chart).
Introduce the terms ‘geology’ (the study of the Earth) and ‘geologist’ (a scientist who studies the Earth’s surface, what lies beneath it, and how it changes over time).
Pose the question: How do you think a geologist finds out what's inside a rock?
Discuss the different ways geologists might study rocks, for example:
- using magnifying glass or microscopes.
- testing how they respond to heat/cold.
- testing the rocks for strength.
- breaking the rocks open to look inside.
The Inquire phase allows students to cycle progressively and with increasing complexity through the key science ideas related to the core concepts. Each Inquire cycle is divided into three teaching and learning routines that allow students to systematically build their knowledge and skills in science and incorporate this into their current understanding of the world.
When designing a teaching sequence, it is important to consider the knowledge and skills that students will need in the final Act phase. Consider what the students already know and identify the steps that need to be taken to reach the level required. How could you facilitate students’ understanding at each step? What investigations could be designed to build the skills at each step?
Read more about using the LIA FrameworkThe Investigate routine provides students with an opportunity to explore the key ideas of science, to plan and conduct an investigation, and to gather and record data. The investigations are designed to systematically develop content knowledge and skills through increasingly complex processes of structured inquiry, guided inquiry and open inquiry approaches. Students are encouraged to process data to identify trends and patterns and link them to the real-world context of the teaching sequence.
When designing a teaching sequence, consider the diagnostic assessment (Launch phase) that identified the alternative conceptions that students held. Are there activities that challenge these ideas and provide openings for discussion? What content knowledge and skills do students need to be able to complete the final (Act phase) task? How could you systematically build these through the investigation routines? Are there opportunities to build students’ understanding and skills in the science inquiry processes through the successive investigations?
Read more about using the LIA FrameworkSmash it
Explain that last lesson we observed rocks from the outside. In this lesson, we'll be working like geologists: we will break apart ‘rocks’ to observe what we can find in each one.
Explain that students will be breaking apart model rocks, not real rocks, and discuss why that is:
- Real rocks are very hard—even the softer ones we can scratch! It takes a lot of pressure to break one, more pressure than we can safely use in the classroom.
- Real rocks can sometimes contain grains that are dangerous, and whilst they're okay when they're contained within the rock, we don't want to break a rock open and breathe them in.
- Scientists often use models to help them learn about things that are difficult to ‘get to’. Real geologists have the equipment and safety procedures that enable them to see inside real rocks, but schools don't. But that's okay, because using models is what scientists would do in this situation.
Distribute the model rock, popstick, plate and magnifying glass to each team. Before explaining and beginning the steps of the investigation, allow students time to observe and discuss their model rock and the equipment they have been given.
As a class, discuss suitable techniques for investigating the model rocks. For example, students might break them apart by hand then separate the pieces using a popstick.
Discuss safety and hygiene requirements as required. If using a food item for the rock model, discuss why it is important not to eat food when we do not know all of the ingredients, or to pressure others to eat foods. Some people can have life-threatening allergies to certain foods. Eating foods that have been touched by many hands can also spread illness.
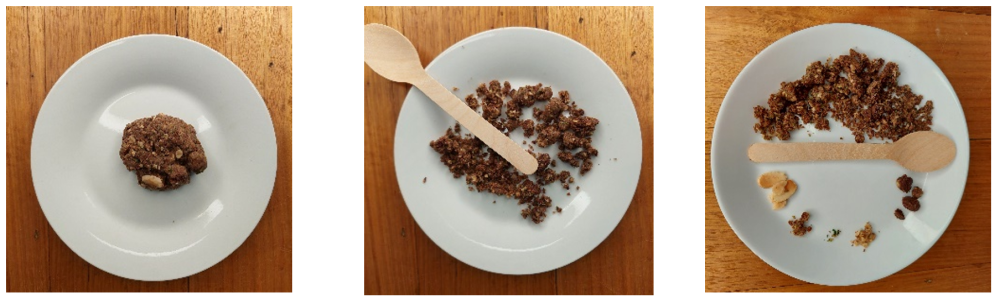
Allow time for students to:
- break apart their model rocks.
- separate components using a popstick/spoon.
- group together components that are the same/similar, and discuss why they have grouped them that way.
Explain that the components the students have identified in their model rock represent the minerals inside a real rock, and that some of the ways geologists classify minerals is according to their:
- colour.
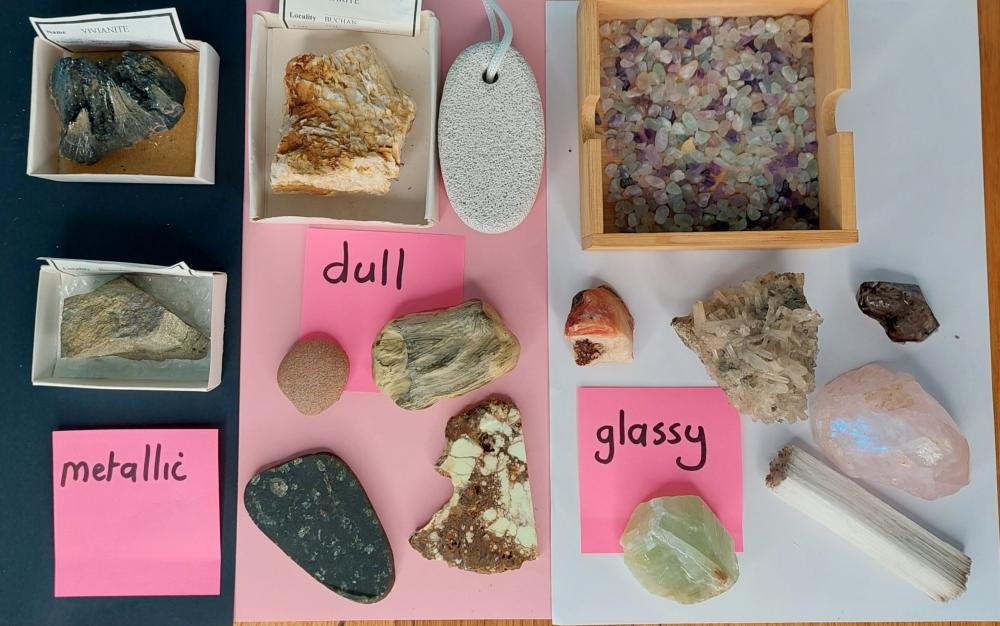
- lustre—how light reflects off the surface of a mineral.
- Does it look glassy like light reflecting off a window, metallic like light reflecting off a mirror, or dull and not shiny at all?
- If you are using food ingredients to represent minerals in rocks, it is likely that the food ingredients won't have lustre properties like minerals, and will instead be dull.
- tenacity—a mineral’s reaction to pressure.
- Does it shatter like a potato chip, bend like a banana peel or spring back like a marshmallow?
Use the Lustre and tenacity Resource sheet to help explain lustre and tenacity.
Using the demonstration copy of Model rock analysis Resource sheet, model for students how to examine their model minerals for colour, lustre and tenacity, and record their observations. Explain that for safety reasons they won't test for tenacity and instead should predict what they think would happen to the mineral under pressure.
Allow teams time to complete the Model rock analysis Resource sheet.
Identifying and classifying minerals
How are minerals identified and classified?
Each mineral is classified by both its chemical composition (the elements from which it is formed) and crystal structure (the pattern the atoms form when they lock together). Graphite and diamond are made of the same element—carbon—but have different crystal shapes so are different minerals.
Some minerals can be identified using our senses. For example, talc feels soapy, salt has a particular taste, and some clays have distinct smells—although we do not want to encourage students to smell and taste soils, rocks, and minerals for safety reasons.
Minerals can be classified and identified according to their properties:
- hardness
- density
- magnetism
- crystal structure
- colour
- streak (colour of powdered mineral)
- lustre (how light reflects off the surface)
- tenacity (toughness, reaction to pressure)
- cleavage (breaks along flat planes) and fracture (breaks that are not flat or even)
It would be helpful to students’ developing understanding if they were able to see a real rock with obvious minerals within it. A coarse granite works well, but it needs to have ‘fresh’ broken surfaces, not weathered, so that the ‘sparkles’ of the minerals within the granite are more obvious. If you have a piece of polished granite then the broken edge is more helpful (note that many benchtop stones may be called ‘granite’ but aren’t real granites). Granite ingredients are quartz, feldspar (one or two types) and mica (and/or dark hornblende).
The Inquire phase allows students to cycle progressively and with increasing complexity through the key science ideas related to the core concepts. Each Inquire cycle is divided into three teaching and learning routines that allow students to systematically build their knowledge and skills in science and incorporate this into their current understanding of the world.
When designing a teaching sequence, it is important to consider the knowledge and skills that students will need in the final Act phase. Consider what the students already know and identify the steps that need to be taken to reach the level required. How could you facilitate students’ understanding at each step? What investigations could be designed to build the skills at each step?
Read more about using the LIA FrameworkFollowing an investigation, the Integrate routine provides time and space for data to be evaluated and insights to be synthesized. It reveals new insights, consolidates and refines representations, generalises context and broadens students’ perspectives. It allows student thinking to become visible and opens formative feedback opportunities. It may also lead to further questions being asked, allowing the Inquire phase to start again.
When designing a teaching sequence, consider the diagnostic assessment that was undertaken during the Launch phase. Consider if alternative conceptions could be used as a jumping off point to discussions. How could students represent their learning in a way that would support formative feedback opportunities? Could small summative assessment occur at different stages in the teaching sequence?
Read more about using the LIA FrameworkMinerals
Share and discuss students’ findings.
- What colour was one of the ‘minerals’ you found inside your rock?
- How did you describe the lustre? Why?
- What do you think would happen if you applied lots of pressure to one of the ‘minerals’ found in your rock? What might you learn about its tenacity?
- How is a rock different to a mineral?
- A rock is made up of one or more minerals, but minerals are not made up of rocks. Minerals are the ingredients of rocks.
Show the video Gems, Minerals, Crystals & Rocks–What's the Difference? (3:31) and discuss the difference between rocks, minerals, crystals and gems.
Show the video Inside of the Rock under the Microscope (1:04). Pause the video at 0:54 and discuss how the different minerals in the rock can be seen when observed through a microscope.
- Is this a rock, mineral or gem?
- A rock made of several minerals.
- What colours can be seen?
- Pink, gold, clear, brown.
- Are there any minerals in this rock with a metallic lustre (reflects light like a mirror)?
- Yes, some of the yellows and also the pink have a metallic lustre.
- Can you identify a mineral with a glassy lustre?
- The large clear pieces.
- Do we think this rock is made up of one mineral or many different minerals? Why?
- Many, as each different colour is likely to be a different mineral and some of the minerals are metallic, some are glassy and some are dull
Optional: Watch the video Explore Amazing Rocks and Minerals! (stop by 3 minutes). This video explores minerals in a museum and might be useful for students looking for real mineral properties, like lustre.
Optional: If you have been building an Earth table during the course of the sequence, invite students to observe any minerals displayed and categorise them according to colour and lustre.
Pose the questions: How do humans use rocks and minerals? How would your life be different without rocks and minerals?
Grouping minerals
How might minerals be grouped on your Earth table?
Grouping the minerals on your Earth table can be adapted to suit the items available.
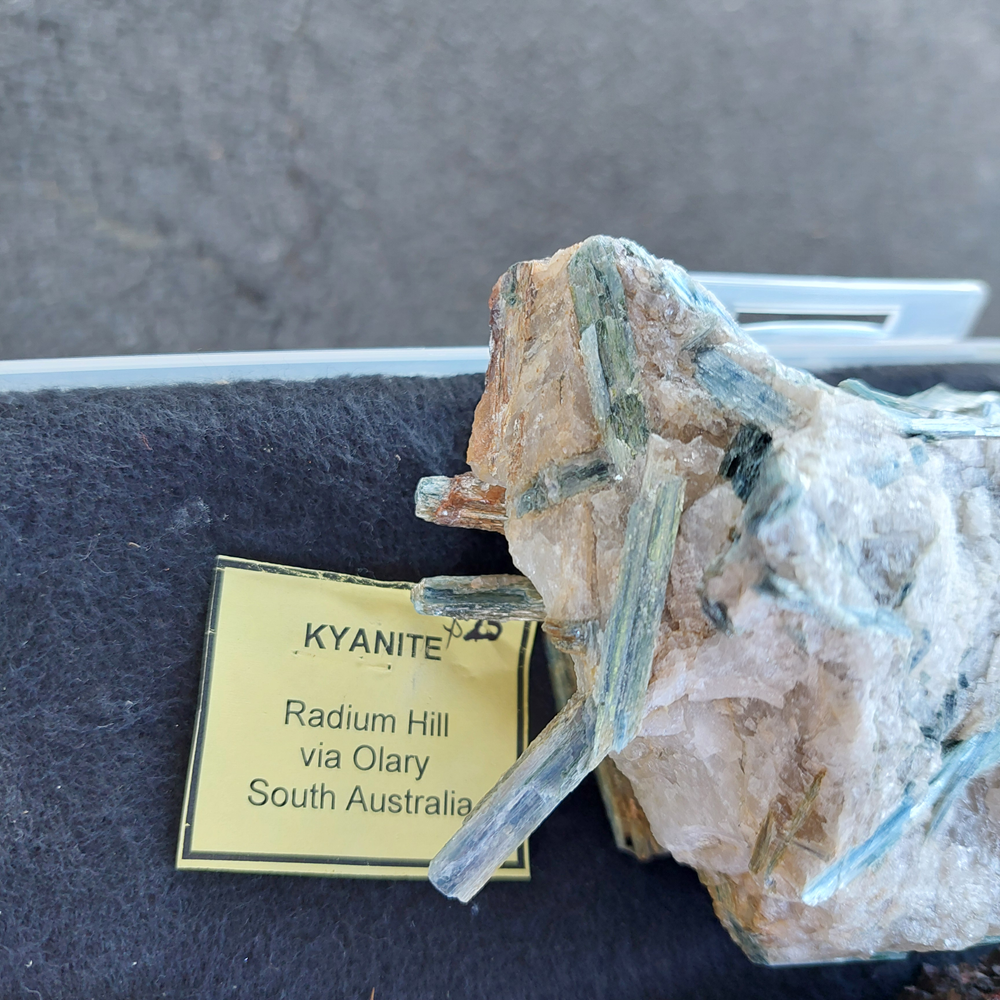
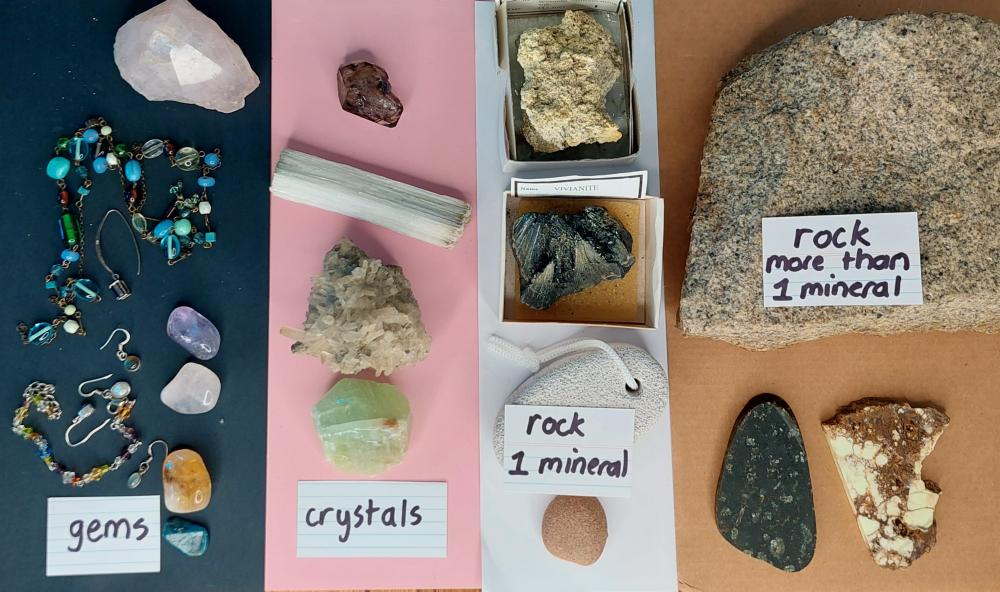
Mineral specimens on the table might include:
- rocks—rocks are made of one or more minerals.
- gems—polished minerals set in jewellery or small collectable pieces.
- natural crystals.
- silica (quartz sand), halite (salt), gold leaf, silver, copper, talc etc.
The focus in this sequence is the observable properties of the minerals. Groupings should be made based on properties students can readily and safely observe. This might include:
- lustre (metallic, glassy, dull).
- mineral specimen type (rock, gem, crystal).
- mineral colour.
Testing and grouping minerals by hardness is not recommended due to the risk of pieces breaking away and damaging eyes or being inhaled. This is particularly risky with unidentified minerals which may be hazardous. For more information see the embedded professional learning Hazardous Materials in Lesson 1.
Grouping the minerals on your Earth table can be adapted to suit the items available.
Mineral specimens on the table might include:
- rocks—rocks are made of one or more minerals.
- gems—polished minerals set in jewellery or small collectable pieces.
- natural crystals.
- silica (quartz sand), halite (salt), gold leaf, silver, copper, talc etc.
The focus in this sequence is the observable properties of the minerals. Groupings should be made based on properties students can readily and safely observe. This might include:
- lustre (metallic, glassy, dull).
- mineral specimen type (rock, gem, crystal).
- mineral colour.
Testing and grouping minerals by hardness is not recommended due to the risk of pieces breaking away and damaging eyes or being inhaled. This is particularly risky with unidentified minerals which may be hazardous. For more information see the embedded professional learning Hazardous Materials in Lesson 1.
The Inquire phase allows students to cycle progressively and with increasing complexity through the key science ideas related to the core concepts. Each Inquire cycle is divided into three teaching and learning routines that allow students to systematically build their knowledge and skills in science and incorporate this into their current understanding of the world.
When designing a teaching sequence, it is important to consider the knowledge and skills that students will need in the final Act phase. Consider what the students already know and identify the steps that need to be taken to reach the level required. How could you facilitate students’ understanding at each step? What investigations could be designed to build the skills at each step?
Read more about using the LIA FrameworkThe Investigate routine provides students with an opportunity to explore the key ideas of science, to plan and conduct an investigation, and to gather and record data. The investigations are designed to systematically develop content knowledge and skills through increasingly complex processes of structured inquiry, guided inquiry and open inquiry approaches. Students are encouraged to process data to identify trends and patterns and link them to the real-world context of the teaching sequence.
When designing a teaching sequence, consider the diagnostic assessment (Launch phase) that identified the alternative conceptions that students held. Are there activities that challenge these ideas and provide openings for discussion? What content knowledge and skills do students need to be able to complete the final (Act phase) task? How could you systematically build these through the investigation routines? Are there opportunities to build students’ understanding and skills in the science inquiry processes through the successive investigations?
Read more about using the LIA FrameworkUsing rocks and minerals
Remind students that minerals can be small, valuable, or difficult to access for investigation. Sometimes, in cases like this, we have to rely on models—like we did with our model rocks—or information that geologists have found out before us in order to learn more. Explain that scientists also do this type of investigating all the time—they use other people's information or test results when they can't do the investigation themselves.
Show the video Using Rocks and Minerals (1:43).
Watch the video again, this time asking students to list 10 keywords or phrases from the video that help us answer our question How do humans use rocks and minerals?
Use the cumulative listing technique to share and rank students’ keywords by frequency:
- Ask one student to share a keyword.
- Other students who also had this keyword raise their hands.
- Record the keyword and note next to the keyword how many students in total identified it. Repeat for as long as appropriate.
Categorise the keywords based on whether they relate to using rocks or minerals.
Repeat the activity with the video In what ways do you interact with minerals in your daily life? (stop the video after the first two minutes). Students might also list actions they notice, such as items containing materials disappearing into the ‘mineral meter’.
Compare the information in the two videos, especially regarding how we use minerals. Also discuss the importance of using multiple sources to cross-check key information when relying on other people’s research and data.
- Do the two videos identify some of the same uses of minerals?
- What different uses do they show?
- Do you think the information in the videos is accurate? Why do you think that?
- Why is it important to look at more than one source of information when you're relying on other people's research and data?
Discuss the different uses of rocks and minerals, and together brainstorm answers to the question How would your life be different without rocks and minerals? Jointly construct a series of sentences or a paragraph to answer the question and record it in the class science journal. Students might also do this in a collaborative team, before sharing their ideas and jointly constructed a shared class understanding.
Cumulative listing
What is cumulative listing and why is it effective?
Cumulative listing is a fast and efficient way to collate responses from a group.
- Following an activity, ask a participant to share one of their ideas.
- Record the idea and ask others with a similar response or those who agree with the response to raise their hands. Record the number of raised hands.
- Move to a second participant and repeat the process.
- Continue until all ideas have been exhausted.
This process allows you to capture broadly similar responses quickly, with a measure of the frequency of that response. You can then undertake a more detailed analysis of common responses through discussion if required.
Some instances where you might use the cumulative listing technique include:
- listing ideas generated from an individual or collaborative brainstorm.
- following an observation and discussion of a science phenomenon.
- after posing a question, to list the generated responses to that question. For example What do we use minerals for?
- Listing students’ ideas or explanations after watching a science demonstration.
This technique was adapted from Murdoch, Kath (1998). Classroom Connections: Strategies for Integrated Learning. Victoria: Eleanor Curtain Publishing.
The Inquire phase allows students to cycle progressively and with increasing complexity through the key science ideas related to the core concepts. Each Inquire cycle is divided into three teaching and learning routines that allow students to systematically build their knowledge and skills in science and incorporate this into their current understanding of the world.
When designing a teaching sequence, it is important to consider the knowledge and skills that students will need in the final Act phase. Consider what the students already know and identify the steps that need to be taken to reach the level required. How could you facilitate students’ understanding at each step? What investigations could be designed to build the skills at each step?
Read more about using the LIA FrameworkFollowing an investigation, the Integrate routine provides time and space for data to be evaluated and insights to be synthesized. It reveals new insights, consolidates and refines representations, generalises context and broadens students’ perspectives. It allows student thinking to become visible and opens formative feedback opportunities. It may also lead to further questions being asked, allowing the Inquire phase to start again.
When designing a teaching sequence, consider the diagnostic assessment that was undertaken during the Launch phase. Consider if alternative conceptions could be used as a jumping off point to discussions. How could students represent their learning in a way that would support formative feedback opportunities? Could small summative assessment occur at different stages in the teaching sequence?
Read more about using the LIA FrameworkWhat have we learned?
Discuss why some rocks are harder than others, referring back to the pet rocks observed in Lesson 4, the scratch test conducted last lesson, and what students have discovered this lesson.
- Why are some rocks harder than others?
- Different rocks are made of different minerals. Some minerals are harder than others and some rock minerals are changed because of heat and pressure.
- Are the rocks in our schoolgrounds hard or soft? How do we know?
- Can you describe the rocks you have seen in other places?
Optional: As a class, use the Who am I? Resource sheet to learn more about everyday minerals by matching mineral names to their description. You could also play this game using a selection of pet rocks from Lesson 4 and descriptions written by students.
Reflect on the lesson
You might:
- review the TWLH chart. Record what students have learned about minerals and answer any questions.
- add to the class word wall vocabulary related to minerals and the properties of colour, lustre (metallic, glassy, dull), and tenacity (shatter, bend, spring back).
- discuss how students were thinking and working like scientists during the lesson. Focus on classifying objects by their observable mineral properties of colour, lustre and tenacity.