Dig deep
View Sequence overviewStudents will:
- scratch test rocks to compare their hardness.
- explore how rocks are used based on the property of hardness.
Students will represent their understanding as they:
- record their observations on the Hard rock Resource sheet.
- order rocks from softest to hardest.
- discuss the different uses for softer rocks and harder rocks.
In this lesson, assessment is formative.
Feedback might focus on:
- students’ rock scratch test. Can they identify that some rocks are harder and dent softer rocks?
- applying understanding. Can students apply their knowledge of rock hardness to explain possible ways to use different rocks?
In this lesson, assessment might also be summative in relation to Science inquiry.
Students working at the achievement standard (science inquiry) should have:
- made predictions and carried out investigations to test their predictions.
- used informal measurement techniques to make observations.
- considered if their investigation was fair.
- compared findings with others.
- drawn conclusions based on observations.
Refer to the Australian Curriculum content links on the Our design decisions tab for further information.
Whole class
Class science journal (digital or hard-copy)
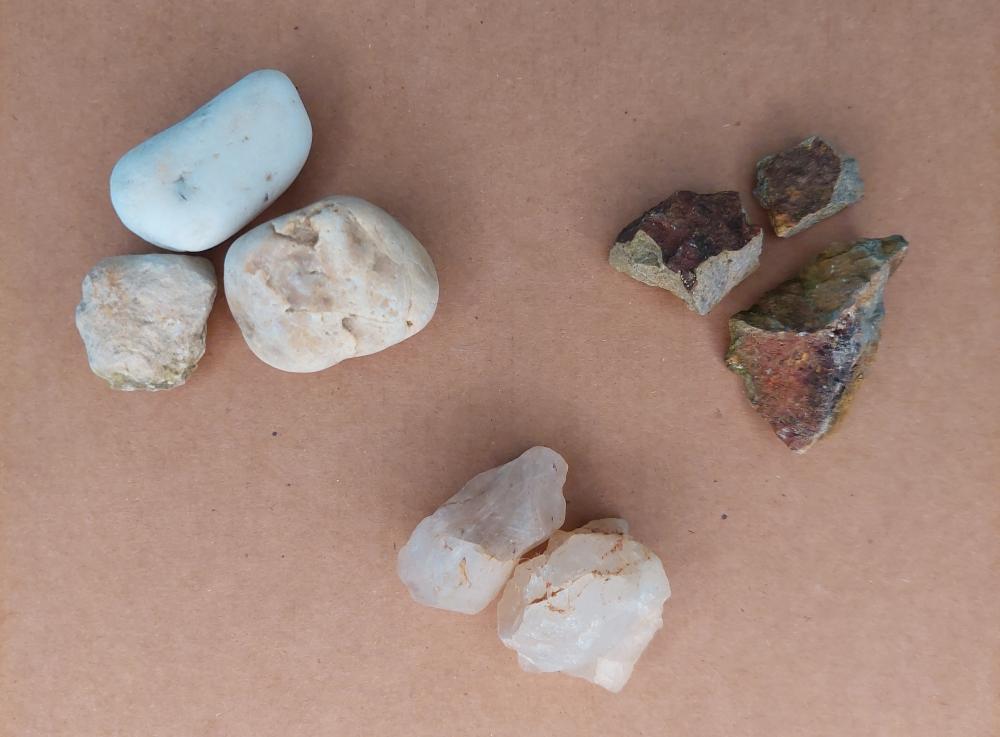
Two different rocks. See Preparing for this sequence for advice on preparing a selection of rocks for the purpose of this lesson.
A variety of rocks on the Earth table or in the school grounds
Optional: Demonstration copy of the Hard rock Resource sheet
Videos about the use and importance of rocks to First Nations people, for example:
- The ancient Aboriginal art and culture of NSW's Sandstone Caves (4:16), about engravings and water wells in sandstone
- Grindstones (1:22)
- Aboriginal blade making with Traditional Resin handle (6:59), about the making of a quartzite blade
- Making ochre at luyni mungalina (3:01)
Each group
At least two different rocks. See Preparing for this sequence for advice on preparing a selection of rocks for the purpose of this lesson.
Optional: Iron nail
Each student
Individual science journal (digital or hard-copy)
Hard rock Resource sheet
Lesson
The Inquire phase allows students to cycle progressively and with increasing complexity through the key science ideas related to the core concepts. Each Inquire cycle is divided into three teaching and learning routines that allow students to systematically build their knowledge and skills in science and incorporate this into their current understanding of the world.
When designing a teaching sequence, it is important to consider the knowledge and skills that students will need in the final Act phase. Consider what the students already know and identify the steps that need to be taken to reach the level required. How could you facilitate students’ understanding at each step? What investigations could be designed to build the skills at each step?
Read more about using the LIA FrameworkRe-orient
Recall the previous lesson, focusing on classifying rocks by observable features.
The Inquire phase allows students to cycle progressively and with increasing complexity through the key science ideas related to the core concepts. Each Inquire cycle is divided into three teaching and learning routines that allow students to systematically build their knowledge and skills in science and incorporate this into their current understanding of the world.
When designing a teaching sequence, it is important to consider the knowledge and skills that students will need in the final Act phase. Consider what the students already know and identify the steps that need to be taken to reach the level required. How could you facilitate students’ understanding at each step? What investigations could be designed to build the skills at each step?
Read more about using the LIA FrameworkIdentifying and constructing questions is the creative driver of the inquiry process. It allows students to explore what they know and how they know it. During the Inquire phase of the LIA Framework, the Question routine allows for past activities to be reviewed and to set the scene for the investigation that students will undertake. The use of effective questioning techniques can influence students’ view and interpretation of upcoming content, open them to exploration and link to their current interests and science capital.
When designing a teaching sequence, it is important to spend some time considering the mindset of students at the start of each Inquire phase. What do you want students to be thinking about, what do they already know and what is the best way for them to approach the task? What might tap into their curiosity?
Read more about using the LIA FrameworkHard rocks
Refer to any questions asked by students in Lesson 1 about:
- rocks.
- strength/hardness of rocks.
- how rocks are used.
Hold up two different rocks and pose the questions: Is one of these rocks harder than the other one? How will we find out?
The Inquire phase allows students to cycle progressively and with increasing complexity through the key science ideas related to the core concepts. Each Inquire cycle is divided into three teaching and learning routines that allow students to systematically build their knowledge and skills in science and incorporate this into their current understanding of the world.
When designing a teaching sequence, it is important to consider the knowledge and skills that students will need in the final Act phase. Consider what the students already know and identify the steps that need to be taken to reach the level required. How could you facilitate students’ understanding at each step? What investigations could be designed to build the skills at each step?
Read more about using the LIA FrameworkThe Investigate routine provides students with an opportunity to explore the key ideas of science, to plan and conduct an investigation, and to gather and record data. The investigations are designed to systematically develop content knowledge and skills through increasingly complex processes of structured inquiry, guided inquiry and open inquiry approaches. Students are encouraged to process data to identify trends and patterns and link them to the real-world context of the teaching sequence.
When designing a teaching sequence, consider the diagnostic assessment (Launch phase) that identified the alternative conceptions that students held. Are there activities that challenge these ideas and provide openings for discussion? What content knowledge and skills do students need to be able to complete the final (Act phase) task? How could you systematically build these through the investigation routines? Are there opportunities to build students’ understanding and skills in the science inquiry processes through the successive investigations?
Read more about using the LIA FrameworkWho scratched who?
Demonstrate a scratch test by scratching the two rocks against each other to determine which is harder. The harder rock will leave a scratch/dent on the softer rock.
Discuss the difference between a dent and dust:
- A harder rock will leave a dent/scratch line in a softer rock.
- If a line of dust appears on one rock, wipe it away to look for a dent/scratch. The dust may have come from the softer rock that was used to try to scratch.
- Dust will come off the softer rock.
Allow students a chance to examine the rocks to predict which rocks will be the hardest (not be scratched), and which will be the softest (can be scratched by all the other rocks). Safety note: This test should be carried out outdoors to mitigate any risk posed by rock dust.
Allow students time to scratch test at least two sets of rocks and record their results on the Hard rock Resource sheet, which include a labelled diagram of the two rocks and a Predict, Reason, Observe, Explain (PROE) chart. Model how to record results using a demonstration copy of the Hard rock Resource sheet if required.
Alternative conceptions—rock hardness
What alternative concepts might students hold about the hardness of rocks?
Students might think that rocks are hard and unchangeable because in their lifetime little natural change is visible. This is reinforced by expressions in everyday language such a ‘hard as a rock’. However, some rocks might crumble easily, for example, sedimentary rocks that are made of sand, shells and pebbles that are poorly cemented/compressed together.
All rocks are susceptible to changes due to weathering; harder rocks tend to weather more slowly. Over the life of planet Earth, its rocks have changed many times.
Adapting to your context
How might you adapt the scratch test to suit your students and context?
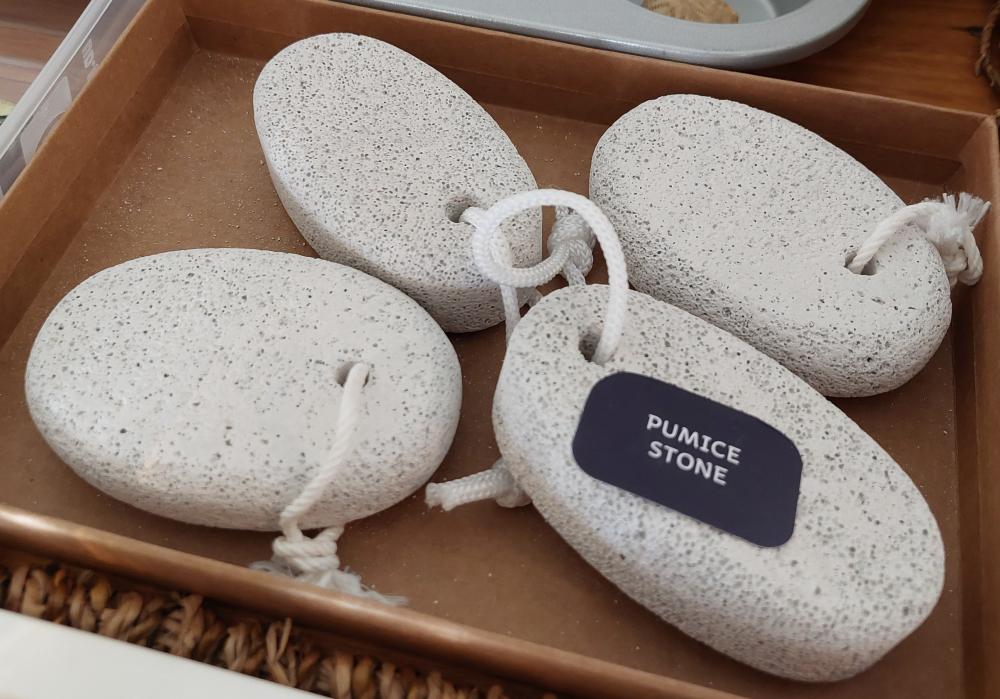
The rock scratch test can be adapted to suit the context and needs of the students in the class. Where local rocks are in limited supply, pumice beauty stones, chunks of rock salt and blackboard chalk (gypsum) can be added to the rock collection. Be mindful that chalk can be an irritant for asthmatics.
The method used to conduct the scratch test can also be adapted when necessary. Below are three examples.
Just rocks
Simply scratching one rock against another (as they do in this lesson) allows students to determine “this rock is harder than that rock.” This can be repeated for multiple rocks, and the rocks are sorted from softest to hardest with some trial and error. This method is suitable for most Year 3 cohorts, and also when:
- field testing in the schoolyard/bushland/backyard.
- equipment is limited.
- there are safety concerns around sharper scratching tools.
Nail scratch
Alternatively, the rocks can all be scratched with an iron nail. If a scratch, line, dent, or dust appears on the rock, the nail is harder than the rock. However if a silver line appears on the rock, this is the iron from the nail being left on the rock, showing that the rock is harder than the nail. This method is suitable when:
- students want to group rocks into two groups (harder than the nail and softer than the nail).
- students can safely use a nail without risk to themselves or others.
Going further
It is not until Year 8 that students are introduced to Moh’s hardness scale, where 10 common minerals are ranked from 1-10 of increasing hardness—diamond being the hardest at 10. In simple terms, Moh’s scale is a ‘who scratches who’ mineral list, and experiments are designed using tools of known hardness. For example, fingernails have a hardness of 2.5 (slightly harder than gypsum) and iron nails have a hardness of 6.5 (harder than feldspar but softer than quartz).
In Year 3 most of the minerals on Moh’s scale will be unknown to students, and it goes beyond the scope of the Year 3 curriculum. We advise you not to introduce students explicitly to Moh’s scale. Instead, Moh’s scale provides us as teachers with the background knowledge to support students through the Double nail scratch test. In this test students first test each rock/mineral by scratching it with a fingernail (hardness 2.5) followed by an iron nail (hardness 6.5). This method is suitable when:
- soft rocks both appear to crumble when scratched against each other.
- extending students’ thinking to consider the hardness property of the equipment when ordering from softest to hardest. For example: pumice (softest), fingernail, rock salt, iron nail, quartz (hardest).
- assisting student to develop their own alternative fair test on the hardness of rocks and/or minerals.
The Inquire phase allows students to cycle progressively and with increasing complexity through the key science ideas related to the core concepts. Each Inquire cycle is divided into three teaching and learning routines that allow students to systematically build their knowledge and skills in science and incorporate this into their current understanding of the world.
When designing a teaching sequence, it is important to consider the knowledge and skills that students will need in the final Act phase. Consider what the students already know and identify the steps that need to be taken to reach the level required. How could you facilitate students’ understanding at each step? What investigations could be designed to build the skills at each step?
Read more about using the LIA FrameworkFollowing an investigation, the Integrate routine provides time and space for data to be evaluated and insights to be synthesized. It reveals new insights, consolidates and refines representations, generalises context and broadens students’ perspectives. It allows student thinking to become visible and opens formative feedback opportunities. It may also lead to further questions being asked, allowing the Inquire phase to start again.
When designing a teaching sequence, consider the diagnostic assessment that was undertaken during the Launch phase. Consider if alternative conceptions could be used as a jumping off point to discussions. How could students represent their learning in a way that would support formative feedback opportunities? Could small summative assessment occur at different stages in the teaching sequence?
Read more about using the LIA FrameworkUseful rocks
Discuss the findings and any challenges faced by students. Guide the discussion with students to reach the consensus understanding that some rocks are harder than others.
- Was it always easy to work out which rock was harder? Why or why not?
- Were there any rocks that were about the same hardness?
- Did the same person do the scratching each time? Why might this make a difference?
- The same person is more likely to use the same pressure each time.
- Did everyone get the same results? Why or why not?
- Do you think this was a fair test? Why or why not?
- How do you think we could make this a fair test?
- Use a robot to apply the same pressure each time.
Allow students time to order the rocks from softest through to hardest, then continue the discussion:
- What can we determine about the hardness of rocks based on our test?
- Some rocks are harder than others.
- What does that tell us about minerals?
- Since rocks are made of different minerals it is reasonable to conclude that some minerals are harder than others.
Explain that the hardness of rocks affects how they are used by First Nations peoples, and discuss how this knowledge applies to the rocks in their own environment. Select and show some videos about the importance of rocks to First Nations people and discuss how the hardness of rocks affects their use. For example, sandstone can be carved for artwork and water wells, whereas quartzite is harder and can be used to make a sharp blade.
Examples of videos to view:
- The ancient Aboriginal art and culture of NSW's Sandstone Caves (4:16)
- Grindstones (1:22)
- Aboriginal blade making with Traditional Resin handle (6:59)
- Making ochre at luyni mungalina (3:01)
As a class, consider the different rocks that were examined in the previous lesson, and discuss what each rock would be suitable for. For example, they might be suitable for:
- engraving into.
- building walls and houses.
- making an axe or blade.
- a habitat for small reptiles to hide amongst.
- carving to make an ornament etc.
- polishing for a kitchen bench.
Provide an opportunity for students to ask more questions about rocks and record these in the class science journal.
Reflect on the lesson
You might:
- review the TWLH chart. Record what students have learned about rock and mineral hardness and answer any questions.
- add to the class word wall vocabulary related to rock and mineral hardness.