'Dig deep' IS ONE OF OUR NEW TEACHING SEQUENCES FOR V9
- On the 'Sequence overview' tab you'll find all the lessons in this sequence and curriculum alignment.
- The 'Our design decisions' tab shows how key scientific ideas develop over the sequence, and shows how the sequence addresses curriculum achievement standards.
- The 'Preparing for this sequence' tab guides you through important information and considerations for this sequence.
- Have you taught this sequence? Use the Feedback button to let us know how it went!
Launch
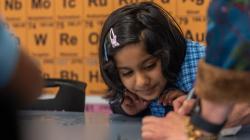
Lesson 1 • Schoolyard exploration
Students participate in a geology quest through the school grounds or local area to find and record the locations of rocks and soil. They collect a sample for further exploration.

Inquire
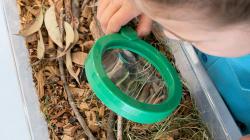
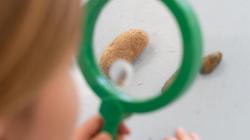
Lesson 2 • Features of soil
Students investigate soil samples to observe what they can see, feel and hear in soil.
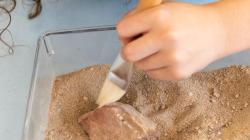
Lesson 3 • Soil profiles
Students measure their settled soil profiles and create a labelled diagram, then determine soil texture using the ribboning technique.

Lesson 4 • Rock sort
Students observe a rock in detail so it can be recognised amongst a collection of other rocks. They sort and classify a collection of rocks then attempt to work out other groups’ classification systems.

Lesson 5 • Scratch test
Students investigate the hardness of rocks with a simple scratch test, then examine how a rock’s hardness determines its use.
Lesson 6 • Minerals in rocks
Students examine rocks, and models of rocks, for minerals, then explore the importance of minerals.
Lesson 7 • Making soil
Students consolidate their knowledge by investigating soil layers (from organic material down to bedrock) and making their own soil.
Act
Lesson 8 • Sustainable design
Students consolidate their learning, using the design thinking process to use or reuse a material that exists because of soil, rocks or minerals.
The Australian Academy of Science supports and encourages broad use of its material. Unless indicated below, copyright material available on this website is licensed under a Creative Commons Attribution-NonCommercial-ShareAlike 4.0 International (CC BY-NC-SA 4.0) licence.
Curriculum and syllabus alignment
Year 3
By the end of Year 3 students describe the observable properties of soils, rocks and minerals and describe their importance as resources. They describe how people use data to develop explanations. They identify solutions that use scientific explanations.
Students pose questions to explore patterns and relationships and make predictions based on observations. They use scaffolds to plan safe investigations and fair tests. They use familiar classroom instruments to make measurements. They organise data and information using provided scaffolds and identify patterns and relationships. They compare their findings with those of others, explain how they kept their investigation fair, identify further questions and draw conclusions. They communicate ideas and findings for an identified purpose, including using scientific vocabulary when appropriate.
Science as a human endeavour
Science understanding
Compare the observable properties of soils, rocks and minerals and investigate why they are important Earth resources
Science inquiry
Pose questions to explore observed patterns and relationships and make predictions based on observations
Use provided scaffolds to plan and conduct investigations to answer questions or test predictions, including identifying the elements of fair tests, and considering the safe use of materials and equipment
Follow procedures to make and record observations, including making formal measurements using familiar scaled instruments and using digital tools as appropriate
Construct and use representations, including tables, simple column graphs and visual or physical models, to organise data and information, show simple relationships and identify patterns
Compare findings with those of others, consider if investigations were fair, identify questions for further investigation and draw conclusions
Write and create texts to communicate findings and ideas for identified purposes and audiences, using scientific vocabulary and digital tools as appropriate
Australian Curriculum content links
| Science understanding core concept: The Earth system comprises dynamic and interdependent systems; interactions between these systems cause continuous change over a range of scales. |
| Sub-strand | Content descriptor | AC code | Achievement standard | How the sequence addresses this content |
|---|---|---|---|---|
| SHE: Nature and development of science | Examine how people use data to develop scientific explanations. | AC9S3H01 | Describe how people use data to develop explanations. | Investigate how soil tests are undertaken in agriculture to monitor and manage the soil profile on farms. (Lesson 3) |
| SHE: Use and influence of science | Consider how people use scientific explanations to meet a need or solve a problem. | AC9S3H02 | Identify solutions that use scientific explanations. | Explore how gardeners and farmers use compost and how composting can help improve soil conditions and plant growth. (Lesson 3) Explore how the hardness of rocks determines their use. (Lesson 5) |
| SU: Earth and Space Sciences | Compare the observable properties of soils, rocks and minerals and investigate why they are important Earth resources. | AC9S3U02 | Describe the observable features of soils, rocks and minerals and describe their importance as resources. | Investigate and describe the observable properties of soils, rocks and minerals and why they are important Earth resources. (Lessons 1-8) |
| SI: Questioning and predicting | Pose questions to explore observed patterns and relationships and make predictions based on observations. | AC9S3I01 | Pose questions to explore patterns and relationships and make predictions based on observations. | Explore and consider the different soil types in the school/local landscape and predict how human behaviour might cause changes to the soil. (Lessons 2 and 3) Predict how different rocks will respond to forces and determine how this affects their use. (Lessons 5 and 6) |
| SI: Planning and conducting | Use provided scaffolds to plan and conduct investigations to answer questions or test predictions, including identifying the elements of fair tests, and considering the safe use of materials and equipment. | AC9S3I02 | Use scaffolds to plan safe investigations and fair tests. | Identify what to change, what to keep the same and what to measure to make a test fair. (Lessons 5) Use a flowchart to investigate soil texture. (Lesson 3) Discuss safety rules to follow when conducting investigations, such as following teacher instructions, manipulating equipment and materials with care and wearing appropriate personal safety gear. (Lessons 1-7) |
| SI: Planning and Conducting | Follow procedures to make and record observations, including making formal measurements using familiar scaled instruments and using digital tools as appropriate. | AC9S3I03 | Use familiar classroom instruments to make measurements. | Collaboratively design a table to record observations of two different composting systems. (Lesson 3) Use appropriate equipment to make and record observations, such as digital cameras, magnifying glasses, and scaled instruments with appropriate increments such as graph paper and rulers. (Lessons 1-7) |
| SI: Processing, modelling and analysing | Construct and use representations, including tables, simple column graphs and visual or physical models, to organise data and information, show simple relationships and identify patterns. | AC9S3I04 | Organise data and information using provided scaffolds and identify patterns and relationships. | Add locations of soil, rocks and minerals to a school map. (Lesson 1, 2 and 8) Use simple tables to represent data and identify patterns. (Lesson 1-7) Create a labelled model to demonstrate the soil layers. (Lesson 7) |
| SI: Evaluating | Compare findings with those of others, consider if investigations were fair, identify questions for further investigation and draw conclusions. | AC9S3I05 | Compare their findings with those of others, explain how they kept their investigation fair, identify further questions and draw conclusions. | Share findings verbally with peers, consider if investigations were fair and identify further questions for investigation.(Lessons 1-7) Participate in a gallery walk with their rock classifications (Lesson 4) and their soil layer models (Lesson 7). Identify further questions for investigation. (Lessons 1-8) |
| SI: Communicating | Write and create texts to communicate findings and ideas for identified purposes and audiences, using scientific vocabulary and digital tools as appropriate. | AC9S3I06 | Communicate ideas and findings for an identified purpose, including using scientific vocabulary when appropriate. | Use scientific terms (such as ‘minerals’, ‘weight’, ‘organic matter’ and ‘lustre’) to describe soil, rocks and minerals. (Lessons 1-7) Create a labelled soil layer model and explain the selection of materials. (Lesson 7) |
Science journals
Create a class science journal, either in hard-copy or digitally. You might:
- use/create a large scrap book or flip chart.
- use poster/butchers’ paper so learning can be displayed in sequence on the wall.
- create a digital journal using your platform/ technology of choice.
- any combination of the above.
Plan for students’ creation of an individual science journal, either in hard-copy or digitally. They might:
- use an exercise book, scrap book or flip chart to record their thinking and gather resource sheets together.
- use a folder to store and collate resource sheets, diagrams, photographs etc.
- use a digital folder to store work samples, images and videos.
- any combination of the above.
See Using a science journal throughout inquiry for more detailed information on the importance of science journals.
General preparation
- Read through the teaching sequence.
- Note any adaptations you would like to make to suit your school’s and students’ context.
- Prepare demonstration copies of Resource sheets as required.
- Read the information below to make further decisions relevant to the teaching of this sequence.
Selecting the prompt for the Act phase
During the Act phase of this sequence, students are given the opportunity to contribute to the sustainability of Earth’s resources by using/reusing a material that exists because of soil, rocks or minerals.
Consider your students’ interests and how they could use their knowledge of soil/rocks/minerals within your local context. The specific student task can be selected by the teacher (see suggestions below) or negotiated with students over the course of the sequence, and should use/reuse a material that was reliant on Earth’s resources (soil, rock or mineral) at some point in its ‘lifecycle’. It should be accompanied by written or diagrammatic representations that emphasise its connection to soil, rocks and/or minerals as important Earth resources.
There are many possibilities, as soil, rocks and minerals are essential to the growth or production of a variety of everyday materials. For example:
- most/all of the food we eat is either directly or indirectly reliant on soil for growth.
- dairy products are reliant on soil to grow the grass or grain that was fed to the cattle.
- electronics such as mobile phones require several minerals or elements including copper, lithium, silica, germanium, bauxite and potassium and even gold.
This is also an excellent opportunity to highlight sustainability and the reuse and repurposing of materials.
Some suggestions, categorised by the Earth resource (soil/rock/mineral) include:
| soil | rocks | minerals |
|---|---|---|
Use clay to make:
Use dried grasses such as Lomandra to weave a:
Use available timber to make a:
Make a:
Plant a:
| Make a:
Create a:
| Design and make a recycling system at school or home for aluminium cans and glass. Plan and run an e-waste recycling blitz to collect and recycle old phones, televisions etc. Use recycled tin cans to make a:
Use baking soda to make:
Use recycled glass jars to make storage jars, vases, mini planters, sensory jars, or ready to make cookie mix. Upcycle tiles or dishes (feldspar is a group of minerals and key ingredient in ceramic tiles and dishes). |
Also consider if you will add some parameters around the design, relating to materials available, design and construction time limits etc. Consider if the creation should adhere to a specific theme related to your school or community context (such as recycling, biodiversity, resident native animal etc.)
Earth table
An Earth table is a table covered in items that have come from the Earth, particularly soil, rock, and mineral samples, and have been collected by students and teachers.
The Earth table is intriguing to many students and something they can all experience success contributing to. It also provides an opportunity for students to share their knowledge and experiences, reinforcing that we value them and their understanding.
Special items (such as mineral samples) may need to be returned to students—a collection of small boxes/tubs/trays can help to keep those items sorted and named while on the table.
As a class, ensure everyone knows which items they are allowed to touch. It may be simpler to only permit items onto the table that can be touched by everyone, to encourage free exploration.
Soil versus dirt—collecting samples for Lesson 1
Whilst dirt is a component of soil, dirt and soil are not the same. Soil is living, whereas dirt does not contain any living components. When looking for a sample of dirt, look for an area that is usually lighter brown in colour, that may contain rocks, but is typically devoid of organic matter such as decaying roots, leaves and wood as well as any animal life. Soil will be dark brown in colour, and contain organic matter and living creatures.
Collecting soil samples for Lessons 2 and 3
If collecting soil samples from a natural area, consider taking samples from different locations to increase the likelihood of finding different soil types.
Also, consider potential detrimental environmental impacts of removing too much soil from any one location, including exposing roots, increasing erosion, and harming animal habitats.
Collecting a bucket or tub of soil from each location to keep for the duration of the sequence should be sufficient. You will need enough soil to allow for 2-3 cups per team, plus extra for demonstration purposes.
Potting mix might also be used as a source of soil.
Safety considerations for soil/potting mix
Soil, mulch, compost and bagged potting mix are living products and can contain microbes, both helpful and potentially harmful. Of particular concern is Legionella bacteria.
It is important that any bagged product is opened and poured out in well-ventilated spaces, away from students. Open bags slowly with a pair of scissors, and away from the direction of your face.
Teachers and students should wear a mask and gloves when handling soil, mulch, compost and potting mixes. You should always wash your hands carefully after touching soil, particularly before eating and drinking.
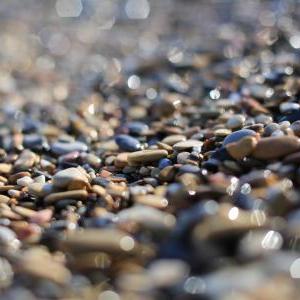
Curating a collection of rocks for Lessons 4 and 5
Rocks can be sourced in many places, including the school grounds, local parks, bush reserves, or riverbeds. However, care should be taken not to remove too many rocks from any one location. You should also check local restrictions and permissions around removing natural resources from a location, as this is restricted or forbidden in some places. Landscape supply stores or local stone masons may be able to supply schools with excess or off-cuts for no (or a nominal) fee.
It is best to source rocks that have 'fresh' surfaces, i.e. natural surfaces that have not been weathered or polished. This will enable students to see what the rock is made of (if grains are large enough to be visible), and any sparkly crystals in the rock, such as in granite, will show up better.
Gather a selection of rocks for students to pick out their 'pet rock' for the investigation described in Lesson 4. Try to avoid having too many rocks of a similar size, shape, and colour. This might make it difficult for students to pick their 'pet rock' from the collection, and lead to disinterest and disengagement.
In Lesson 4 you will also need enough rocks to supply approximately 6-10 to each team, to group according to their characteristics. You might reuse the rocks collected for the pet rock activity, and add more rocks with some similar characteristics such as size, shape and colour so that students can place multiple rocks into the same group.
Safety considerations when working with rocks
Rocks may contain naturally occurring elements such as asbestos, mercury, arsenic, lead etc. that can lead to serious health complication if they are inhaled or come into contact with the skin.
In this sequence this risk is mitigated by providing whole rocks for students to examine, and not engaging in activities where rocks are 'broken open'. See the embedded professional learning on Hazardous materials in Lesson 1 of this sequence for further information.
In Lesson 5 students undertake a 'scratch test' to determine the hardness of rocks. This single scratch will not raise a significant amount of dust from the rocks. To mitigate this risk further the testing should be carried out outdoors or in a well-ventilated area.
Rocks collected from the school grounds should be fine to undergo scratch testing, as most school sites will have undergone site and material testing to ensure safety. If sourcing rocks from the local area, take care to consider the likelihood of its safety. If sourcing rocks from landscaping supply companies or similar, make sure to find out the type of rocks being supplied.
Rock salt, pumice or chalkboard chalk can be used as a rock if locally available rocks are limited (pumice is a light volcanic rock commonly used as a body exfoliator and modern chalk is made from gypsum).
See the embedded professional learning Adapting to your context in Lesson 5 for further information on rock selection.
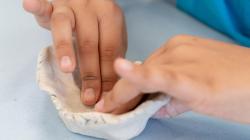
Preparing a model rock for analysis
In Lesson 6 teams will need a model rock to investigate. They will break apart their rock and separate the 'components' found inside, as a stand-in for examining minerals contained in rock. Rock and mineral mining dig kits can be purchased for this purpose, or you can create your own model rocks easily.
Make a homemade playdough such as the one in the recipe below, then mix through items to represent minerals such as paper confetti, small coloured beads, grains of rice etc. Mould the playdough into rock sizes and shapes and allow them to air-dry in the sun. Take care that they don't dry out so much that students can’t break them apart.
Using items of different colours and lustres (whether they appear dull, metallic, glassy) will replicate minerals more closely.
Alternatively food items such as cookies, rock cakes, scones etc. can be used to represent rocks, with the items inside like chocolate chip, sultanas, glace cherries etc. representing minerals.
Recipe for homemade playdough
2 tbs cooking oil
4 tbs cream of tartar
2 cups plain flour
Food colouring
2 cups cold water
(Stove top) Mix all ingredients in a saucepan and stir continuously over medium heat for 3-5 minutes, until the mixture is combined and not sticky. Allow to cool. Knead until smooth.
(Microwave) Mix all ingredients in a large microwave-safe bowl. Microwave for 2 minutes. Stir well. Microwave for 1 minute 30 seconds. Stir well. Microwave for 30 seconds. The mixture should be combined and not sticky. Allow to cool. Knead until smooth.
Allergy and hygiene information if using food to represent rocks
If using food as a model of a rock in Lesson 6 of the sequence, consider the allergy requirements of students in your class, particularly those students allergic to nuts, dairy, and eggs (which are commonly present in baked goods). Making playdough rocks might be necessary in these instances.
The materials required for each lesson are listed on the lesson's page. For the full sequence resource list, download the Preparing to teach this sequence document below.

'Dig deep' IS ONE OF OUR NEW TEACHING SEQUENCES FOR V9
- On the 'Sequence overview' tab you'll find all the lessons in this sequence and curriculum alignment.
- The 'Our design decisions' tab shows how key scientific ideas develop over the sequence, and shows how the sequence addresses curriculum achievement standards.
- The 'Preparing for this sequence' tab guides you through important information and considerations for this sequence.
- Have you taught this sequence? Use the Feedback button to let us know how it went!