Packaging pioneers
View Sequence overviewStudents will:
- recall what they already know about materials and their properties.
- classify materials used to package their own lunches.
- consider why foods are packaged in different materials.
Students will represent their understanding as they:
- participate in a class discussion about materials.
- record the materials used to package their own lunches in a table, identifying the properties of each material.
In the Launch phase, assessment is diagnostic.
Take note of:
- students’ ideas about materials and where the materials come from.
- Can students confidently identify the materials used to make objects? Can they explain which properties make each material useful?
- the vocabulary students used to describe the properties of different materials.
Whole class
Class science journal (digital or hard-copy)
Demonstration copy of the Frayer Model brainstorming technique Resource sheet
Demonstration copy of the Unpacking our lunchboxes Resource sheet
Demonstration copy of the Same food, different packaging Resource sheet
Each group
Optional: A variety of food packaging and storage containers to examine (if students cannot examine the contents of their own lunchboxes)
Optional: Magnifying glasses to look more closely at materials
Each student
Individual science journal
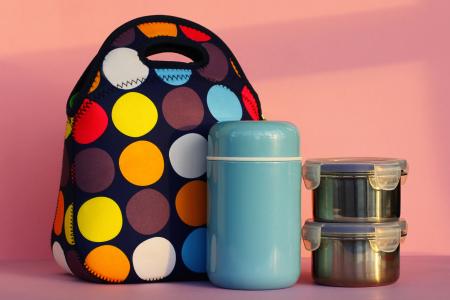
Their lunchbox, snack box, water bottle, or other food container, containing a variety of food and packaging. It is best to complete Step 1 of this lesson in the morning, when students’ lunchboxes are still full and will contain the most variety.
Unpacking our lunchboxes Resource sheet
Lesson
The Launch phase is designed to increase the science capital in a classroom by asking questions that elicit and explore students’ experiences. It uses local and global contexts and real-world phenomena that inspire students to recognise and explore the science behind objects, events and phenomena that occur in the material world. It encourages students to ask questions, investigate concepts, and engage with the Core Concepts that anchor each unit.
The Launch phase is divided into four routines that:
- ensure students experience the science for themselves and empathise with people who experience the problems science seeks to solve (Experience and empathise)
- anchor the teaching sequence with the key ideas and core science concepts (Anchor)
- elicit students’ prior understanding (Elicit)
- and connect with the students’ lives, languages and interests (Connect).
Students arrive in the classroom with a variety of scientific experiences. This routine provides an opportunity to plan for a common shared experience for all students. The Experience may involve games, role-play, local excursions or yarning with people in the local community. This routine can involve a chance to Empathise with the people who experience the problems science seeks to solve.
When designing a teaching sequence, consider what experiences will be relevant to your students. Is there a location for an excursion, or people to talk to as part of an incursion? Are there local people in the community who might be able to talk about what they are doing? How could you set up your classroom to broaden the students’ thinking about the core science ideas? How could you provide a common experience that will provide a talking point throughout the sequence?
Read more about using the LIA FrameworkThe Elicit routine provides opportunities to identify students’ prior experiences, existing science capital and potential alternative conceptions related to the Core concepts. The diagnostic assessment allows teachers to support their students to build connections between what they already know and the teaching and learning that occurs during the Inquire cycle.
When designing a teaching sequence, consider when and where students may have been exposed to the core concepts and key ideas in the past. Imagine how a situation would have looked without any prior knowledge. What ideas and thoughts might students have used to explain the situation or phenomenon? What alternative conceptions might your students hold? How will you identify these?
The Deep connected learning in the ‘Pedagogical Toolbox: Deep connected learning’ provides a set of tools to identify common alternative conceptions to aid teachers during this routine.
Read more about using the LIA FrameworkWhat’s in the (lunch)box?
In this activity students will unpack a lunchbox to examine the packaging materials contained within.
Before the unpacking
Using the Frayer Model (see the embedded professional learning The Frayer Model technique below), students consider what they know and understand about the terms ‘material’ and ‘packaging’. Remind them that it is acceptable to have multiple definitions/usages for the terms. The Frayer Model brainstorming technique Resource sheet is available to use if required.
Share students’ ideas and create a shared class understanding of what ‘material’ means in a scientific context: any substance that an object is made from. Record this shared definition in the class science journal.
During the discussion, note the difference between the common everyday use of ‘material’ (often used to refer to fabric, for example) and the scientific use. Also note the importance of differentiating between an object and the material it is made of, such as windows/glass or spoon/metal (or plastic or wood). Refer to specific examples where this might be confusing, for example a ‘drinking glass’ might be called a glass, and can be made of glass, but might also be made of plastic.
Share students’ ideas and create a shared class understanding of what ‘packaging’ means in the context of this sequence (materials used to wrap or protect goods during transport and storage). Record this definition in the class science journal.
List common packaging materials that students already know (e.g. metal, wood, plastic, glass, fabric, paper). Ask students if they know how any of these packaging materials are made, how the materials are used/what they are used to make, and where students would expect to find the materials around the classroom/school.
NOTE: The purpose of this question is to ascertain students’ prior knowledge (if any) about natural and processed materials. It is only necessary to gauge students’ initial ideas here. Students may have some knowledge of how, for example, trees are used to make paper, or that metal is melted and shaped to make other products, however this has not yet appeared in the curriculum, so they may not.
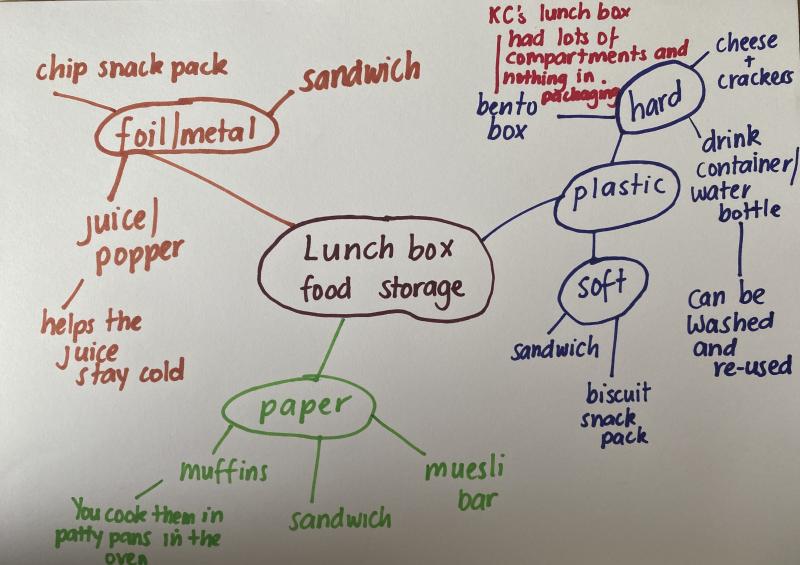
During the unpacking
In collaborative teams, students unpack each of their lunchboxes to examine how the food inside is packaged and/or stored, including the lunchbox itself, any drink containers, and any methods of keeping the lunch cool or warm.
Using the data table found on the Unpacking your lunchbox Resource sheet, students record the names of each food item, list the material/s the item is packaged in, describe the properties of the materials, and consider if the properties were suitable for this purpose.
Model how to complete this table using an example item if appropriate for your students.
After the hunt
Share and discuss what students found. Record students’ observations in the class science journal in an appropriate manner. See the table below for one example.
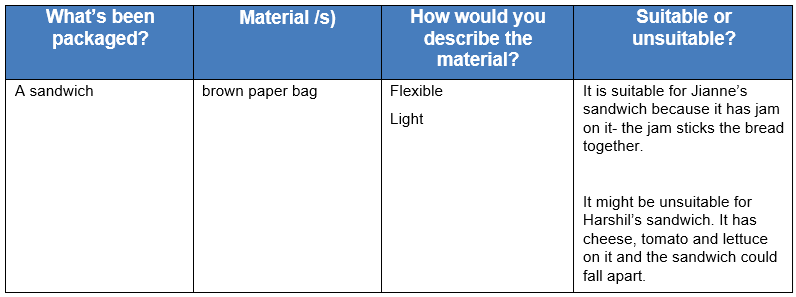
- What packaging materials did you find? What were they being used for?
- Did any food items use the same type of packaging?
- How would you describe the colour, weight, size, strength etc. of the packaging? Is it easy open, can it be re-used etc.?
- Could you describe one type of packaging in the same way as another?
- For example, glass and plastic can both be see-through.
- Which packaging materials were made from more than one type of material?
- For example, a jar is made of glass with a plastic or metal lid.
- How did you describe the materials?
- Students might describe appearance (colour, shape, size) or the materials’ structural properties (hard, soft, strong, stiff, bendy/flexible) etc. You might consider how you record this information, but it is all important and will be explored later in the sequence.
- Students might use more informal terms to describe materials, such as ‘bendy’, ‘can be scrunched’, ‘clear’, ‘doesn’t let water through’ etc. This is acceptable at this phase of the sequence. The specific term ‘properties’ and more formal language will be introduced as the unit progresses. Students may have already been introduced to the term ‘properties’ in Year 2, and it is acceptable to use this terminology with students if they offer it first.
- Could you describe a material in more than one way?
- For example, cling wrap can be described as ‘bendy, clear and doesn’t leak’, or ‘flexible, transparent and waterproof’.
- For example, cling wrap can be described as ‘bendy, clear and doesn’t leak’, or ‘flexible, transparent and waterproof’.
Core concepts and key ideas
Where does this sequence fit into the larger picture of science and the science curriculum?
When planning for teaching in your classroom, it can be useful to see where a sequence fits into the larger picture of science. This unit is anchored to the Science understanding core concepts for Chemical sciences.
- The chemical and physical properties of substances are determined by their structure at a range of scales.
In Year 4, this involves examining the properties of natural and man-made materials including fibres, metals, glass and plastics and consider how these properties influence their use.
This core concept is linked to the key science ideas:
- the observable form of non-living things can change over time as a result of energy and forces. (Form and function)
- similarities and differences can be used to sort and classify objects and events. (Patterns, order, and organisation)
- components and their interactions can be described. (Systems)
- standard units of measurement are used and can enable comparisons to be made. (Scale and measurement)
When your students next progress through this core concept, they will explain the observable properties of solids, liquids and gases by modelling the motion and arrangement of particles (Year 5).
Adapting to your context
What if students don’t have a lunchbox to unpack?
In this activity lunchboxes are used as easily accessible sources of foodstuffs packaged in different ways and materials.
It is the variety of food packaging and storage materials that is important to the activity.
Providing food packages and storage containers (or even images of these) for students to examine will suffice.
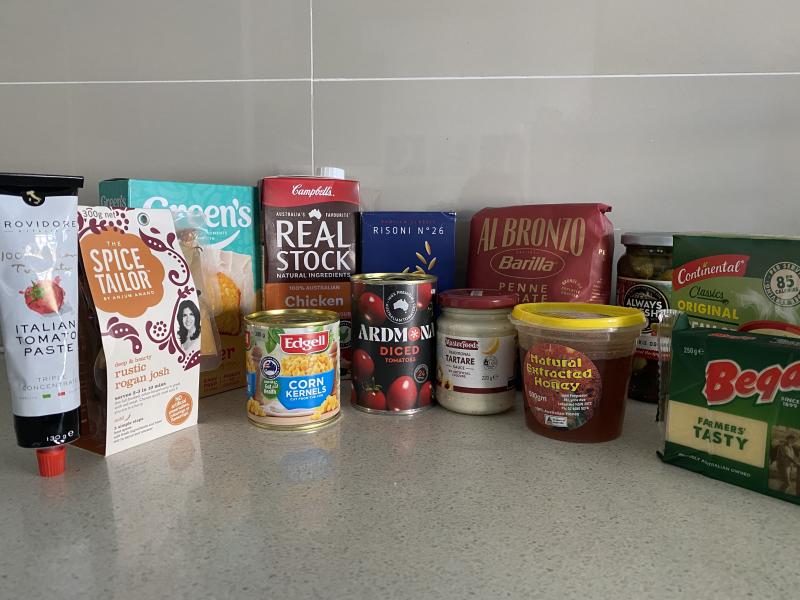
You might gather a collection of pantry staples such as canned goods, pasta, rice etc., as well as food storage containers for students to examine on a rotational basis. Consider how you might show that items that are the same/similar can be packaged in different ways, for example dry pasta packaged in plastic and cardboard, or drinks stored in cardboard cartons and plastic bottles.
Alternatively, students might simply examine the packaging materials of items commonly found in the classroom, such as stationery items and maths/science equipment.
In this activity lunchboxes are used as easily accessible sources of foodstuffs packaged in different ways and materials.
It is the variety of food packaging and storage materials that is important to the activity.
Providing food packages and storage containers (or even images of these) for students to examine will suffice.
You might gather a collection of pantry staples such as canned goods, pasta, rice etc., as well as food storage containers for students to examine on a rotational basis. Consider how you might show that items that are the same/similar can be packaged in different ways, for example dry pasta packaged in plastic and cardboard, or drinks stored in cardboard cartons and plastic bottles.
Alternatively, students might simply examine the packaging materials of items commonly found in the classroom, such as stationery items and maths/science equipment.
Vocabulary usage
What vocabulary may cause confusion for students during this sequence?
Taking account of students’ existing ideas is important in planning effective teaching approaches which help students learn science. Students develop their own ideas during their experiences in everyday life and might hold more than one idea about an event or phenomenon.
Students might know a range of meanings for the term ‘material’ (such as fabric or written information) and for the term ‘property’ (such as land, real estate or possessions). This is addressed directly in the sequence by providing opportunities for students to identify all of the potential definitions of these terms, and determining which definitions are suitable for this scientific context.
In this sequence the term ‘material’ refers to what an object is made of, and ‘properties’ are qualities or attributes. Many students might be unaware that the properties of a material determine how useful it is for particular purposes. For instance, students might accept that rubber is commonly used in the soles of shoes without considering the properties which make them suitable for wear including flexibility and durability.
This sequence addresses this idea by highlighting the properties of common materials and making connections between these properties and the manner in which the material is used.
The Frayer Model technique
What is the Frayer Model and how/why should you use it?
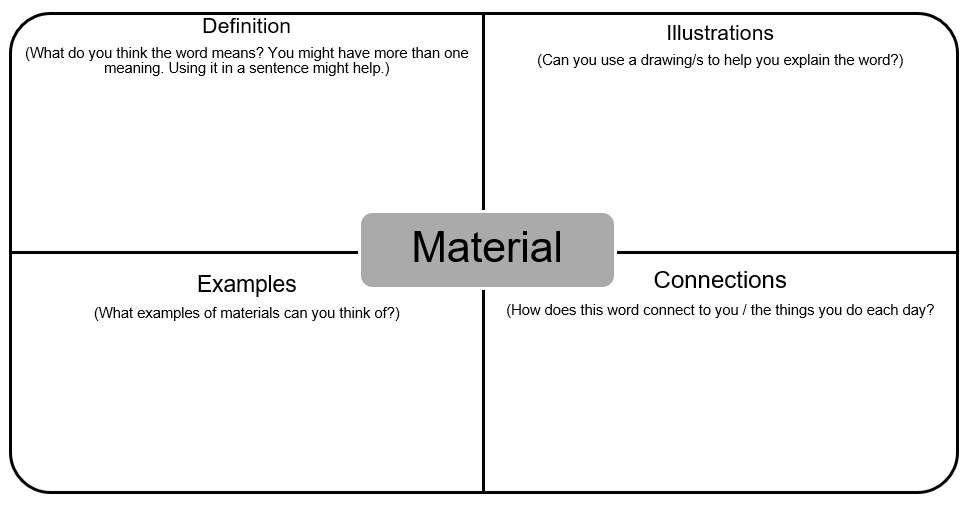
Research identifies the importance of explicitly teaching new vocabulary and its meaning, creating opportunities for repeated engagement and use over time (Nunes, et al. 2017). In this case, the term ‘material’ is likely not new to students, but the focus on its scientific definition in this sequence may be.
By using the Frayer Model technique, students have an opportunity to consider all the ways in which they are familiar with and commonly use the term ‘material’, before focusing on the specific scientific definition required by the topic.
The Frayer Model may support students to:
- develop understanding of key scientific concepts and vocabulary.
- retrieve prior knowledge to make connections among concepts.
- make connections to everyday life.
- build a word wall for quick reference of word meanings.
Below is an outline of how to undertake the Frayer Model technique.
1. Identify science-specific vocabulary
Pre-select key vocabulary you would like students to explore. Each student requires their own copy of the Frayer Model template for each word they are defining.
2. Model the process
Explain each section of the template—definition, illustrations, examples and connections. Consider modelling how to complete each section with a different term, particularly if student have never used the technique before.
The technique is accessible for all students as it allows them to focus on the section in which they feel most comfortable.
3. Work independently, then in teams
Each student should work independently in the first instance to support retrieval practice, before sharing and comparing their ideas in groups. Ideas and definitions are then shared as a class.
4. Begin/add to the word wall
Acknowledge all potential definitions and usages of a term before identifying the science-specific definition. Include the scientific definition on the class word wall or glossary.
References
Nunes, T., Bryant, P., Strand, S., Hillier, J., Barros, R. and Miller-Friedmann, J. (2017) ‘Review of SES and Science Learning in Formal Educational Settings’, London: Education Endowment Foundation and Royal Society: <https://royalsociety.org/~/media/policy/topics/education-skills/ education-research/evidence-review-eef-royalsociety-22-09-2017. pdf?la=en-GB>
Henrichs, L. F. and Leseman, P. P. M. (2014) ‘Early Science Instruction and Academic Language Development Can Go Hand in Hand: The Promising Effects of a Low-Intensity Teacher-Focused Intervention’, International Journal of Science Education, 36 (17), pp. 2978–995;
EEF (2021) Teaching and Learning Toolkit: Oral Language Interventions, London: Education Endowment Foundation.
The Launch phase is designed to increase the science capital in a classroom by asking questions that elicit and explore students’ experiences. It uses local and global contexts and real-world phenomena that inspire students to recognise and explore the science behind objects, events and phenomena that occur in the material world. It encourages students to ask questions, investigate concepts, and engage with the Core Concepts that anchor each unit.
The Launch phase is divided into four routines that:
- ensure students experience the science for themselves and empathise with people who experience the problems science seeks to solve (Experience and empathise)
- anchor the teaching sequence with the key ideas and core science concepts (Anchor)
- elicit students’ prior understanding (Elicit)
- and connect with the students’ lives, languages and interests (Connect).
Science education consists of a series of key ideas and core concepts that can explain objects, events and phenomena, and link them to the experiences encountered by students in their lives. The purpose of the Anchor routine is to identify the key ideas and concepts in a way that builds and deepens students’ understanding. During the Launch phase, the Anchor routine provides a lens through which to view the classroom context, and a way to frame the key knowledge and skills students will be learning.
When designing a teaching sequence, consider the core concepts and key ideas that are relevant. Break these into small bite-sized pieces that are relevant to the age and stage of your students. Consider possible alternative concepts that students might hold. How could you provide activities or ask questions that will allow students to consider what they know?
Why is it packaged like that?
Using the Same food, different packaging Resource sheet, separately examine each of the images that show a food item in different ways—in this example, pasta is shown in uncooked form, cooked and served hot, and cooked and served cold.
First, identify the different states of the food item, and what is different about them. Note what the foods are packaged in and ask students to share their ideas about why they are packaged in this way. Ask students to consider what might happen if we switched the ‘packaging’ around, for example, we put the cooked, hot spaghetti bolognaise in a thin, clear plastic bag.
- What is the food item?
- Is it ‘raw’ or cooked?
- What material is it packaged in?
- Does it always come packaged in that material?
- If you wanted to bring it to school for lunch, how would you store and transport it?
After examining all three images, discuss what could happen if you swapped the packaging for something else.
- What would happen if I put the uncooked pasta into a paper bag to store it? Why do you think that?
- What about the cooked spaghetti that you eat hot? Could you store that in a paper bag? Why/why not?
- Why do you think the hot spaghetti has been stored in a foil tray?
- What about pasta salad? What material would be best to store that in?
Refer back to the lunchbox ‘unpacking’. Consider how foods were stored in lunchboxes, why they were stored this way, and what other suitable and unsuitable ways they could be packaged/stored. Record students’ ideas on a mind map.
Optional: Discuss different materials/methods to serve and store food at home.
Optional: Explore the methods used by First Nations peoples to ‘package’ food for storage and transportation. Discuss the materials used, why they would have been used, and the differences in how we package things today. For example, look at this wallaby skin water carrier, and this dilly bag.
Aboriginal and Torres Strait Islander Histories and Cultures
How can you explore the different ways First Nations peoples selected and used materials?
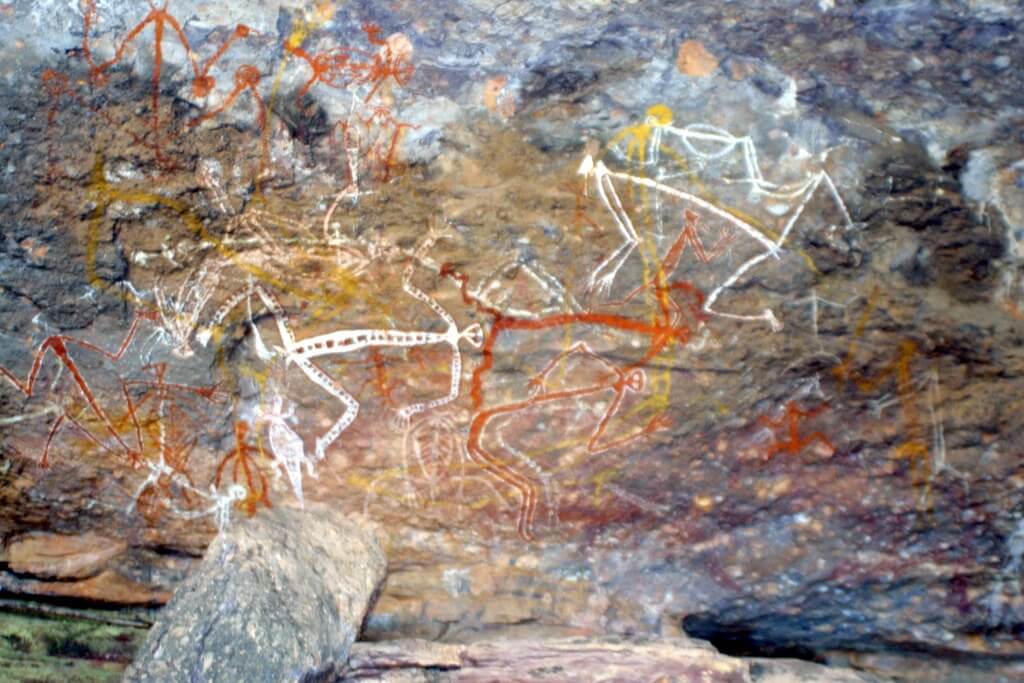
Aboriginal and Torres Strait Islander Peoples sustainably utilised natural resources from the land to make tools, weapons, food, shelter, and clothing.
With over 500 distinct Nations, the materials selected and used would have varied depending upon the specific geographical location. Each Nation had a deep knowledge of the physical properties of wood, bark, plants, stone, animal skins, shells, etc. that were available to them.
Materials were selected based on their characteristics such as strength, flexibility, and durability, and are often processed to enhance these properties for specific uses, such as steam bending wood for tool-making or shelter construction.
Examples include different types of wood being chosen to make fishing spears or hunting tools. Flexible, buoyant woods are chosen for fishing while denser woods are used for hunting larger game. Plant fibres are used to make string, clothing, and nets, with some fibres being processed through steaming or twisting to increase strength. Rock materials are also carefully selected for tools, such as grindstones and spearheads, using knowledge of the rock’s absorbency, sharpness, and density.
The way that Aboriginal and Torres Strait Islander Peoples used the resources available illustrates a sophisticated understanding of material science and continues to influence their cultural practices today.
This is an opportunity to deepen your school's connections with the local Aboriginal and Torres Strait Islander community. Listen and learn on Country about the way local materials are used. Alternatively, consider how you might connect with resources that enable you to explore the First Nations History and Culture of your local area.
The Launch phase is designed to increase the science capital in a classroom by asking questions that elicit and explore students’ experiences. It uses local and global contexts and real-world phenomena that inspire students to recognise and explore the science behind objects, events and phenomena that occur in the material world. It encourages students to ask questions, investigate concepts, and engage with the Core Concepts that anchor each unit.
The Launch phase is divided into four routines that:
- ensure students experience the science for themselves and empathise with people who experience the problems science seeks to solve (Experience and empathise)
- anchor the teaching sequence with the key ideas and core science concepts (Anchor)
- elicit students’ prior understanding (Elicit)
- and connect with the students’ lives, languages and interests (Connect).
Each student comes to the classroom with experiences made up from science-related knowledge, attitudes, experiences and resources in their life. The Connect routine is designed to tap into these experiences and that of their wider community. It is also an opportunity to yarn with community leaders (where appropriate) to gain an understanding of the student’s lives, languages and interests. In the Launch phase, this routine identifies and uses the science capital of students as the foundation of the teaching sequence so students can appreciate the relevance of their learning and its potential impact on future decisions. In short, this routine moves beyond scientific literacy and increases the science capital in the classroom and science identity of the students.
When planning a teaching sequence, take an interest in the lives of your students. What are their hobbies, how do they travel to and from school? What might have happened in the lives of your students (i.e. blackouts) that might be relevant to your next teaching sequence? What context might be of interest to your students?
Read more about using the LIA FrameworkApplying to design
Explain that, during this sequence, students will examine the different ways food is packaged and stored, and conduct investigations to determine why certain materials are used and not others.
At the end of the sequence, students will design their own food packaging solution so that all different types of food—wet, dry, cold, and hot—can be transported and stored for a specific purpose. You should select a purpose relevant to your students and context. For example: transporting and storing student lunches, food for a school event such as a fete or cultural day, sports carnival, or a picnic.
Optional: Examine a selection of students’ or other lunchboxes/food storage containers, and list what students think about the way they are designed and what they are made from.
Jointly construct a list of foods (of all cultures) that all students might bring to school. Encourage students to suggest some criteria/properties their containers will need to transport the different types of food, for example, washable, sustainable, light, easy to carry, waterproof, etc.
The Launch phase is designed to increase the science capital in a classroom by asking questions that elicit and explore students’ experiences. It uses local and global contexts and real-world phenomena that inspire students to recognise and explore the science behind objects, events and phenomena that occur in the material world. It encourages students to ask questions, investigate concepts, and engage with the Core Concepts that anchor each unit.
The Launch phase is divided into four routines that:
- ensure students experience the science for themselves and empathise with people who experience the problems science seeks to solve (Experience and empathise)
- anchor the teaching sequence with the key ideas and core science concepts (Anchor)
- elicit students’ prior understanding (Elicit)
- and connect with the students’ lives, languages and interests (Connect).
Identifying and constructing questions is the creative driver of the inquiry process. It allows students to explore what they know and how they know it. During the Inquire phase of the LIA Framework, the Question routine allows for past activities to be reviewed and to set the scene for the investigation that students will undertake. The use of effective questioning techniques can influence students’ view and interpretation of upcoming content, open them to exploration and link to their current interests and science capital.
When designing a teaching sequence, it is important to spend some time considering the mindset of students at the start of each Inquire phase. What do you want students to be thinking about, what do they already know and what is the best way for them to approach the task? What might tap into their curiosity?
Read more about using the LIA FrameworkWhat do we want to know?
Use the Question Formulation Technique to brainstorm questions students have about packaging materials, the design task etc.
Reflect on the lesson
You might:
- begin a class word wall or glossary with relevant terms.
- begin a class TWLH chart.