Wear on Earth
View Sequence overviewStudents will:
- follow procedures to investigate the physical weathering of rocks.
- use models to represent changes that occur over long time scales and in large environments.
- observe and explain how weathering causes river rocks to become rounded and smooth.
Students will represent their understanding as they:
- contribute to discussion to explain physical weathering observations.
- explain the science of physical weathering of rocks.
In this lesson, assessment is formative.
Feedback might focus on:
- students’ identification that physical weathering (including abrasion) breaks rocks into smaller pieces. Are they able to identify that scraping and shaking the rocks are both breaking the rocks and therefor both physical weathering processes?
- students’ explanation of physical weathering in rivers. Can they explain how physical weathering rounds the shape of river rocks by slowly breaking away sharp edges?
Whole class
Class science journal (digital or hard-copy)
2 small rocks that are easy to hold
Demonstration copy of the Scrape it, shake it Resource sheet
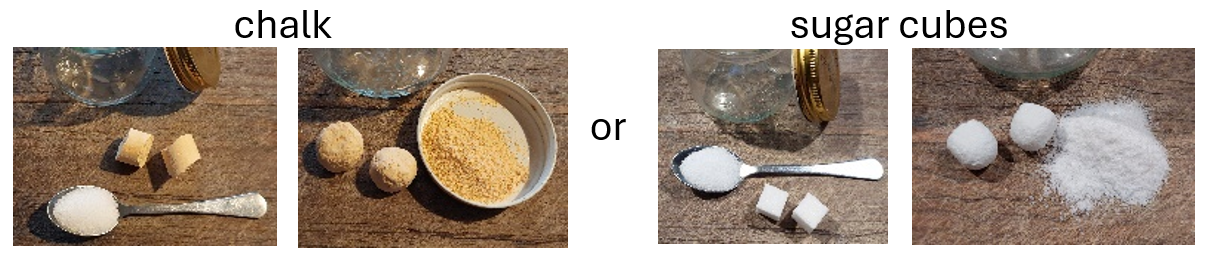
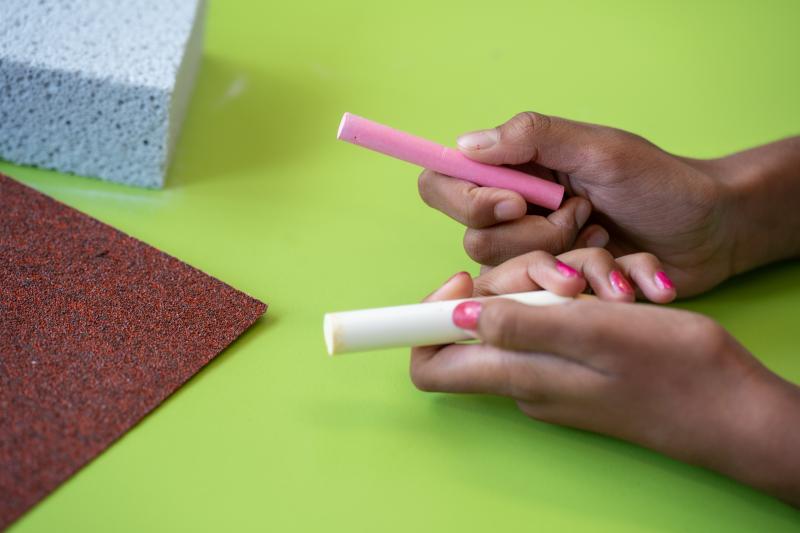
Chalk or sugar cubes
Small piece of sandpaper (coarse grit)
Glass jar with a lid
1 teaspoon of salt
Optional video: Tumbling rocks (0:57)
Each group
3 x chalk pieces or sugar cubes
1 x small piece of sandpaper (coarse grit)
1 x jar with lid
1 teaspoon of salt
Timing device (alternatively you can use a single timer for the whole class, asking all teams to start and stop scraping/shaking at the same time)
Damp paper towel to clean up chalk dust/sugar
Each student
Individual science journal (digital or hard-copy)
Scrape it, shake it Resource sheet
Optional: dust mask
Lesson
Re-orient
Review the meaning of the term ‘weathering’, the changes to London Bridge Arch rock formation, and any examples of weathering students identified during their observation walk/virtual tour.
The Inquire phase allows students to cycle progressively and with increasing complexity through the key science ideas related to the core concepts. Each Inquire cycle is divided into three teaching and learning routines that allow students to systematically build their knowledge and skills in science and incorporate this into their current understanding of the world.
When designing a teaching sequence, it is important to consider the knowledge and skills that students will need in the final Act phase. Consider what the students already know and identify the steps that need to be taken to reach the level required. How could you facilitate students’ understanding at each step? What investigations could be designed to build the skills at each step?
Read more about using the LIA FrameworkIdentifying and constructing questions is the creative driver of the inquiry process. It allows students to explore what they know and how they know it. During the Inquire phase of the LIA Framework, the Question routine allows for past activities to be reviewed and to set the scene for the investigation that students will undertake. The use of effective questioning techniques can influence students’ view and interpretation of upcoming content, open them to exploration and link to their current interests and science capital.
When designing a teaching sequence, it is important to spend some time considering the mindset of students at the start of each Inquire phase. What do you want students to be thinking about, what do they already know and what is the best way for them to approach the task? What might tap into their curiosity?
Read more about using the LIA FrameworkCan we change the shape of rocks?
Ask students if they think all rocks are the same level of hardness, or if some rocks are harder/softer than others, and why they think that.
Discuss how they might investigate to find the answer.
Note: In Year 3, students may have undertaken a rock scratch test when learning about rocks and minerals. See Lesson 5 of the Year 3 teaching sequence Dig deep for details of this lesson. You might choose to include that lesson in this sequence if students demonstrate alternative conceptions about rock hardness.
Model attempting to scratch one rock with another rock and observe and discuss any changes to the surface of the rocks (the harder rock will leave a scratch or a dent on the softer rock). Ask students how rocks might end up scratching/rubbing together in nature or with the help of humans.
- How will we know which of these rocks is harder?
- It will create a small dent/line in the softer rock which we can feel when we run our finger across it.
- In nature, how could rocks scratch against each other?
- Tumbling down a hill with gravity, tumbling down a river, etc.
- What human activities might cause rocks to scratch/rub together, or might scratch rocks in other ways?
- Mining, bush walking on very soft rocks, grinding seeds between rocks, etc.
Pose the question: If rocks scratched against each other for long enough, would it change their observable features such as size, shape, pointiness?
The Inquire phase allows students to cycle progressively and with increasing complexity through the key science ideas related to the core concepts. Each Inquire cycle is divided into three teaching and learning routines that allow students to systematically build their knowledge and skills in science and incorporate this into their current understanding of the world.
When designing a teaching sequence, it is important to consider the knowledge and skills that students will need in the final Act phase. Consider what the students already know and identify the steps that need to be taken to reach the level required. How could you facilitate students’ understanding at each step? What investigations could be designed to build the skills at each step?
Read more about using the LIA FrameworkThe Investigate routine provides students with an opportunity to explore the key ideas of science, to plan and conduct an investigation, and to gather and record data. The investigations are designed to systematically develop content knowledge and skills through increasingly complex processes of structured inquiry, guided inquiry and open inquiry approaches. Students are encouraged to process data to identify trends and patterns and link them to the real-world context of the teaching sequence.
When designing a teaching sequence, consider the diagnostic assessment (Launch phase) that identified the alternative conceptions that students held. Are there activities that challenge these ideas and provide openings for discussion? What content knowledge and skills do students need to be able to complete the final (Act phase) task? How could you systematically build these through the investigation routines? Are there opportunities to build students’ understanding and skills in the science inquiry processes through the successive investigations?
Read more about using the LIA FrameworkScrape ‘n’ shake
There are two short investigations in this lesson: Scrape it and Shake it. Similar materials are required for each investigation and it is recommended that students complete both to build a solid understanding of the physical weathering of rocks.
Discuss the importance and limitations of models in scientific investigations. Show students the equipment they will be using to simulate rocks for the investigation and discuss why these are being used in place of real rocks.
- Why and when is it helpful to create models in science?
- Sometimes, the things being investigated are too large to see as a whole, or the processes are too slow. Scientists use models instead in these cases.
- What limitations or problems could we face by using models?
- The materials used may be different, other factors may not be considered and excluded from the modelling etc.
- Why are we using sugar, chalk and sandpaper in these models, instead of real rocks?
- Real rocks would take a very long time to break down—much longer than we have to give. Using something to represent the rocks help us see what happens in a much shorter timeframe.
Scrape it
Use a demonstration copy of the first page of the Scrape it, shake it Resource sheet to explain/model the investigation.
Using chalk/a sugar cube to represent one rock, and sandpaper to represent the other, students will:
- Draw a labelled diagram to represent what they observe before scraping the 'rocks' against each other.
- They will then scrape the 'rocks' against one another for 30 seconds to see what happens.
- Draw a labelled diagram to represent what they observe after scraping the 'rocks' against each other.

Shake it
Use a demonstration copy of the second page of the Scrape it, shake it Resource sheet to explain/model the investigation.
Using 2 pieces of chalk/sugar cubes to represent large rocks, salt to represent small rocks, and a glass jar to shake them in, students will:
- Draw a labelled diagram to make observations about the rocks before they shake them.
- Predict what they think will happen when they shake the rocks inside the glass jar.
- Shake the rocks in the jar for 2 minutes.
- Write/draw their observations after shaking.
- Explain what happened, why they think it happened, and compare their predictions with the results.
Distribute equipment (chalk or sugar cubes, salt, jar with lid) and allow time for students to complete the investigations, recording their results on the Scrape it, shake it Resource sheet.
Weathering
What is physical weathering?
Physical weathering describes the process by which rocks or minerals are physically broken into smaller fragments without altering their chemical make-up. It often occurs in combination with chemical weathering, erosion, and transportation, which will all be explored in greater detail as the sequence progresses.
Wind and water, in either liquid or solid form, can break off pieces of rock as they move past them. Ice can also cause weathering—for example, if water drips into a crack in a rock, it will expand as it freezes, widening the crack. Glaciers are large moving masses of ice that can scrape underlying rock into sediment as they move through a valley. Abrasion from living things such as animals moving across rocks or plant roots growing into rock crevices can cause weathering.
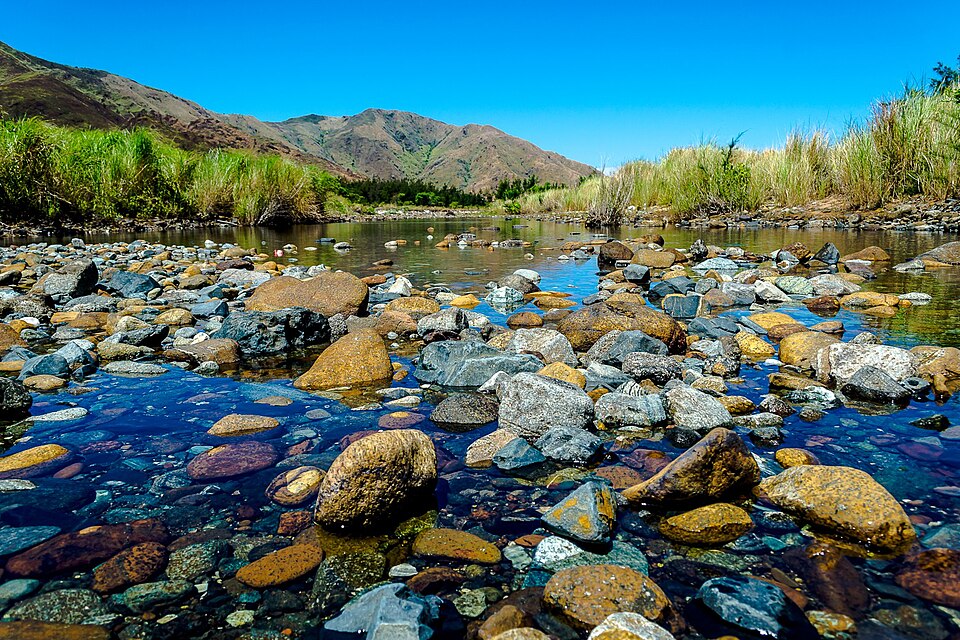
In this lesson, students model a rock being tumbled in a river or stream. As the water flows, it moves the rocks downstream rubbing the rocks together and small pieces are broken off. Eventually, this causes the characteristic smoothness of river rocks. However, the model rocks (chalk or sugar cubes) used in this activity are much softer and break down much more quickly than real rocks.
Environmental factors that affect rates of weathering include:
- rock type—some rocks weather more easily than others (for example, limestone weathers more easily than granite).
- climate—flowing water and rapidly changing temperatures can affect the rate at which weathering takes place.
- time—some rocks in Western Australia have been dated as 3800 million years old and have developed weathering profiles that are hundreds of meters thick.
Iconic landmarks such as the Twelve Apostles, Karlu Karlu (The Devil’s Marbles), and Uluru (Ayers Rock) in Australia, as well as the Grand Canyon in the USA, glacial landscapes in Europe and the huge dune fields of the Sahara Desert in Africa are all examples of weathering and erosion in action.
For more information:
- See the Weathering and erosion tab on the Earth and space science big ideas page.
- See the Geoscience Australia website for further detail on weathering, erosion and landforms.
Physical weathering describes the process by which rocks or minerals are physically broken into smaller fragments without altering their chemical make-up. It often occurs in combination with chemical weathering, erosion, and transportation, which will all be explored in greater detail as the sequence progresses.
Wind and water, in either liquid or solid form, can break off pieces of rock as they move past them. Ice can also cause weathering—for example, if water drips into a crack in a rock, it will expand as it freezes, widening the crack. Glaciers are large moving masses of ice that can scrape underlying rock into sediment as they move through a valley. Abrasion from living things such as animals moving across rocks or plant roots growing into rock crevices can cause weathering.
In this lesson, students model a rock being tumbled in a river or stream. As the water flows, it moves the rocks downstream rubbing the rocks together and small pieces are broken off. Eventually, this causes the characteristic smoothness of river rocks. However, the model rocks (chalk or sugar cubes) used in this activity are much softer and break down much more quickly than real rocks.
Environmental factors that affect rates of weathering include:
- rock type—some rocks weather more easily than others (for example, limestone weathers more easily than granite).
- climate—flowing water and rapidly changing temperatures can affect the rate at which weathering takes place.
- time—some rocks in Western Australia have been dated as 3800 million years old and have developed weathering profiles that are hundreds of meters thick.
Iconic landmarks such as the Twelve Apostles, Karlu Karlu (The Devil’s Marbles), and Uluru (Ayers Rock) in Australia, as well as the Grand Canyon in the USA, glacial landscapes in Europe and the huge dune fields of the Sahara Desert in Africa are all examples of weathering and erosion in action.
For more information:
- See the Weathering and erosion tab on the Earth and space science big ideas page.
- See the Geoscience Australia website for further detail on weathering, erosion and landforms.
Scientific models
Why do scientists use models and how are they helpful to students?
The physical world is a complex ecosystem with millions of variables. If a natural system being investigated is too big (or complex) or the processes are too slow, scientists will use a model to represent and visualise these complex ideas.
Models can help people to help engage with a concept, bring ideas into focus leading to more questions and better explanations, or help to produce testable hypotheses. Models are also used to communicate ideas to others. They can be evaluated and refined over time.
In this sequence, students explore weathering and erosion through modelling—creating physical representations of the phenomena to substitute for not being able to easily observe it in situ.
Models can be expressed:
- physically, for example, creating the model of a mountain in an aluminium tray.
- by the written word, for example, saying that ‘DNA is like a computer program’.
- by a mathematical formula.
- or by a combination of these.
It is important to understand that models also have limitations to their power of explanation and representation, and we must think critically about these. Models are approximations and are often simplified to make them easier to understand. They can be missing important details. The adequacy of a model (i.e. what it shows and what it doesn’t show) should be examined and discussed to determine whether it is ‘good enough’ for its current purpose. A scientist will acknowledge and describe the limitations of any scientific model devised. Information gathered from experiments can support or discredit a scientific model.
For example, using chalk and salt shaken in a jar to represent rocks rumbling in a river does not include the interactions between the rocks and all the other components of the river such as water, animals, the riverbed, plants etc. However, the benefits of being able to see how rocks crashing together rounds their shape is ‘good enough’ to make the model valuable.
In another example, using sand or soil piled in a tray to represent a hillside/sand dune does not model erosion completely. In reality, the soil/sand may contain plant roots, rocks etc. that help stop erosion. However, the benefits of being able to visualise how exposed soil/sand is easily transported down a hill in heavy rain is ‘good enough’ to be helpful for students’ developing understanding.
Using scientific models to represent scientific phenomena can assist students in developing their understanding. Effective teaching includes a discussion of the way in which models represent a concept and ways in which they might not.
The Inquire phase allows students to cycle progressively and with increasing complexity through the key science ideas related to the core concepts. Each Inquire cycle is divided into three teaching and learning routines that allow students to systematically build their knowledge and skills in science and incorporate this into their current understanding of the world.
When designing a teaching sequence, it is important to consider the knowledge and skills that students will need in the final Act phase. Consider what the students already know and identify the steps that need to be taken to reach the level required. How could you facilitate students’ understanding at each step? What investigations could be designed to build the skills at each step?
Read more about using the LIA FrameworkFollowing an investigation, the Integrate routine provides time and space for data to be evaluated and insights to be synthesized. It reveals new insights, consolidates and refines representations, generalises context and broadens students’ perspectives. It allows student thinking to become visible and opens formative feedback opportunities. It may also lead to further questions being asked, allowing the Inquire phase to start again.
When designing a teaching sequence, consider the diagnostic assessment that was undertaken during the Launch phase. Consider if alternative conceptions could be used as a jumping off point to discussions. How could students represent their learning in a way that would support formative feedback opportunities? Could small summative assessment occur at different stages in the teaching sequence?
Read more about using the LIA FrameworkRounding out the rocks
In this integrate step, guide students to link their experiences in the investigation to the processes of weathering in real-life.
|
Share and discuss findings from the investigations as a class to form conclusions and common understandings.
- What happened when you scraped the chalk/sugar cube against the sandpaper?
- Is that what you expected to happen? Why? Why not?
- Were you able to scratch/ break away any of the chalk/sugar? How can you tell?
- Has the shape of your chalk/sugar changed? How?
- How were the 'rocks' moving against one another during the Scrape it investigation?
- When might rocks move against each other like this in a real situation?
- What did you predict would happen when you shook the chalk pieces/sugar cubes in the jar?
- Did your predictions match your observations after you shook the jar?
- What actually happened when you shook the jar?
- How were the 'rocks' moving against each other in the Shake it investigation?
- When might rocks move together like this in a real life situation?
- Did the scraping create sharp or rounded edges? What about the shaking?
Ask students if they have ever seen rocks in a river, and what might cause them to move. Discuss, and potentially view using Google Maps, any specific locations where students may have viewed river rocks, for example the Buckland River in Victoria.
- How do you think rocks in a river feel? Why do you think they might feel that way?
- How would rocks in a river be affected by physical weathering?
- Rocks scratch and bump against each other, the force of the water breaks off small pieces.
- What things might affect how smooth river rocks become over time?
- How fast the river flows, the hardness of the rocks, the size of the rocks, how long the rocks have been in the river, what the rocks are made of, the temperature of the water.
- What did we learn about what happens to rocks tumbling down a river?
- What do you think this simulation might help explain about real-life weathering?
- Why do you think scientists use models to gather information?
- Can you think of any jobs in the workforce where models or simulations are used?
- Environmental scientists use modelling to predict effects on animal populations and develop conservation strategies, city planners use models to simulate traffic patterns and design efficient transport systems, architects use building models to test design ideas.
Optional: View the video Tumbling Rocks (0:55) to observe how rock/mineral tumbling mimics the natural process of rocks being rounded in a river.
Introduce and discuss these following terms with students:
- ‘physical weathering’: when physical forces break down of rock into smaller pieces. Note that this is sometimes also called mechanical weathering.
- ‘abrasion’—the process of scraping or wearing something away.
If students haven't already made the connection, review their understanding of forces (which they have learned about in Year 1 and Year 4), including push-pull forces and friction, identifying their roles in the actions students have modelled in the investigation.
Either as a class, and recorded in the class science journal, or individually in their own journals, students construct a short explanation using these terms to describe what/how physical forces cause the rocks to rub against each other and what happens to them during these processes.
Reflect on the lesson
You might:
- add to the class word wall of vocabulary related to physical weathering.
- add to the class TWLH chart, completing the H and L sections with what they have learned about mechanical weathering, rivers and rocks.
- re-examine the intended learning goals for the lesson and consider how they were achieved.