Wear on Earth
View Sequence overviewStudents will:
- identify what they think they know about weathering and erosion and how it causes changes to the Earth’s surface.
- recognise that weathering and erosion cause changes to the Earth’s surface, including some that affect humans, animals and the environment.
Students will represent their understanding as they:
- represent their current understanding of weathering and erosion using images, words and labels.
In the Launch phase, assessment is diagnostic.
Take note of:
- students’ ideas about weathering and erosion.
See the embedded professional learning Students’ conceptions and alternative conceptions in the Elicit step of this lesson.
Whole class
Class science journal (digital or hard-copy)
Materials to create a word wall or class glossary
Demonstration copy of the Thinking about landscapes Resource sheet—See the embedded professional learning Adapting to your context in the Elicit step of this lesson to find out how you might modify this resource sheet to better suit your context and location.
Demonstration copy of the Vulnerable to erosion? Resource sheet
Schoolyard or local site for observation walk to introduce the issue of erosion. Alternatively, use Google maps to take a virtual tour of your local area. Some landscapes suitable for this introductory observation walk include:
- school grounds.
- nearby park or garden.
- bushland/forest/desert/sand dunes.
- local creek/river/beach.
- cave/gorge/rocky outcrop.
Video: Behind The News segment ‘Dust Storm’ (3:50)
Each student
Individual science journal (digital or hard-copy)
Thinking about landscapes Resource sheet
Lesson
The Launch phase is designed to increase the science capital in a classroom by asking questions that elicit and explore students’ experiences. It uses local and global contexts and real-world phenomena that inspire students to recognise and explore the science behind objects, events and phenomena that occur in the material world. It encourages students to ask questions, investigate concepts, and engage with the Core Concepts that anchor each unit.
The Launch phase is divided into four routines that:
- ensure students experience the science for themselves and empathise with people who experience the problems science seeks to solve (Experience and empathise)
- anchor the teaching sequence with the key ideas and core science concepts (Anchor)
- elicit students’ prior understanding (Elicit)
- and connect with the students’ lives, languages and interests (Connect).
The Elicit routine provides opportunities to identify students’ prior experiences, existing science capital and potential alternative conceptions related to the Core concepts. The diagnostic assessment allows teachers to support their students to build connections between what they already know and the teaching and learning that occurs during the Inquire cycle.
When designing a teaching sequence, consider when and where students may have been exposed to the core concepts and key ideas in the past. Imagine how a situation would have looked without any prior knowledge. What ideas and thoughts might students have used to explain the situation or phenomenon? What alternative conceptions might your students hold? How will you identify these?
The Deep connected learning in the ‘Pedagogical Toolbox: Deep connected learning’ provides a set of tools to identify common alternative conceptions to aid teachers during this routine.
Read more about using the LIA FrameworkWhat do we think we know
Note for teachers
The terms ‘weathering’ and ‘erosion’ are deliberately not used in this step, as they have not appeared in the curriculum prior to this sequence and are unlikely to be known and/or understood by students. If students offer and show an understanding of these terms then it is perfectly acceptable to use them.
Explain to students that, over the course of this sequence, they will undertake investigations to learn about how Earth’s surface changes over time, and that, before they begin, they’ll have an opportunity to consider and show what they currently think they know, through words, drawings and discussion.
Individually, students complete the Thinking about landscapes Resource sheet.
Students then cut along the dotted lines on any pages where there is more than one question, so that each question is on its own slip of paper. Responses can be anonymous or students can put their name on the back of each slip. Determine which approach is most suitable for your students.
- Remaining anonymous is a good way to elicit prior knowledge in a non-judgmental way. It can encourage students to answer in more detail as it removes the anxiety of being incorrect.
- Identifying students’ responses allows students the opportunity to compare their responses at the end of the sequence and consider how their ideas have changed.
Organise the slips into piles based on their question. Set aside all of the slips for Question 6 (these will be tallied later).
Using the responses to Question 1, Where does soil come from?, demonstrate how to compare and find similarities between responses by, for example, looking for matching key words or phrases used by students, and how to summarise the response. Repeat this for Question 2, Where does sand come from?, if required.
Distribute the rest of the piles of responses out to teams, dividing piles as necessary but ensuring each team gets at least 10 responses to a question.
Teams examine the responses they have been assigned and collate the information.
Teams report back to the class on what they found. Record this in the class science journal. Where students have given different responses discuss each idea and why students might think different things.
Tally up the responses for Question 6 as a class and make generalisations where possible. For example: Most students think Uluru will look the same in five thousand years as it does now. If appropriate invite students to share their thinking. Or, if some have voted that Uluru will remain the same because it is a hard rock and others voted that it will not be the same, discuss each idea and why students might think different things.
Students might revisit this task at the end of the teaching sequence, comparing their responses and explaining their ideas.
Core concepts and key ideas
Where does this sequence fit into the larger picture of science and the science curriculum?
When planning for teaching in your classroom, it can be useful to see where a sequence fits into the larger picture of science. This unit is anchored to the Science Understanding core concepts for Earth and Space Sciences.
- The Earth system comprises dynamic and interdependent systems; interactions between these systems cause continuous change over a range of scales
Students have experienced this core concept before by examining daily and seasonal changes (Year 1), the properties of soils, rocks, and minerals (Year 3), and the water cycle (Year 4). In Year 5, this core concept involves explaining how weathering, erosion, transportation, and deposition cause slow or rapid change to the Earth’s surface.
This core concept is linked to the Key Science Ideas:
- Energy (kinetic movement of water, thermal heat energy) moves through and can cause observable changes to the Earth's surface. (Systems)
- The stability of the Earth's surface can be disrupted by sudden changes or gradual changes over time. (Stability and change)
- Patterns of change on the Earth's surface can be used to identify cause-and-effect relationships and make predictions. (Patterns, order, and organisation)
- Some patterns of change on the Earth's surface have an underlying cause that cannot be observed at the same spatial or temporal scale. (Patterns, order, and organisation)
- Models can be used to investigate relationships between components of systems. (Systems)
When your students next progress through this Core Concept, they will investigate the rock cycle and tectonic activity (Year 8).
Student conceptions and alternative conceptions
What alternative conceptions might students hold about weathering and erosion? How does this sequence address them?

Taking account of students’ existing ideas is important in planning effective teaching approaches which help students learn science. Students develop their own ideas during their experiences in everyday life and might hold more than one idea about an event or phenomenon.
Some students might believe that landforms do not change over time, that the rivers are dug out by God or man, or that it is the wind that makes rivers flow. However, landscapes are ever changing through weathering, erosion, transportation, deposition and human activities.
Students often think that soils have always existed. This is because the rates at which soils form can appear to be very slow to students. For example, untended house gutters may develop a thin layer of soil over a few years.
Students might think that rocks are hard and unchangeable because in their lifetime little natural change is visible. This is reinforced by expressions in everyday language such as ‘hard as a rock’. However, some rocks might crumble easily, for example, sedimentary rocks that are made of sand, shells and pebbles that are compressed together. All rocks are susceptible to changes due to weathering; harder rocks tend to weather more slowly. Over the life of planet Earth, its rocks have changed many times.
Students might think that the Earth’s crust consists mainly of soil with some rocks embedded in it. However, the Earth’s crust is primarily rock, with a thin layer of soil on top which varies in thickness.
In this sequence students are given the opportunity to consider the different timescales over which weathering and erosion occur. By Year 5, a student’s ability to understand relative size and rates of change is developing, and they can understand that events and phenomena that change the Earth’s surface can occur rapidly within hours or slowly over thousands and millions of years.
Over the course of this sequence students will explore and make models of weathering and erosion processes to further their understanding, culminating in exploring a solution to a local problem caused by weathering or erosion.
Adapting to your context
How might you modify this lesson to include local examples, whilst still gathering similar useful diagnostic data?

The images used in the Thinking about landscapes Resource sheet can be swapped for local examples showing similar weathering and erosion issues. Outlined below is a guide for what you might look for if selecting your own images to include.
Questions 1 & 2
These questions are designed to activate students’ prior knowledge on rocks and soils covered in Year 3. The questions also provide opportunities to model how to collate and write generalisations about the responses. They are non-specific and should be suitable for students in various contexts. However, if you are (for example) living in a rural farming community where students have a deeper knowledge of soil composition, the questions may be augmented and added to.
Question 3
In this question students are prompted by an image of a river bank that has been eroded after heavy rain. This image could be replaced with any example of erosion caused by water such as eroded coastlines, muddy run-off, bare patches of dirt where topsoil has been washed away, or rills/gullies formed on hillsides.
Question 4
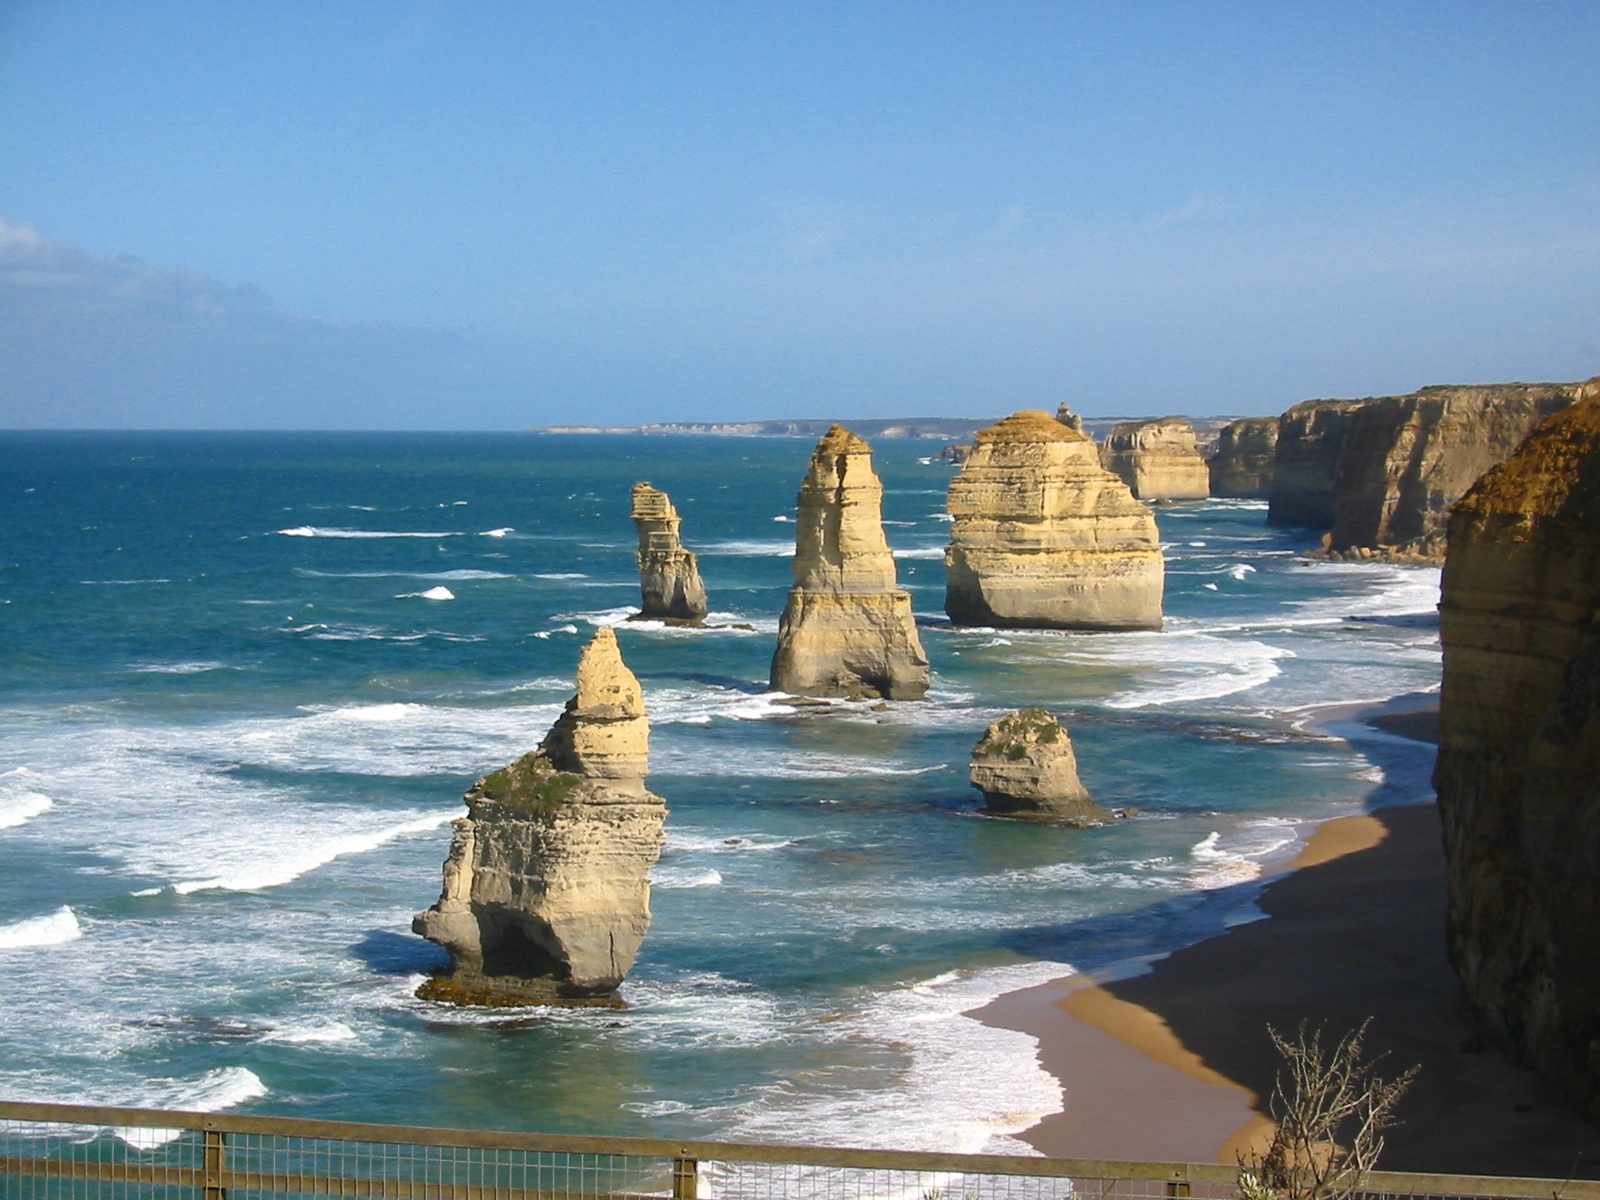
This question shows an example of physical (also called mechanical) weathering. The London Bridge arch was broken down over time by the pressure of repeated waves crashing against it. Whilst there is a small component of chemical weathering involved (due to the salinity of the ocean’s waters), chemical weathering causes a change in the composition of the rock, which is not the case here. The arch simply crumbled into the sea due to the force of the waves.
If using a local example, look for one where rocks have been broken up by physical forces. This might include rocks cracked open by freezing and thawing water or tree roots. It can also include rock worn down, or into unusual shapes, through the abrasive force of wind.
Question 5
This question shows an example of chemical weathering, from Katter Kich (or Wave Rock) in Western Australia. Slightly acidic rainwater ran into cracks and crevices in the rock, reacting with the granite the rock is made from and breaking it down from within. This made it vulnerable to further erosion and dissolving.
If using a local context, look for examples where chemical reactions have created unusual shapes, such as pits and cavities in rock surfaces. Rust appearing on rocks is also caused by a chemical reaction to iron oxide in the rock.
Question 6
In this question, students are prompted by an image of Uluru and asked to think about what it may look like 5000 years into the future. This will help determine if students understand the slow timescale of weathering. Any local rock formation that students know of can be substituted if using a local example.
Connections to local First Nations peoples
Many rock formations and natural areas carry special significance for the First Nations peoples of the area in which they are found. They may have specific Dreaming or traditional stories attached to their creation and future, or be sites of cultural significance that it is not appropriate to talk about in the classroom. Where possible, consult with the local First Nations Elders or Education Officers to discuss the protocols for what is appropriate for your area, and the possibility of enriching student understanding by sharing appropriate local knowledge.
The images used in the Thinking about landscapes Resource sheet can be swapped for local examples showing similar weathering and erosion issues. Outlined below is a guide for what you might look for if selecting your own images to include.
Questions 1 & 2
These questions are designed to activate students’ prior knowledge on rocks and soils covered in Year 3. The questions also provide opportunities to model how to collate and write generalisations about the responses. They are non-specific and should be suitable for students in various contexts. However, if you are (for example) living in a rural farming community where students have a deeper knowledge of soil composition, the questions may be augmented and added to.
Question 3
In this question students are prompted by an image of a river bank that has been eroded after heavy rain. This image could be replaced with any example of erosion caused by water such as eroded coastlines, muddy run-off, bare patches of dirt where topsoil has been washed away, or rills/gullies formed on hillsides.
Question 4
This question shows an example of physical (also called mechanical) weathering. The London Bridge arch was broken down over time by the pressure of repeated waves crashing against it. Whilst there is a small component of chemical weathering involved (due to the salinity of the ocean’s waters), chemical weathering causes a change in the composition of the rock, which is not the case here. The arch simply crumbled into the sea due to the force of the waves.
If using a local example, look for one where rocks have been broken up by physical forces. This might include rocks cracked open by freezing and thawing water or tree roots. It can also include rock worn down, or into unusual shapes, through the abrasive force of wind.
Question 5
This question shows an example of chemical weathering, from Katter Kich (or Wave Rock) in Western Australia. Slightly acidic rainwater ran into cracks and crevices in the rock, reacting with the granite the rock is made from and breaking it down from within. This made it vulnerable to further erosion and dissolving.
If using a local context, look for examples where chemical reactions have created unusual shapes, such as pits and cavities in rock surfaces. Rust appearing on rocks is also caused by a chemical reaction to iron oxide in the rock.
Question 6
In this question, students are prompted by an image of Uluru and asked to think about what it may look like 5000 years into the future. This will help determine if students understand the slow timescale of weathering. Any local rock formation that students know of can be substituted if using a local example.
Connections to local First Nations peoples
Many rock formations and natural areas carry special significance for the First Nations peoples of the area in which they are found. They may have specific Dreaming or traditional stories attached to their creation and future, or be sites of cultural significance that it is not appropriate to talk about in the classroom. Where possible, consult with the local First Nations Elders or Education Officers to discuss the protocols for what is appropriate for your area, and the possibility of enriching student understanding by sharing appropriate local knowledge.
The Launch phase is designed to increase the science capital in a classroom by asking questions that elicit and explore students’ experiences. It uses local and global contexts and real-world phenomena that inspire students to recognise and explore the science behind objects, events and phenomena that occur in the material world. It encourages students to ask questions, investigate concepts, and engage with the Core Concepts that anchor each unit.
The Launch phase is divided into four routines that:
- ensure students experience the science for themselves and empathise with people who experience the problems science seeks to solve (Experience and empathise)
- anchor the teaching sequence with the key ideas and core science concepts (Anchor)
- elicit students’ prior understanding (Elicit)
- and connect with the students’ lives, languages and interests (Connect).
Science education consists of a series of key ideas and core concepts that can explain objects, events and phenomena, and link them to the experiences encountered by students in their lives. The purpose of the Anchor routine is to identify the key ideas and concepts in a way that builds and deepens students’ understanding. During the Launch phase, the Anchor routine provides a lens through which to view the classroom context, and a way to frame the key knowledge and skills students will be learning.
When designing a teaching sequence, consider the core concepts and key ideas that are relevant. Break these into small bite-sized pieces that are relevant to the age and stage of your students. Consider possible alternative concepts that students might hold. How could you provide activities or ask questions that will allow students to consider what they know?
What is weathering/erosion?
Introduce the term ‘weathering’ to the students: the process by which wind and water break up and wear away rocks and minerals into smaller rocks and rock particles. Students will have learned about rocks, minerals and soils in Year 3, so using this terminology with students is appropriate at the start of this sequence.
Discuss the different uses of the term ‘wear/worn’ as students may be more familiar with it in terms of clothing items.
Look at an example of weathering by viewing the sample images of the London Bridge Arch from the Thinking about landscapes Resource sheet. Review the ideas students had about the differences between the two images and how they occurred.
Ask students if they think it takes a long time or a short time for wind or water to wear down a rock, why they think that, and where they think the small rocks/rock particles end up.
Confirm for students that the constant pounding of waves against the rock causes it to wear away and disappear. Ask students if they think it took a long time or a short time for the ‘arch’ to fall into the ocean.
Introduce the term ‘erosion’ to the students: the process by which wind, water, gravity etc. move rocks and sediments from one place to another.
Also, clarify the term ‘sediments’ as including any material that sinks to the bottom of water, including small rocks, soil, sand, remains of plants (such as mulch and bark), and animal remains. These can be left behind when the water evaporates or flows away.
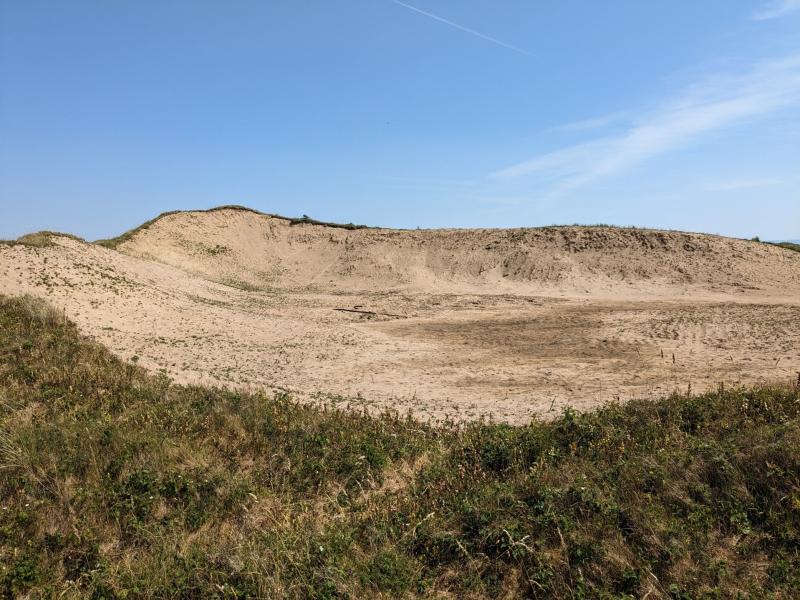
Show students two contrasting images, one where the land is exposed and vulnerable to erosion, and one where the land is less vulnerable. Examples are included in the Vulnerable to erosion? Resource sheet (a recently harvested field versus a planted field, and sand dunes with no vegetation versus sand dunes with vegetation cover). You might also use images of local examples if more appropriate.
Ask students to determine which 'place' they think is more vulnerable to erosion—that is wind or water blowing or washing away the soil/sand—and why they think that. Make a list of factors that students think might make a place more vulnerable to erosion caused by wind or water. Some examples might include sloping land, land exposed to high winds, of changing tides/water flows, exposed soil etc.
Ask students if they think it takes a long time or a short time for wind/water to blow/wash away sediments, and why they think that.
Explain that weathering and erosion are important natural processes that change the Earth's surface over time, however, human activities can contribute to increased erosion, leading to negative effects on the environment. Explain that during this sequence students will be using models and simulations to learn about the processes of weathering and erosion, how they change the Earth's surface, and what humans can do to minimise their impact.
Weathering and erosion
What are weathering, erosion, transportation and deposition?

Weathering and erosion causes the surface of the Earth to constantly change.
Some of these changes, such as changes to rock faces and formations, happen very slowly over hundreds or even thousands of years. Others, such as the erosion of topsoil on farmland or the changing of coastline, also happen slowly but may be visible during our lifetimes. Catastrophic events such as floods and landslides can cause rapid and sometimes devastating change.
Below are some geological terms used in this sequence. As this is the first time students will have encountered these concepts in the curriculum, the terms ‘weathering’ and ‘erosion’ are introduced in basic sense during this lesson. Subsequent lessons should support students to deepen their understanding of these terms and explicitly introduce others.
Weathering is the breaking up or wearing away of rocks or minerals, resulting in smaller rocks and rock particles. Weathering can be caused by chemical, physical or biological processes.
- Physical (also called mechanical) weathering involves physical actions that break down rocks or minerals into smaller pieces. For example, the expansion of frozen water might cause a rock to crack, waves crashing into rocks on the coast can create sea caves, and wind-blown sand can act like sandpaper, wearing away the surface of rocks over time.
- Chemical weathering is the breaking down of rocks and minerals through changes in the chemical composition of the material. For example, rainwater running over the surface of a rock will carry away particles of rock. It also softens the surface of the rock and leave it vulnerable to other forms of weathering. Chemical weathering is impacted by the pH (acidic or basic level) of the water and the rocks and minerals it is interacting with. The presence of oxygen can also play a part, particularly when iron is involved.
- Biological weathering occurs where living or once-living organisms contribute to both chemical and mechanical/physical weathering. For example, the growth of a tree root may cause a rock to crack, lichens and mosses secrete acids which break down rock, and burrowing animals can weaken rock structures.
Erosion is the process where a transportation agent (such as water, wind or gravity) moves soil, rocks, sediments and dissolved material from one location and deposits it in another.
- Water erosion comes in many forms and can be highly destructive. Even the splash of a single raindrop on bare soil can cause soil particles to rise as high as 60cm and to move up to 1.5m from the point of impact. Areas where there is little vegetation to hold the soil in place are vulnerable to having the top, most nutrient-dense layers of soil being washed away. As water travels along the surface it concentrates in depressions on the surface, forming ridges, or rills. These can eventually become gullies as the ridges get deeper.
And that’s just what's happening on the surface! Under the surface, water moves easily through poor soils, animal burrows or spaces left by decaying tree roots, undermining the surface and making it more vulnerable to mass movement events. - Wind erosion occurs when the force from the wind detaches soil and sand particles and carries them away. Dry and sandy soils are the most vulnerable to wind erosion, which is worsened in strong and persistent winds. A lack of vegetation and ground cover, which leaves soil and sand exposed, also worsens wind erosion. Exposure of soil can be caused by deforestation, land clearing for construction, large numbers and overgrazing of animals, and intensive farming. Exposure of sand occurs when vegetation is removed or washed away from beaches and sand dunes during high tides, especially when exacerbated by storms. Wind erosion can cause dust and sand storms.
Transportation is the movement of weathered and eroded material across the Earth’s surface, carrying sediments (small rocks, sand and soil away) from their source to a new location. Transporting agents include wind, water in all its forms (rivers, rainwater runoff, ocean waves, ice, snow) and gravity.
Deposition is the laying down of sediment carried by wind, water or gravity in a new location.
Sediments are the solid matter (small rocks, sand and soil) that do not dissolve and are transported from and deposited in a new location.
The Launch phase is designed to increase the science capital in a classroom by asking questions that elicit and explore students’ experiences. It uses local and global contexts and real-world phenomena that inspire students to recognise and explore the science behind objects, events and phenomena that occur in the material world. It encourages students to ask questions, investigate concepts, and engage with the Core Concepts that anchor each unit.
The Launch phase is divided into four routines that:
- ensure students experience the science for themselves and empathise with people who experience the problems science seeks to solve (Experience and empathise)
- anchor the teaching sequence with the key ideas and core science concepts (Anchor)
- elicit students’ prior understanding (Elicit)
- and connect with the students’ lives, languages and interests (Connect).
Students arrive in the classroom with a variety of scientific experiences. This routine provides an opportunity to plan for a common shared experience for all students. The Experience may involve games, role-play, local excursions or yarning with people in the local community. This routine can involve a chance to Empathise with the people who experience the problems science seeks to solve.
When designing a teaching sequence, consider what experiences will be relevant to your students. Is there a location for an excursion, or people to talk to as part of an incursion? Are there local people in the community who might be able to talk about what they are doing? How could you set up your classroom to broaden the students’ thinking about the core science ideas? How could you provide a common experience that will provide a talking point throughout the sequence?
Read more about using the LIA FrameworkIdentifying local issues
Take students on an observation walk of the school grounds or local area to look for examples of weathering and erosion. Alternatively use Google Maps to take a virtual tour of your local area. See the embedded professional learning Using Google Maps to undertake a virtual tour for more information.
Before the walk/virtual tour
Ask students if they can identify any school/local examples where weathering and erosion might have taken/be taking place. Discuss what kinds of places in the local community are likely to be more vulnerable to weathering/erosion and the factors that make them so.
Allow students the opportunity to share ideas of how they might identify sites of weathering and erosion before offering any ideas. See the embedded professional learning Identifying local examples of weathering and/or erosion for information that will support you to support your students.
Some examples you might use as prompts, if required, include:
- in coastal communities, exposed sand dunes are vulnerable to high winds and tides, particularly during and after heavy rainfall.
- in rural communities, fields and paddocks are vulnerable after harvesting or due to grazing livestock.
- river and lake shorelines are vulnerable after heavy rainfall events.
- local parks and bushlands might have pathways worn by heavy pedestrian traffic, both human and animal.
- buildings can also show signs of weathering including peeling paint, cracking materials, or worn-down stones, pavers or bricks.
During the walk/virtual tour
- Stop at student-identified sites of potential weathering and/or erosion.
- Discuss what made the student/s want to stop and explore/discuss this particular site.
- Identify the factors they think are present that indicate weathering and/or erosion.
- Take photographs/videos of sites of interest.
- Mark sites of interest on a map of the local area.
- If you have already identified a weathering/erosion issue in your schoolyard or local area that your students will design a solution for, ensure this area is visited on the walk/virtual tour and discussed in depth after the walk.
After the walk/virtual tour
- Review the photographs/video and location of sites of interest and why students wanted to observe them more closely.
- Identify the features that made this site susceptible to weathering/erosion.
- Discuss how the environment, including the who (people) or what (plants and animal) might have been changed by the weathering/erosion.
- Discuss if students think that human activity has contributed to the weathering/erosion and how.
- Discuss if students think these changes are problematic and potentially need to be controlled.
- Discuss what might happen if the erosion is not controlled.
Explain to students that at the end of the sequence, they will have an opportunity to design (and possibly test) a strategy to address a problem caused by weathering or erosion in the community.
Note: As part of preparing for this sequence you may have already identified a weathering/erosion issue in your schoolyard or local area that your students will design a solution for. If so, also include a targeted discussion of this issue after the walk/virtual tour. If you are allowing students to determine the issue to be addressed, the discussion can be more general in nature, with a focus on the issue students believe is causing the most negative impacts on the environment.
Identifying sites of weathering and/or erosion
How can you identify sites where weathering and/or erosion has occurred/is occurring?
Weathering
Weathering is a natural process that has occurred since the Earth was formed. It is a vital part of creating the Earth's ecosystems and occurs over a long time scale, so it is almost impossible for students to observe as it occurs in-situ.
When looking for evidence of weathering in the local area you might observe:
Physical weathering
- Rock fragments: Look for broken/smaller pieces of rock at the base of a larger rock.
- Cracks: Observe cracks in rocks causes by the growth of tree roots, or water freezing and thawing.
- Exfoliation: Look for peeling or scaling rock surfaces.
- Rounded/smooth edges/surfaces: Notice how rocks become rounded and smooth over time due to wind, water or ice.
Chemical weathering
- Discolouration: Look for changes to rock colour. A common one is rust formed by oxidation of iron present in the rock.
- Softening/crumbling: Rocks that are easily crumbled can be a sign they have been dissolving or reacting to chemicals in air/water.
- Pits and cavities: The formation of pits and cavities in rock surfaces can be an indication of dissolving.
Biological weathering
- Root penetration: Look for tree roots growing into cracks and crevices in rocks.
- Animal burrows: See if there are any burrows created by animals, which have exposed otherwise covered rocks to weathering processes.
- Organic acids: Look for the presence of plants, such as moss and lichens, that can produce acids that decay the rock.
Erosion
Erosion is also a natural process that helps move organic matter around the Earth's surface. It too can take a long time, but it can also happen rapidly due to weather events. Human activities such as deforestation, construction, agriculture and mining can have a more noticeable impact on the rate of erosion.
When looking for evidence of erosion in the local area you might observe:
- Devegetation: Areas where vegetation has been removed and topsoil left exposed. It will often occur near construction sites, in agricultural areas, or even in the school garden. It can lead to exposed soil roots and gullies.
- Exposed soil: exposed topsoil is much more easily blown or washed away, revealing bare patches.
- Bare patches/spots: Look for areas where the topsoil has been removed and bare dirt is exposed. Plants often do not grow in these areas because there are not enough nutrients to support their growth.
- Exposed roots and leaning trees: Exposed roots often means erosion, and can mean the soil is unstable, leading to falling or tilting trees.
- Gullies: Channels formed by running water that often indicate the removal of topsoil.
- Rills: Shallows gullies formed on the side of hills; also caused by run-off.
- Sedimentation: Muddy or discoloured water in streams and ponds often means sediment is being carried away.
- Cracks and depressions: Cracks or sunken areas in soil can form as soil is transported away.
- Cracks in buildings: This can mean the soils underneath has been eroded, causing the building to shift and crack.
Coastal erosion may also be characterised by:
- reduced sand volume.
- narrower beaches.
- lower beach slopes.
- creation or destruction of sandbars.
- decreasing dune size.
- exposed dune faces.
- undercutting of cliffs leading to the formation of arches and also rockfalls.
- landslides.
Weathering and erosion of man-made structures
Man-made structures such as buildings, roads and bridges can also be impacted by weathering and erosion.
Buildings might be affected by weathering and erosion causing minor and easily remedied issues such as peeling paint or cracking pavements. More serious issues might include damaging the foundation of the building, leading to cracking, structural damage and subsidence.
Stairs, especially those made of stone or bricks, can be worn away over time through use. Many staircases in historical buildings show this wear, with indents often formed in the centre of the steps after hundreds or even thousands of years of footsteps.
Roads can be eroded when the soil and/or pavement around the roads is washed away during/after heavy rainfall or worn away by excess traffic. Potholes, ruts, corrugations or even landslides can often be the result.
The structural integrity of bridges can be impacted by heavy rainfall, floods, debris flows, and landslides causing them to be unsafe.
Using Google Maps to undertake a virtual tour
What features do I need to be aware of when using Google Maps for a virtual tour?
Although not ideal, there are many reasons why it might be more convenient, practical and appropriate to use Google Maps or similar to undertake a virtual tour of your area to look for examples of weathering and erosion. These might include the accessibility of the local landscape, weather conditions, or simply supervisory capacity.
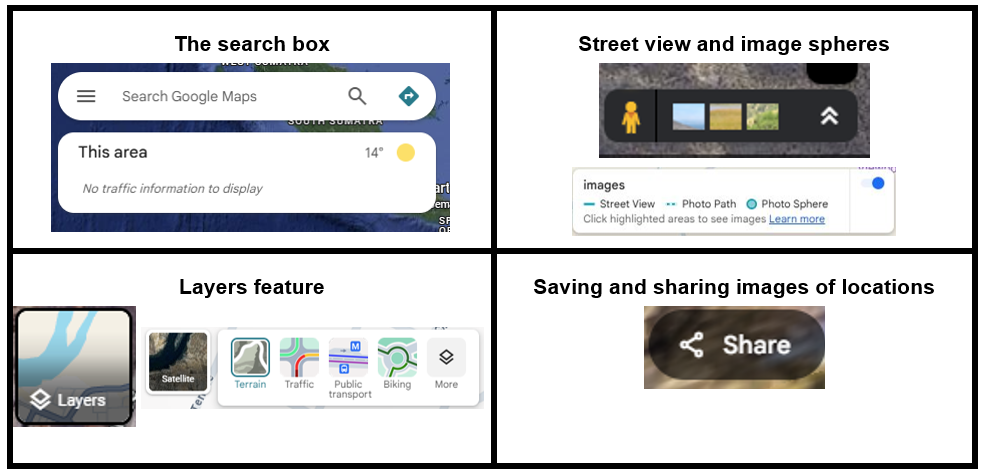
Google Maps has many features that can be utilised to support a virtual tour. See the image above to see how each feature will look on a desktop screen.
- Typing the specifically required location into the search box, located in the top left on a desktop screen, will give you an aerial overview of the area. You can use a specific address, a suburb name, or even the name of a whole region.
- Use the Layers feature, located in the bottom left of a desktop screen, to switch between views. Satellite view shows photographic aerial shots. Note that these images may be out of date.
- Use the Street View feature, found in the bottom right on a desktop screen, to see a 360° street-level view of a specific location. You can navigate along the roadway using the arrows or by simply tapping or clicking in the direction you'd like to move.
- Save or share images of a location using the Share icon located in the top right on a desktop screen.
Although not ideal, there are many reasons why it might be more convenient, practical and appropriate to use Google Maps or similar to undertake a virtual tour of your area to look for examples of weathering and erosion. These might include the accessibility of the local landscape, weather conditions, or simply supervisory capacity.
Google Maps has many features that can be utilised to support a virtual tour. See the image above to see how each feature will look on a desktop screen.
- Typing the specifically required location into the search box, located in the top left on a desktop screen, will give you an aerial overview of the area. You can use a specific address, a suburb name, or even the name of a whole region.
- Use the Layers feature, located in the bottom left of a desktop screen, to switch between views. Satellite view shows photographic aerial shots. Note that these images may be out of date.
- Use the Street View feature, found in the bottom right on a desktop screen, to see a 360° street-level view of a specific location. You can navigate along the roadway using the arrows or by simply tapping or clicking in the direction you'd like to move.
- Save or share images of a location using the Share icon located in the top right on a desktop screen.
The Launch phase is designed to increase the science capital in a classroom by asking questions that elicit and explore students’ experiences. It uses local and global contexts and real-world phenomena that inspire students to recognise and explore the science behind objects, events and phenomena that occur in the material world. It encourages students to ask questions, investigate concepts, and engage with the Core Concepts that anchor each unit.
The Launch phase is divided into four routines that:
- ensure students experience the science for themselves and empathise with people who experience the problems science seeks to solve (Experience and empathise)
- anchor the teaching sequence with the key ideas and core science concepts (Anchor)
- elicit students’ prior understanding (Elicit)
- and connect with the students’ lives, languages and interests (Connect).
Each student comes to the classroom with experiences made up from science-related knowledge, attitudes, experiences and resources in their life. The Connect routine is designed to tap into these experiences and that of their wider community. It is also an opportunity to yarn with community leaders (where appropriate) to gain an understanding of the student’s lives, languages and interests. In the Launch phase, this routine identifies and uses the science capital of students as the foundation of the teaching sequence so students can appreciate the relevance of their learning and its potential impact on future decisions. In short, this routine moves beyond scientific literacy and increases the science capital in the classroom and science identity of the students.
When planning a teaching sequence, take an interest in the lives of your students. What are their hobbies, how do they travel to and from school? What might have happened in the lives of your students (i.e. blackouts) that might be relevant to your next teaching sequence? What context might be of interest to your students?
Read more about using the LIA FrameworkHow does weathering and erosion affect us?
Invite students to share their own experiences of erosion such as: sand blowing in their eyes at the beach/schoolyard/outback, dust devils, dust storms, heavy rain washing away a garden/sandpit/favourite beach etc.
View and discuss the Behind the News segment ‘Dust Storm’ (3:50) This will:
- connect students’ own experiences to the topic of erosion.
- create a sense of agency on the issue.
- introduce the DustWatch program which you may choose to get involved in.
- Has anyone experienced a dust storm before? How was it similar or different to this one?
- What problems do dust storms cause?
- Health issues, visibility issues and dangers on the road, removal of soil etc.
- What effect do dust storms have on farm soil?
- Soil is blown away and deposited somewhere else making it difficult to grow crops.
Optional:
- Explain that many jobs involve working with soil and rocks, such as mining, farming, construction, landscaping, earthworks and town planning. Ask students if they know someone who works in one of those fields, and if they would like to come and talk to the class about: how their job changes the landscape, why their job is important, what they do to reduce erosion (where relevant).
- Explore and potentially get involved in the DustWatch Citizen Science program.
The Launch phase is designed to increase the science capital in a classroom by asking questions that elicit and explore students’ experiences. It uses local and global contexts and real-world phenomena that inspire students to recognise and explore the science behind objects, events and phenomena that occur in the material world. It encourages students to ask questions, investigate concepts, and engage with the Core Concepts that anchor each unit.
The Launch phase is divided into four routines that:
- ensure students experience the science for themselves and empathise with people who experience the problems science seeks to solve (Experience and empathise)
- anchor the teaching sequence with the key ideas and core science concepts (Anchor)
- elicit students’ prior understanding (Elicit)
- and connect with the students’ lives, languages and interests (Connect).
Identifying and constructing questions is the creative driver of the inquiry process. It allows students to explore what they know and how they know it. During the Inquire phase of the LIA Framework, the Question routine allows for past activities to be reviewed and to set the scene for the investigation that students will undertake. The use of effective questioning techniques can influence students’ view and interpretation of upcoming content, open them to exploration and link to their current interests and science capital.
When designing a teaching sequence, it is important to spend some time considering the mindset of students at the start of each Inquire phase. What do you want students to be thinking about, what do they already know and what is the best way for them to approach the task? What might tap into their curiosity?
Read more about using the LIA FrameworkWhat do we want to know
Use the Question Formulation Technique with the responses to the Thinking about landscapes Resource sheet (from earlier this lesson) to support students to generate questions they might want/need the answers to in order to design an erosion strategy at the end of the sequence.
Reflect on the lesson
You might:
- begin a word wall or glossary of relevant words and images that students will likely use throughout the sequence.
- begin a TWLH chart about weathering and erosion. Use the questions generated using the QFT as the W section of the chart.
- look back at some of the images students have encountered during the lesson and discuss if students think they are examples of weathering or erosion and why they think that.
Question Formulation Technique
How can you support your students to generate questions on a topic?

The Question Formulation Technique (Santana & Rothstein, 2018) outlines four steps for students to generate, refine, and select useful questions. This includes:
- Examine stimulus materials.
- Brainstorm questions.
- Improve questions: change closed questions or statements into open questions.
- Prioritise questions according to importance, ability to be investigated, what will help with the Act phase, and how it will be answered.
Students should work together in small groups of 3-5.
TWLH chart
What is a TWLH chart and why should you use one?

An adaptation of the well-known KWL chart, a TWLH chart is a learning tool used to elicit students’ prior knowledge by asking what they Think they know, determine questions students Want to know answers to, document what has been Learned, and How students know they’ve learned.
One of the key aspects of a TWLH chart is its ability to guide a student in metacognitive (the ability to think about your thinking) processes. By focusing on what students think they know, they are prompted to see learning as a journey, where new scientific evidence and experiences might change your thinking. This is a very important aspect of thinking scientifically.
In this instance, students are considering their initial knowledge of light. In this phase of learning, students should be encouraged to populate the T and W sections of the chart.