Wear on Earth
View Sequence overviewStudents will:
- explore time scales of weathering and erosion.
- determine how humans can influence rates of weathering and erosion.
- further examine wind and water as agents of weathering and erosion.
Students will represent their understanding as they:
- categorise statements about weather and erosion on a time scale from slow to rapid.
- justify the placement of statements on this slow to rapid timescale.
- contribute to discussions about wind and water as agents of weathering and erosion and timescales.
- contribute to the creation of a T chart about weathering and erosion timescales.
In this lesson, assessment is summative.
Students working at the achievement standard should be able to:
- explain the processes of weathering and erosion and their impacts on the landscape.
- identify weathering and erosion as natural processes that occur over varying time scales—millions of years or just a few hours.
- name the human activities that can affect rates of weathering and erosion.
Refer to the Australian Curriculum content links on the Our design decisions tab for further information.
Whole class
Class science journal (digital or hard-copy)
2 x copies of the Time scale statements Resource sheet, printed and cut to separate each statement
Sticky notes and textas
Buckets/bottles/containers of water (alternatively, carry out the Water absorption and runoff activity while it is raining or just afterwards)
Video: Behind the News segment ‘Dust storm’ (3:50)
Video: Weathering by wind (1:33)
Video: The unique geological anomaly in Central Australia (3:30)
Video: Gully erosion: See how quickly it can happen (0:16)
Video: Gully erosion solutions for your property - Part 4 (6:00)over
Video: Great natural wonders—the Twelve Apostles (1:50)
Video: Lighthouse moved 70m on rails to save it from falling into the sea (0:49)
Each student
Individual science journal (digital or hard-copy)
Lesson
Re-orient
Recap what students have learned so far over the course of the sequence about weathering, erosion, transportation and deposition.
The Inquire phase allows students to cycle progressively and with increasing complexity through the key science ideas related to the core concepts. Each Inquire cycle is divided into three teaching and learning routines that allow students to systematically build their knowledge and skills in science and incorporate this into their current understanding of the world.
When designing a teaching sequence, it is important to consider the knowledge and skills that students will need in the final Act phase. Consider what the students already know and identify the steps that need to be taken to reach the level required. How could you facilitate students’ understanding at each step? What investigations could be designed to build the skills at each step?
Read more about using the LIA FrameworkIdentifying and constructing questions is the creative driver of the inquiry process. It allows students to explore what they know and how they know it. During the Inquire phase of the LIA Framework, the Question routine allows for past activities to be reviewed and to set the scene for the investigation that students will undertake. The use of effective questioning techniques can influence students’ view and interpretation of upcoming content, open them to exploration and link to their current interests and science capital.
When designing a teaching sequence, it is important to spend some time considering the mindset of students at the start of each Inquire phase. What do you want students to be thinking about, what do they already know and what is the best way for them to approach the task? What might tap into their curiosity?
Read more about using the LIA FrameworkRapid or slow?
Pose the question: Does weathering and erosion occur slowly or rapidly?
Brainstorm student ideas and record them as a table in the class science journal. One way you might do this is in a T-chart.
The Inquire phase allows students to cycle progressively and with increasing complexity through the key science ideas related to the core concepts. Each Inquire cycle is divided into three teaching and learning routines that allow students to systematically build their knowledge and skills in science and incorporate this into their current understanding of the world.
When designing a teaching sequence, it is important to consider the knowledge and skills that students will need in the final Act phase. Consider what the students already know and identify the steps that need to be taken to reach the level required. How could you facilitate students’ understanding at each step? What investigations could be designed to build the skills at each step?
Read more about using the LIA FrameworkThe Investigate routine provides students with an opportunity to explore the key ideas of science, to plan and conduct an investigation, and to gather and record data. The investigations are designed to systematically develop content knowledge and skills through increasingly complex processes of structured inquiry, guided inquiry and open inquiry approaches. Students are encouraged to process data to identify trends and patterns and link them to the real-world context of the teaching sequence.
When designing a teaching sequence, consider the diagnostic assessment (Launch phase) that identified the alternative conceptions that students held. Are there activities that challenge these ideas and provide openings for discussion? What content knowledge and skills do students need to be able to complete the final (Act phase) task? How could you systematically build these through the investigation routines? Are there opportunities to build students’ understanding and skills in the science inquiry processes through the successive investigations?
Read more about using the LIA FrameworkHow long does it take?
In this investigation students will explore what things can affect the rate of weathering and erosion, and use the information they collect to consider whether humans can change weathering and erosion rates.
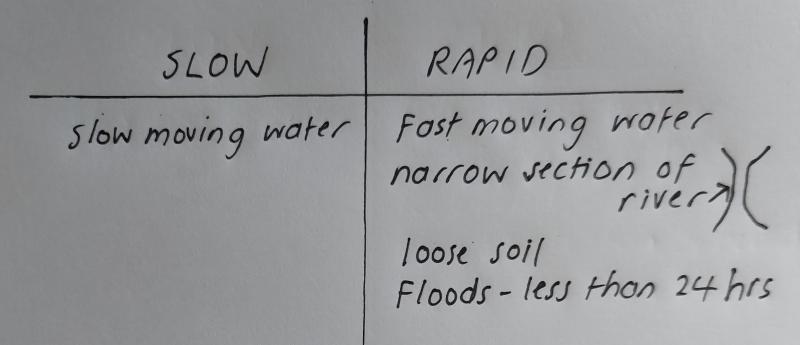
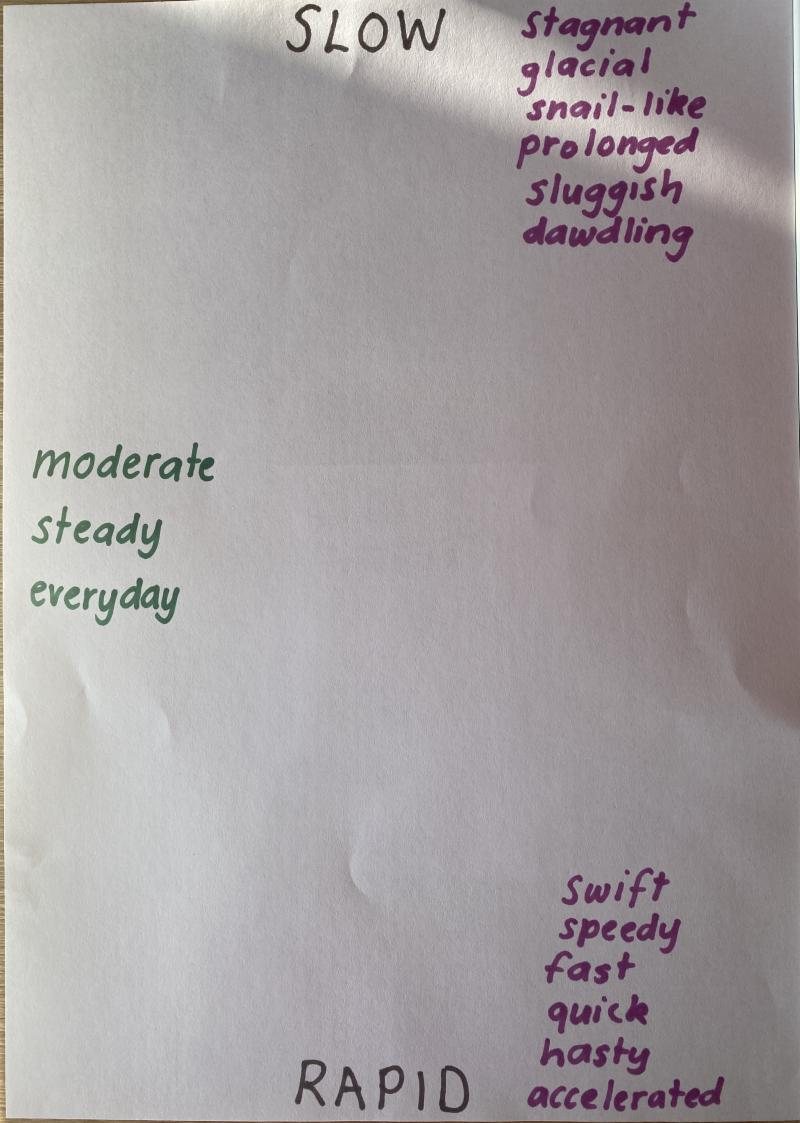
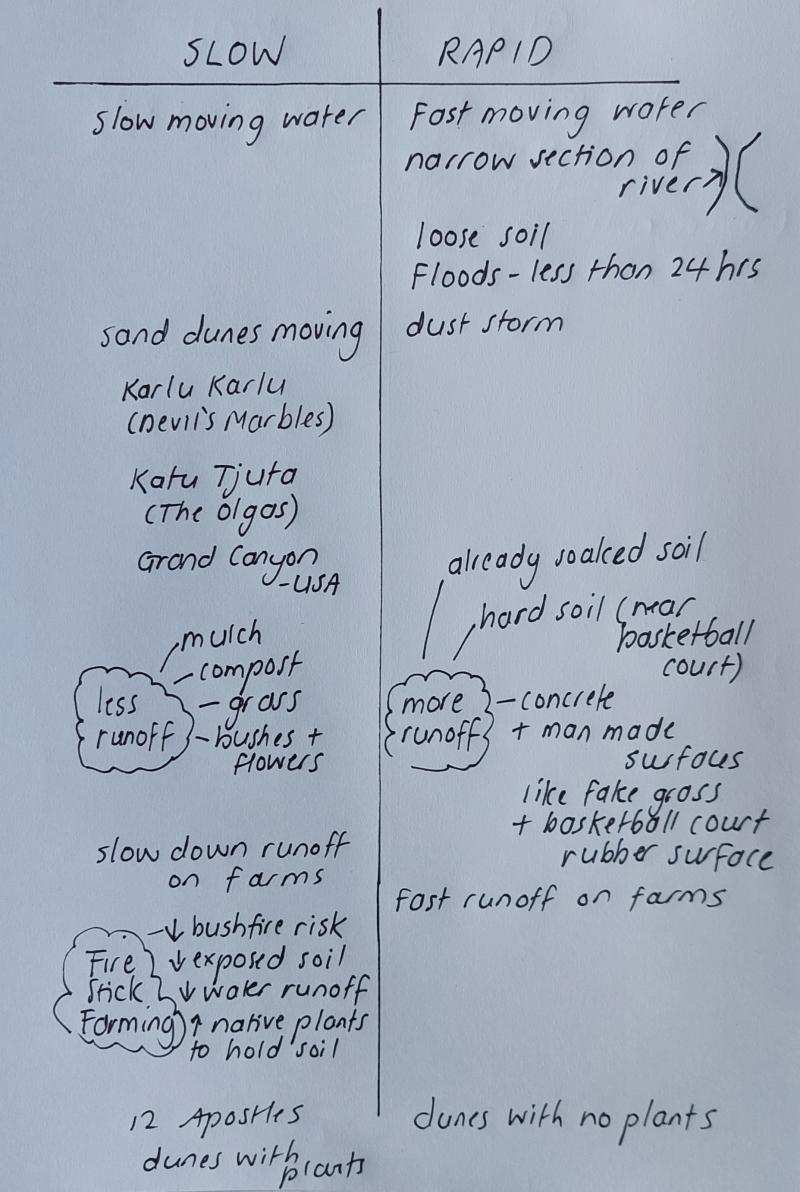
On a page in the class science journal, write the words ‘rapid’ and ‘slow’, either on the top and bottom of the page or on the left and right of a double page. Discuss the meanings of the terms slow and rapid, including synonyms for these terms. Build a time scale continuum by recording other time descriptor words and placing them where students think they would appear between ‘rapid’ and ‘slow’.
Designate one end of the classroom as slow and one as rapid. Ask students to imagine a line between the two ends of the room that represents the time scale continuum. You might place signs at either end of the classroom to help students remember.
Give pairs of students one statement from the Time scale statements Resource sheet.
Pairs discuss their statement, considering:
- the weathering or erosion event described.
- what things are affecting the rate of weathering/erosion in the described event.
- For example, the speed of water flow, strength of wind, size of waves, stability of riverbanks or sand etc.
- where the weathering or erosion event might sit on the time scale continuum.
They then place themselves along the imaginary line representing the time scale continuum.
Note: Students may need some assistance clarifying some of the terminology used in the statements, particularly in relation to landforms such as gorges, rocky outcrops etc.
Each pair reads their statement aloud and shares their reasoning for why they have selected their place on the continuum. Other students can share their thoughts on whether they agree or disagree and why. As you work your way along the continuum, teams might also consider how they are placed next to teams before or after them, and if they might move themselves along the continuum in either direction.
Collect the statements in order from 'slow' to 'rapid' according to the final placements of students and display them in this order for students to refer to later.
Next, students will undertake a series of short investigations to further explore the time scales at which weathering and erosion events occur. These are described below.
Wind erosion
To examine how rapidly erosion can occur, rewatch the video Behind the News segment ‘Dust storm’ (3:50), with a focus on the time scale mentioned in the clip.
Discuss whether erosion and weathering by wind always occurs rapidly or slowly, and add notes to the T chart created at the beginning of the lesson.
- Would we classify a dust storm as causing rapid or slow erosion? Why?
- Can you give an example of slow erosion caused by wind?
- What evidence have we collected during the sequence that supports your ideas?
- When the wind blows sand against rock, it causes weathering. Would this be slow or rapid? How do you know?
- Is erosion by wind a local issue? What things might influence how rapid wind erosion occurs?
Optional: Show the video Weathering by wind (1:33) to further consider slow weathering caused by wind, and/or show the video The Unique Geological Anomaly in Central Australia (3:30) to explore the millions of years of weathering and erosion that have shaped Karlu Karlu (Devil’s Marbles).
Water absorption and runoff in the school grounds
It’s ideal to complete this activity whilst it is raining, however if that is not possible, using buckets of water to simulate rain is also acceptable.
Brainstorm a list of places in the school grounds where students would like to view what happens with water runoff during rain events. This might include areas that contain drains or gutters, any sloping land, areas where soil or tree roots are exposed, or areas with good vegetation cover.
Head out into the school grounds to observe what happens near flowing water and determine which surfaces are permeable (absorb water) and which are non-permeable surfaces (such as concrete and paving). Make notes and/or take photos and video of what happens to the water and the surrounding soil.
Upon returning to the classroom, discuss how the amount of water runoff affects flooding and erosion rates, and add notes to the T chart.
- What differences did you observe?
- If we concrete large areas, would the water runoff into creeks and rivers increase or decrease? Why do you think that?
- What are the positive and negative effects of concreting areas of school grounds, or places like footpaths and driveways etc.?
Gully erosion
Show the video Gully Erosion: See how quickly it can happen (0:16). Note that it is a time-lapse video filmed over a 24 hour period. Ask students to name the factors they observed that contributed to the rapid widening of the gully. For example: rate of water flow, soil type, too much water to penetrate the soil, and run-off into the creek, creating the waterfall effect at the side.
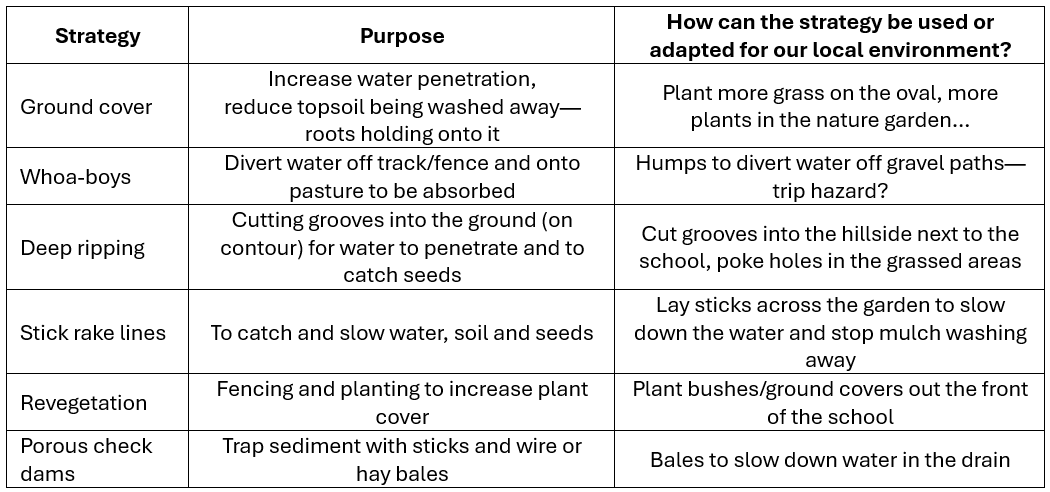
Show the video Gully erosion solutions for your property - Part 4 (6:00), pausing intermittently to discuss the purpose of the erosion control measures being used by the farmers and whether they apply to the local landscape. To support students to build their knowledge for the Act phase, consider allocating 1 sticky note and 1 strategy to each pair, so they can take notes about the purpose of the strategy. Collate their ideas (and sticky notes) in the class science journal.
Discuss the erosion control strategies and their impact on erosion rates, and add further notes to the T chart.
- What is the goal of this erosion control strategy?
- For example, to increase water penetration into the soil, slow down the flow rate of water, spread water out across a larger grassed area, and catch sediment before it is washed too far away.
- Can this erosion control measure be used or adapted for our schoolyard/local landscape?
- Why is it important to slow down the water/increase the amount of water absorbed into the soil?
- Which of these strategies would also help to reduce erosion by wind?
Optional: Students can try some of the erosion control strategies using the landscapes they created in a tray in the previous lesson. If those testing a sloping landscape added coloured aquarium stones to their tray, they could now collect, graph, and compare data after erosion control strategies have been put in place.
Add notes to the T chart as required.
Time scale of change
Over what time scales does weathering and erosion occur?
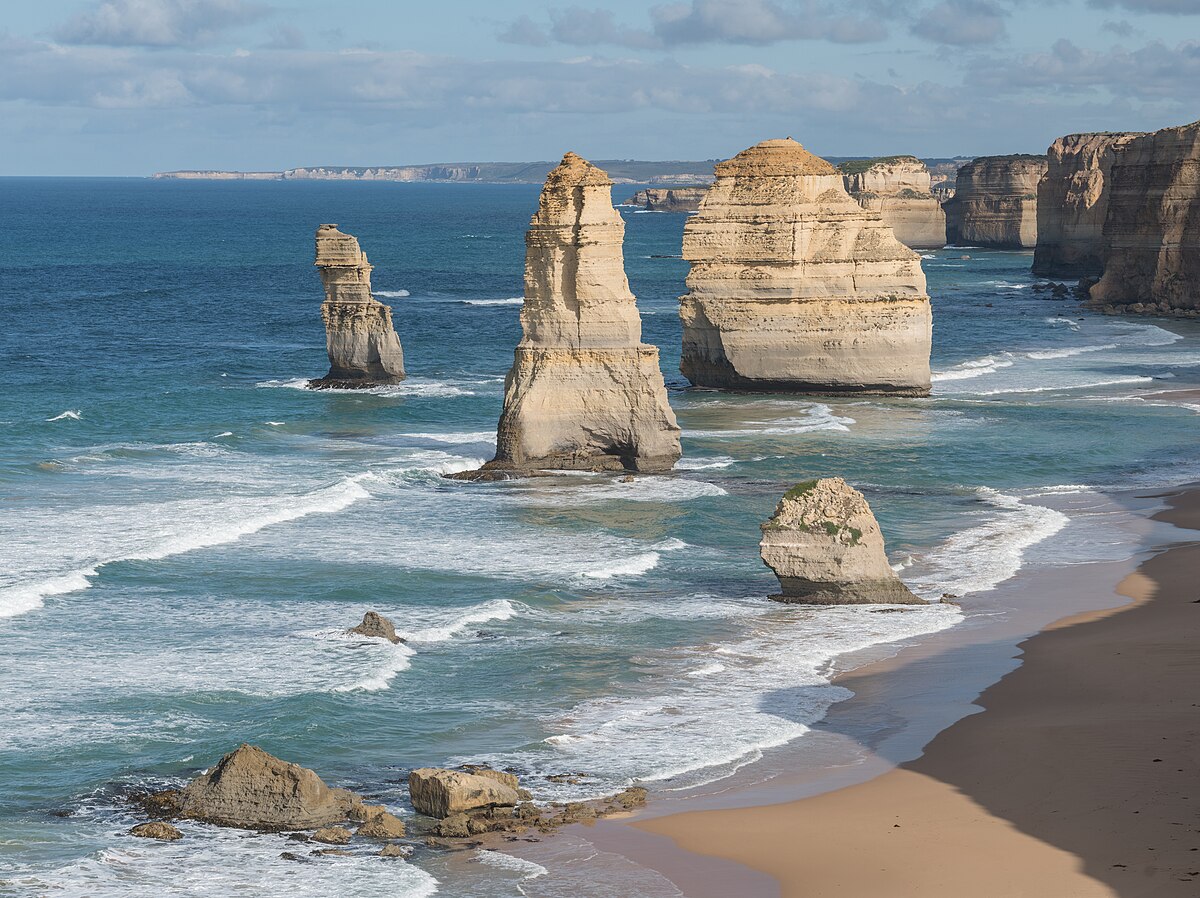
Many rocks take a long time to be broken down and worn away in natural conditions. However, some rocks can be weathered very quickly once they are exposed. For example, the limestone of the Twelve Apostles formation in Victoria developed around 20 million years ago on land. Between 7,000 and 10,000 years ago, at the end of the last ice age, sea levels rose and the limestone was exposed to the sea. Since then, the force of the waves has slowly weathered and eroded the cliffs to create isolated stacks of rocks. In 2005, one of the stacks collapsed, leaving eight standing. The rate of erosion at the base of the limestone stacks is approximately 2 cm per year. Due to wave action eroding the cliff face, existing headlands are expected to become new limestone stacks in the future. The image above shows the Twelve Apostles after the collapse of the stack.
The creation of soils can take hundreds of years; however, the erosion of soils can happen very quickly. For example, a mound of loose soil on a hill can be destabilised by water or by vibrations from an earthquake. The hillside might then suddenly collapse due to gravity. The presence of plants such as trees provides a buffer against the wind, and all plant roots can help bind the soil, reducing the amount blown or washed away.
Flash flooding and dust storms also rapidly erode exposed soil and transport sediment in just a few hours. These are the erosion events students often have the most experience with, as the consequences are easily visible and affect their day-to-day activities. Students may be comfortable sharing their experiences, which can help to provide context for learning. Be mindful that some students’ experiences may have been traumatic and require sensitivity.
The Inquire phase allows students to cycle progressively and with increasing complexity through the key science ideas related to the core concepts. Each Inquire cycle is divided into three teaching and learning routines that allow students to systematically build their knowledge and skills in science and incorporate this into their current understanding of the world.
When designing a teaching sequence, it is important to consider the knowledge and skills that students will need in the final Act phase. Consider what the students already know and identify the steps that need to be taken to reach the level required. How could you facilitate students’ understanding at each step? What investigations could be designed to build the skills at each step?
Read more about using the LIA FrameworkFollowing an investigation, the Integrate routine provides time and space for data to be evaluated and insights to be synthesized. It reveals new insights, consolidates and refines representations, generalises context and broadens students’ perspectives. It allows student thinking to become visible and opens formative feedback opportunities. It may also lead to further questions being asked, allowing the Inquire phase to start again.
When designing a teaching sequence, consider the diagnostic assessment that was undertaken during the Launch phase. Consider if alternative conceptions could be used as a jumping off point to discussions. How could students represent their learning in a way that would support formative feedback opportunities? Could small summative assessment occur at different stages in the teaching sequence?
Read more about using the LIA FrameworkApplying what we’ve learned
In this integrate step, guide students to link their experiences in the investigations into timescales within which weathering and erosion take place.
|
Show the video Great natural wonders—the Twelve Apostles (1:50) and pose the question: In what circumstances are humans unable to slow down the rate of weathering and erosion?
Then show the video Lighthouse moved 70m on rails to save it from falling into the sea (0:49) to observe and discuss a huge engineering mission to save a light house from coastal erosion.
- Why was it necessary to move the lighthouse?
- Why couldn’t they stop the coastal erosion instead?
- It would be very expensive and likely impossible to build a wall tall enough and strong enough to withstand the force of the coastal winds and ocean waves.
- Have you observed coastal erosion? Do you think the erosion could have been slowed or stopped in that circumstance?
Rebuild the time scale continuum in light of students’ new understanding. Distribute a second copy of the statements found on the Time scale statements Resource sheet (you may give pairs the same statement as earlier, or distribute them again randomly). Pairs discuss their statement and place themselves along the imaginary continuum as they did earlier in the lesson.
Share and discuss the statements and students’ reasoning for placing themselves in that position on the continuum. Collect and display the statements in order, comparing them to the previous attempt.
- Is this statement mostly about weathering or erosion?
- As humans can we do anything to speed up or slow down the rate of weathering/erosion occurring in this situation?
- Could this statement be placed in a different place on the time scale? Describe the circumstances that would affect where we place it.
- For example, extreme wind speed could cause erosion to occur more rapidly, humans removing vegetation can make soils more vulnerable to erosion, large ocean swells caused by extreme weather can increase erosion, a quarry that operates 24 hours a day breaks more rocks than a small quarry that only operates 2 days per week.
- In relation to time scales, why is it important that we try to minimise erosion?
Optional: Ask students to write their own additional statements about weathering or erosion and place them on the time scale. Topics covered through the sequence can be used to prompt the students, such as chemical weathering, freeze-thaw weathering and erosion.
Reflect on the lesson
You might:
- add to the rapid/slow T chart.
- refer to the list of student questions asked in Lesson 1. Determine which questions have been answered over the course of the teaching sequence, what the ‘answers’ to the questions are, and the evidence that supports these claims. Address questions that have not been answered during the teaching sequence, discuss why they might not have been addressed and potential investigations that might support students to answer them.
- review students’ responses to the Thinking about landscapes Resource sheet completed in Lesson 1, comparing students’ initial ideas to what they think now and considering how their thinking has changed.
- consider what students have learnt about weathering, erosion, transportation and deposition.
- ask students to represent their learning in words, symbols and pictures.
- discuss why it’s important to have a good understanding of weathering and erosion: what kinds of jobs would require you to understand this? What about in your everyday life? What activities might be affected by weathering and erosion?