Question Formulation Technique
The Question Formulation Technique (Santana & Rothstein, 2018) outlines four steps for students to generate, refine, and select useful questions. Students should work together in small groups of 3-5.
Before the QFT
Before you begin, identify a stimulus that is relevant to the learning focus. The stimulus could be a phrase, an image, a video, a song, a demonstration, etc; almost anything but a question. Present the stimulus to students. Then, guide students through these steps:
- Examine stimulus.
- Brainstorm questions. There are four rules to this:
- Ask as many questions as you can.
- Do not stop to discuss, judge, or answer any questions.
- Write down every question exactly as it is stated.
- Change any statement into a question.
- Improve questions. Categorise questions as open and closed. Add more questions by turning closed questions into open questions, and open questions into closed questions.
- Prioritise questions. This may be according to importance, or the way to source the answers.
- What questions are most important? What questions can be investigated? What questions will help you solve a problem? Possible solution: Observation (direct observation or classification often done immediately), Research (identifying the who or when questions), Action (needing to do a fair test), Pattern seeking (comparing research or experimental results).
During the QFT
- Monitor and facilitate group work. Clarify instructions as necessary. Do not be pulled into discussions about the stimulus, and do not answer any of the questions generated. Do not provide examples of questions.
- Validate students’ contributions. “Thank you” is a neutral response to contributions. Giving feedback to questions in the moment will affect the quality and quantity of questions and is undesirable.
- Allow groups to work at their own pace. Some groups may generate five questions and others may generate 15 in the same timeframe. Encouraging competition or insisting on a particular number of questions from each group can be counterproductive and reduce the quality and variety of questions. If a group gets stuck, remind them of the stimulus. Prompt them to think about what they would like to know about it.
This process encourages students to develop their own questions related to the topic which is the driver of the inquiry process.
Discuss with your colleagues
You will need a variety of stress balls, gloves, large trays (able to contain liquid), a scalpel or sharp knife, scissors, post-it notes, pen.
Consider what you know about stress balls. Write all your ideas as a list or concept map.
Put on the gloves and place your stress ball in the tray. Use the scalpel to make a small slit in the side of the stress ball. Use the scissors to cut open the stress ball. Remove the filling of the stress ball into the tray. Spend about 5 minutes exploring the contents of the stress ball.
Engagement
Did you enjoy this activity?
Did you become more interested in stress balls?
What scientific knowledge/words did you use during this activity?
Asking questions
Now you have experienced the stimulus, brainstorm as many questions as you can about stress balls and what you would like to know. Write each question on a different post-it note. The challenge is you can only use the following question stems (once each) from the list below.
Why…? What…? Where…? Which…? Who…? What if…? How does…? Why…? Will…? Should…? Could…? Would…?
Analysing questions
Did you change any of the questions as you were asking them?
Which question stems did you find most difficult to use?
How did you approach asking the questions? Did you start with the question stems, or modify your question to suit a particular question stem?
How might you use this technique to encourage students to ask a greater variety of questions?
Classifying questions
Break your questions into four groups.
Observation questions: direct observation or classification is often done immediately.
Research questions: identifying the who or when questions.
Action questions: needing to do a fair test.
Pattern-seeking questions: comparing research or experimental results.
- How did this approach change the way you thought about questions?
- Are there any types of questions that you did not ask?
- How does this approach help you to gather answers to the questions?
- Were there any questions that were difficult to classify? Could you change these questions to make it easier?
References
Skamp, K., & Preston, C. (2021). Teaching primary science constructively (7th ed.). Cengage Learning Australia.
Santana, L. & Rothstein, D. (2018). The Question Formulation Technique. Retrieved from http://rightquestion.org/. Massachusetts: The Right Question Institute.

Here's where you'll find:
- Deep dives into high impact teaching practices
- Discussion questions for you to explore with your colleagues
- Links to related lessons in our teaching sequences
Lesson 2 • What is a liquid?
Students undertake a hands-on exploration to determine the properties of a liquid.
Communicating matters
View Sequence overviewStudents will:
- investigate to identify and name the properties that help us describe a liquid.
- apply this to determine if something is a liquid or not.
Students will represent their understanding as they:
- record observations about the behaviour of liquids in a data table.
- make and discuss claims about the properties of liquids.
In this lesson, assessment is formative.
Feedback might focus on:
- the claims students make about which samples are liquids.
- Are they being consistent in their claims? What features are they focusing on to support their ideas?
- Do students’ final claims about the sample match the identified properties of a liquid?
Whole class
Class science journal (digital or hard-copy)
A large quantity of a pourable solid such as laundry powder, flour, sugar etc.
A volume of water for demonstration purposes. The volume of water needs to be large enough that all students will be able to see the behaviour of the water clearly
4 large clear plastic containers of the same size, preferably marked with standard measurements
Demonstration copy of Liquid observations Resource sheet (or create your own)
Each group
Samples of various liquids in small, sealed transparent containers. For example: water, soft drink, cordial, honey, cooking oil, laundry liquid etc.
Sample of at least one pourable solid in a small, sealed transparent container. For example: laundry powder, flour, sugar etc.
Container/s to pour samples into for observation (one container is sufficient, provided it is rinsed and dried between uses)
Each student
Individual science journal (digital or hard-copy)
Liquid observations Resource sheet (or create their own)
Lesson
The Inquire phase allows students to cycle progressively and with increasing complexity through the key science ideas related to the core concepts. Each Inquire cycle is divided into three teaching and learning routines that allow students to systematically build their knowledge and skills in science and incorporate this into their current understanding of the world.
When designing a teaching sequence, it is important to consider the knowledge and skills that students will need in the final Act phase. Consider what the students already know and identify the steps that need to be taken to reach the level required. How could you facilitate students’ understanding at each step? What investigations could be designed to build the skills at each step?
Read more about using the LIA FrameworkRe-orient
Recall the previous lesson, focusing on the samples that students thought might be liquids. Revisit the vocabulary they used to describe liquids and how they decided what made something a liquid.
The Inquire phase allows students to cycle progressively and with increasing complexity through the key science ideas related to the core concepts. Each Inquire cycle is divided into three teaching and learning routines that allow students to systematically build their knowledge and skills in science and incorporate this into their current understanding of the world.
When designing a teaching sequence, it is important to consider the knowledge and skills that students will need in the final Act phase. Consider what the students already know and identify the steps that need to be taken to reach the level required. How could you facilitate students’ understanding at each step? What investigations could be designed to build the skills at each step?
Read more about using the LIA FrameworkIdentifying and constructing questions is the creative driver of the inquiry process. It allows students to explore what they know and how they know it. During the Inquire phase of the LIA Framework, the Question routine allows for past activities to be reviewed and to set the scene for the investigation that students will undertake. The use of effective questioning techniques can influence students’ view and interpretation of upcoming content, open them to exploration and link to their current interests and science capital.
When designing a teaching sequence, it is important to spend some time considering the mindset of students at the start of each Inquire phase. What do you want students to be thinking about, what do they already know and what is the best way for them to approach the task? What might tap into their curiosity?
Read more about using the LIA FrameworkWhat makes something a liquid?
With students brainstorm the names of different liquids, recapping and adding to the list created in the Launch phase.
Display the samples students will be examining during the lesson.
Pose the questions: Which ones are liquids? And what makes something a liquid?
Properties of a liquid
What are the properties of a liquid?
When coupled with the previous investigations, these demonstrations have been designed to support students to articulate the properties of a liquid using accurate descriptions and terminology. Determining the properties of liquid in this specific way will enable students to repeat the process more independently when they explore solids and gases, and will also help them to compare solids, liquids and gases later in the sequence.
Liquids typically have the following properties:
- They have a constant volume, and are often referred to as incompressible. They can be compressed slightly, but this requires a great deal of pressure and is usually not possible in day-to-day situations.
- Liquids flow.
- Liquids do not hold their shape and will spread out to fill the space available.
- Liquids will level out naturally and independently immediately after flowing.
Liquids v pourable solids
Both pourable solids and liquids appear to flow when poured into a cup.
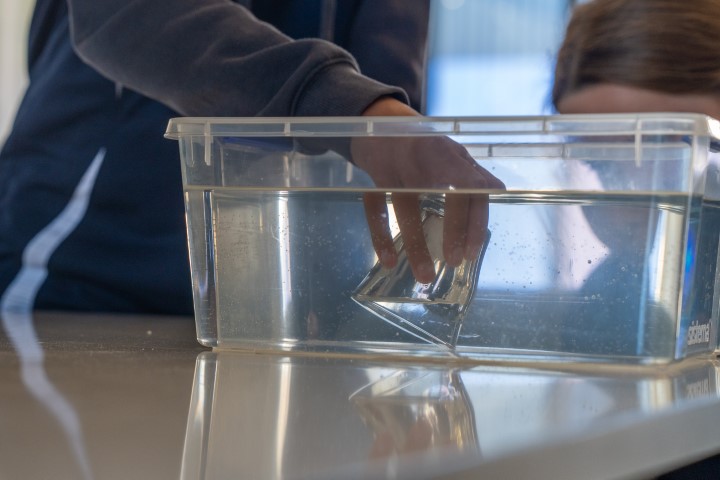
Students might find it difficult to distinguish between a pourable solid and a liquid, because both will appear to flow when poured into a cup.
A liquid does not hold its shape, and will take the shape of the container it is poured into. The surface of the liquid levels on its own after pouring is complete.
A pourable solid is made up of many small solid ‘grains’. Whilst these small grains will pour and flow in much the same way as a liquid, they will typically ‘mound’, and will not level unless manipulated.
The Inquire phase allows students to cycle progressively and with increasing complexity through the key science ideas related to the core concepts. Each Inquire cycle is divided into three teaching and learning routines that allow students to systematically build their knowledge and skills in science and incorporate this into their current understanding of the world.
When designing a teaching sequence, it is important to consider the knowledge and skills that students will need in the final Act phase. Consider what the students already know and identify the steps that need to be taken to reach the level required. How could you facilitate students’ understanding at each step? What investigations could be designed to build the skills at each step?
Read more about using the LIA FrameworkThe Investigate routine provides students with an opportunity to explore the key ideas of science, to plan and conduct an investigation, and to gather and record data. The investigations are designed to systematically develop content knowledge and skills through increasingly complex processes of structured inquiry, guided inquiry and open inquiry approaches. Students are encouraged to process data to identify trends and patterns and link them to the real-world context of the teaching sequence.
When designing a teaching sequence, consider the diagnostic assessment (Launch phase) that identified the alternative conceptions that students held. Are there activities that challenge these ideas and provide openings for discussion? What content knowledge and skills do students need to be able to complete the final (Act phase) task? How could you systematically build these through the investigation routines? Are there opportunities to build students’ understanding and skills in the science inquiry processes through the successive investigations?
Read more about using the LIA FrameworkTesting samples
Discuss what students might do to help them make observations about the samples. For example, they might:
- turn the container upside down.
- shake it.
- use a magnifying glass to look closely at the contents.
- pour the contents into another container and note how long it takes to flow and what happens when it settles.
Discuss:
- how students might record the results of their investigation.
- the purpose of a data table: it allows them to record each action and its results.
- what needs to be included in the data table: what they did, what they observed during/after each action, and their claim identifying the sample as a liquid or other. You might use the Liquid observations Resource sheet or create your own.
If required, discuss what a scientific claim is, and discuss with students how they might reach one. Read Facilitating evidence-based discussions for further information.
Allow students time to carry out the investigation in collaborative teams and record results individually. Students may have different ideas about what each sample is and whether it is a solid or liquid. Recording their findings individually provides an opportunity to discuss and share ideas with others, whilst allowing for individual expression. This also supports formative assessment.
The Inquire phase allows students to cycle progressively and with increasing complexity through the key science ideas related to the core concepts. Each Inquire cycle is divided into three teaching and learning routines that allow students to systematically build their knowledge and skills in science and incorporate this into their current understanding of the world.
When designing a teaching sequence, it is important to consider the knowledge and skills that students will need in the final Act phase. Consider what the students already know and identify the steps that need to be taken to reach the level required. How could you facilitate students’ understanding at each step? What investigations could be designed to build the skills at each step?
Read more about using the LIA FrameworkFollowing an investigation, the Integrate routine provides time and space for data to be evaluated and insights to be synthesized. It reveals new insights, consolidates and refines representations, generalises context and broadens students’ perspectives. It allows student thinking to become visible and opens formative feedback opportunities. It may also lead to further questions being asked, allowing the Inquire phase to start again.
When designing a teaching sequence, consider the diagnostic assessment that was undertaken during the Launch phase. Consider if alternative conceptions could be used as a jumping off point to discussions. How could students represent their learning in a way that would support formative feedback opportunities? Could small summative assessment occur at different stages in the teaching sequence?
Read more about using the LIA FrameworkDiscussing claims
Share and discuss students’ results.
- What claim do you make about each substance?
- Is it a liquid? What evidence do you have to support that?
- Did you have any difficulties deciding if any of the substances where liquids? Which ones and why?
Encourage students to ask questions. Refer to the science question starters.
The Inquire phase allows students to cycle progressively and with increasing complexity through the key science ideas related to the core concepts. Each Inquire cycle is divided into three teaching and learning routines that allow students to systematically build their knowledge and skills in science and incorporate this into their current understanding of the world.
When designing a teaching sequence, it is important to consider the knowledge and skills that students will need in the final Act phase. Consider what the students already know and identify the steps that need to be taken to reach the level required. How could you facilitate students’ understanding at each step? What investigations could be designed to build the skills at each step?
Read more about using the LIA FrameworkThe Investigate routine provides students with an opportunity to explore the key ideas of science, to plan and conduct an investigation, and to gather and record data. The investigations are designed to systematically develop content knowledge and skills through increasingly complex processes of structured inquiry, guided inquiry and open inquiry approaches. Students are encouraged to process data to identify trends and patterns and link them to the real-world context of the teaching sequence.
When designing a teaching sequence, consider the diagnostic assessment (Launch phase) that identified the alternative conceptions that students held. Are there activities that challenge these ideas and provide openings for discussion? What content knowledge and skills do students need to be able to complete the final (Act phase) task? How could you systematically build these through the investigation routines? Are there opportunities to build students’ understanding and skills in the science inquiry processes through the successive investigations?
Read more about using the LIA FrameworkFollowing an investigation, the Integrate routine provides time and space for data to be evaluated and insights to be synthesized. It reveals new insights, consolidates and refines representations, generalises context and broadens students’ perspectives. It allows student thinking to become visible and opens formative feedback opportunities. It may also lead to further questions being asked, allowing the Inquire phase to start again.
When designing a teaching sequence, consider the diagnostic assessment that was undertaken during the Launch phase. Consider if alternative conceptions could be used as a jumping off point to discussions. How could students represent their learning in a way that would support formative feedback opportunities? Could small summative assessment occur at different stages in the teaching sequence?
Read more about using the LIA FrameworkMore observations
Set up four large clear containers of the same size:
- one containing liquid
- one containing a pourable solid
- one empty container next to each sample (so the samples might be poured between containers)
Set up a T-chart in the class science journal to record observations about samples A and B.

Record students’ initial observations about the samples, including the shape and the amount in the containers. Ask students to make a claim identifying samples A and B as liquids or solids, and how certain they are of this.
During the following discussion you will pour the two samples back and forth between their original container and an empty one, first focusing on the amount of the sample and then the shape of the sample.
Amount of the sample
Pour the samples back and forth between containers, asking the students to take note if the two samples are still taking up the same amount of space (yes), and if there is any way to get them to take up more space or less space without changing them somehow (no).
NOTE: Students might offer suggestions of ways to change the amount of space the sample take up that require them to be physically or chemically changed in order to increase or decrease their volume. For example, mixing them together or with other substances, or removing part of the sample. If necessary, remind students that the question specifically focused on not changing the samples in any way.
Allow them time to discuss and share ideas and observations as you demonstrate.
- What do you observe about the amount of space the samples take up?
- They take up the same amount of space in each container, you can’t get them to take up more/less space.
- Does the amount/size of the sample stay the same as I pour them back and forth?
- Could you say the same about both samples?
Introduce the terms:
- volume: a measurement of the amount of space something takes up.
- constant: something that stays the same.
- compressed: to reduce in size, quantity or volume via pressure.
Students discuss with a partner how they would use these terms to describe the samples. Share ideas as a class.
Present the claim that, for each sample: The volume remains constant, and cannot be compressed.
Ask students if they agree and why/why not, referring to evidence from the demonstration. Discuss until the class reaches consensus that the claim appears to be true. Record it in the class science journal, along with the supporting evidence.
Shape of the sample
Now focusing on the shape of each sample as it is poured back and forth between containers, ask students to take note of how the samples level out each time they are poured between containers. They should notice that the liquid levels out independently, but the pourable solid will mound, and needs to be manipulated by shaking the container in order to level out.
Allow them time to discuss and share ideas and observations as you demonstrate.
- What do you observe about the shape of the sample as I pour it between containers?
- Does the shape stay the same?
- Could you say the same about both samples?
- What do I have to do to the container to make the shapes of each sample the same?
- You have to shake sample B’s container to make it level out.
- What might this tell us about which of the samples is a liquid?
- Would you now change the claim you made earlier about the samples being solid or liquid? Or feel more confident about your claim?
Present the claim: Liquids take the shape of the container they’re in, they level out independently, and they have a flat featureless surface when still.
Ask students if they agree and why/why not, referring to evidence from the demonstration. Discuss until the class reaches consensus that the claims appears to be true. Record it in the class science journal, along with the supporting evidence.
Determine which sample is and is not a liquid, what is similar and different when comparing the two, and what students think the sample that is not a liquid might be.
Revisit the samples examined earlier in the lesson and students’ claims about each sample, to determine if they correctly identified the liquids. Discuss if they changed any of their responses, and why they did so.
Reflect on the lesson
You might:
- add to the class word wall of vocabulary related to liquids and their properties.
- refer to the list created in the Launch phase, or substances students confidently categorised as liquid, and substances they weren’t sure about. Would they reclassify any based on what they have learned?
- add to the class TWLH, completing the H and L sections with what they have learned about liquids.
- ask students for further questions about liquids to add to the class science journal or TWLH chart. Discuss how you might investigate to find the answers to these questions. Provide students with opportunities to undertake such investigation.
- revisit the drawings and words students used in the Launch phase to describe liquids and make any additions using a different coloured pen/pencil.
- discuss how they might use science communication techniques to help other understand what they have learned. Add it to the list created in Launch phase.
- consider what questions a 'non-expert' might ask them about liquids.
- discuss how students were thinking and working like scientists during the lesson. Focus on how they made their observations and made claims supported by evidence.
TWLH chart
At this stage, students can now contribute to the L and H sections of the TWLH chart.
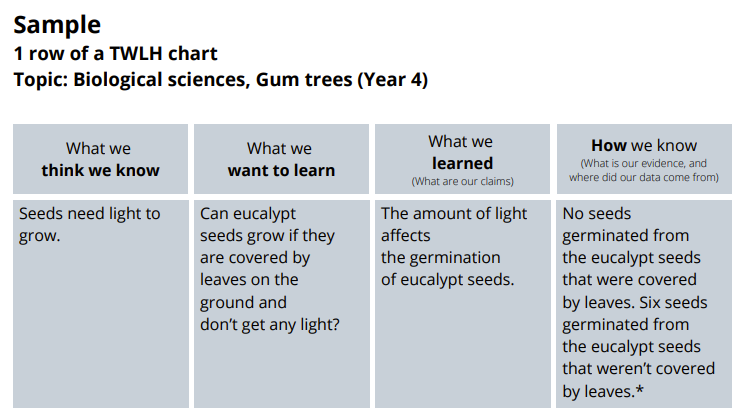
Students have now had some shared experience, where they have made claims about the properties of liquids, supported by the evidence they collected during the investigation.
At this phase, students can now contribute to the L and H sections, linking something they have specifically learned to the supporting evidence. For example, they might say that liquids level out independently, and that they know this because each of the sample they would confidently identify as liquids did so.
For you
Materials
The Q-matrix
The Q-matrix presents a series of question stems that can be used to generate useful questions.
The Q-matrix (Wiederhold & Kagan, 2007) presents a series of question stems that can be used to generate useful questions. Questions might be used by students to shape inquiry about a real-world experience or by teachers using students’ questions to sequence learning across a unit plan.
From left to right, and top to bottom, the presented stems prompt questions from the declarative to the speculative. Questions posed using the stems in the top left corner are more likely to be closed, while those in the bottom right are more likely to be open. In generating responses to questions toward the bottom right of the matrix, students are more likely to be required to explain, analyse, justify, and evaluate data and information. It should be noted though, that some of the usefulness of the Q-matrix rests in valuing students’ questions, without the requirement that students then find resolutions.
The question stems are best introduced using the familiar first-word prompts across the top of the matrix (what, where/when, which, who, why, how). In later lessons, present students with opportunities to use a 2x2 or 3x3 block, a row, or a column, selected by you as appropriate. Finally, allow students to use any intersections of the whole matrix to generate questions.
Below are two formats of the Q-matrix.
Q-matrix 1
| What is…? | Where/when is…? | Which is…? | Who is…? | Why is…? | How is…? |
| What did/was…? | Where/when did/was…? | Which did/was…? | Who did/was…? | Why did/was…? | How did/was…? |
| What can…? | Where/when can…? | Which can…? | Who can…? | Why can…? | How can…? |
| What would…? | Where/when would…? | Which would…? | Who would…? | Why would…? | How would…? |
| What will…? | Where/when will…? | Which will…? | Who will…? | Why will…? | How will…? |
| What might…? | Where/when might…? | Which might…? | Who might…? | Why might…? | How might…? |
Q-matrix 2
| What | Where/when | Which | Who | Why | How | |
| is | ||||||
| did/was | ||||||
| can | ||||||
| would | ||||||
| will | ||||||
| might |
Discuss with your colleagues
Write down three questions that you asked in your classroom in the last week.
Classify these questions as open or closed questions.
Use the Q-matrix to write:
- closed questions as open questions.
- open questions as closed questions.
Compare the questions you have generated with your colleagues.
Discuss:
- How did your questions change as a result of this reading?
- How would the alternative questions have affected the discussion in your classroom?
- When would students benefit most from using a Q-matrix?
- How could you introduce the Q-matrix to your students?
- Which students might need time to formulate a question? How could you incorporate this in your classroom practice?
- How might the complexity of questions change over a lesson/topic?
Reference
Wiederhold, C. W. & Kagan, S. (2007) Cooperative learning & higher-level thinking: the Q-matrix <https://www.kaganaustralia.com.au/shop/cooperative-learning/cooperative-learning-higher-level-thinking/>. Hawker Brownlow Education.
Here's where you'll find:
- Deep dives into high impact teaching practices.
- Discussion questions for you to explore with your colleagues.
- Links to related lessons in our teaching sequences.
Representing in science
Learning science involves understanding how to interpret and use multimodal representations of phenomena: diagrams, 3D models, photographs, tables and graphs, and chemical or mathematical equations.
Learning in science involves multiple multimodal representations
A look at any science textbook will make it obvious that learning science involves understanding how to interpret and use multimodal representations of phenomena: diagrams, 3D models, photographs, tables and graphs, and chemical or mathematical equations. Each mode (visual, verbal or written, tactile, mathematical) has particular strengths in how it productively constrains our attention and shapes our thinking:
- Visual diagrams or photographs are powerful in explicating shape and spatial relations or visualising sequences of events.
- Text is effective for expressing logical arguments such as causal explanation.
- Tables help organise and focus our attention on patterns in events or numbers.
- Graphs constrain our attention to trends and relations.
It is through the creation and use of these multimodal representational languages that scientists build knowledge, and that students learn to discern and use that knowledge and the practices that go with it. For example, understanding a concept like ‘plant structure and function’ involves being able to decipher the key parts of diverse plants (through diagrams, annotations, classification charts) and their purposes (through textual explanation, narrative descriptions and charts, and diagrams, tables and graphs).
Sequencing, interpreting, and coordinating representations
If learning in science can be viewed as induction into these multimodal language practices then science topics need to be planned to strategically sequence and coordinate these. The figure below shows a series of representational tasks for a study of the growth of ‘fast plants’ where students measured these regularly using pipe cleaners placed alongside the plant, recording through diagrams and a table, the growth in height and in leaf number, then a graph of plant growth for different groups, and a series of diagrams of flowers, the pollination process (students themselves pollinated using buds as ‘bee sticks’), and then the plant reproductive cycle.
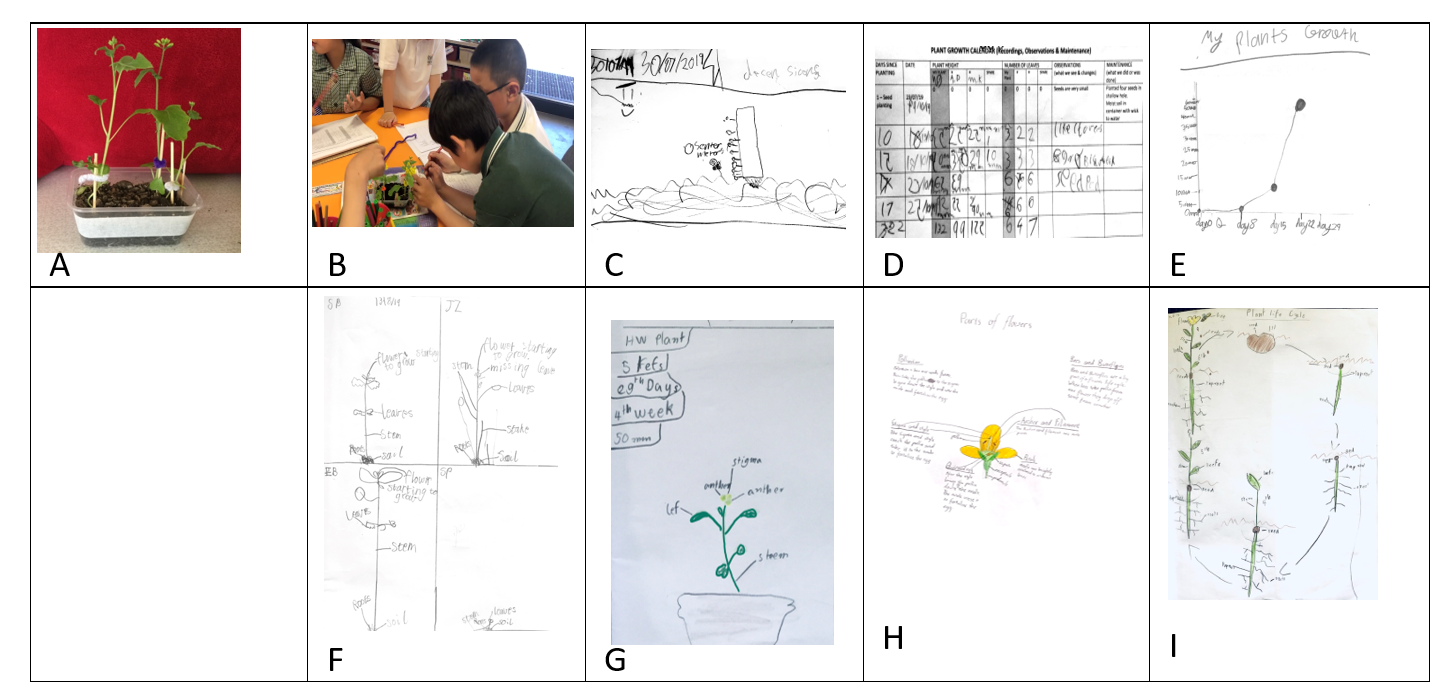
This sequence illustrates:
- the progression from observation through to more abstracted and general scientific and mathematical representations.
- how representational work in science can be productively embedded in observation and measurement activity.
In teaching such sequences it is important to unpack for students the ‘grammar’ of each representational form – how best to annotate diagrams, how to represent scale, the conventions around constructing graphs, or of biological drawings. Too often we assume that students can interpret these representational conventions, but they need to be explicitly unpacked. Further, having students actively create representations is a way of monitoring the challenges they have.
We need to support students to recognise how these representations interrelate to achieve a rich understanding of the target concepts. To understand the meaning of the growth graph, students need to understand its link to the table, and back to the measurement process by which the height was represented. Interpreting the graph slope as showing that the height increased more quickly after the second week, is reflected in the table numbers and made meaningful by linking with students’ material experiences.
Constructing, evaluating and revising representations
If we value representational work as a scientific practice through which understandings are established and expressed, then guiding students to construct representations in response to a challenge, then evaluate and refine them in a consensus-building process, is a powerful way of supporting learning. Such a process underpins the structure of the Inquire phase of the LIA Framework.
The Question routine involves not only engaging students’ interest but also preparing them with the skills to respond productively to a representational challenge.
During the Investigate routine the teacher is constantly interacting with students to question, suggest and challenge students in their representing work. Actively representing to ‘make thinking visible’ supports learning in three distinct ways:
- Supporting individual reasoning: It challenges students to articulate and refine their ideas,
- Collaborative reasoning: Students constructing representations in groups makes thinking visible for discussion and clarification with peers,
- Teacher monitoring: Teachers can more effectively monitor students’ thinking and support them to refine their ideas.
In the Integrate routine involving the building of consensus, two strategies are commonly used:
- Selective display: Strategically inviting particular students to display and explain their representational work, inviting class comment on the strengths of each, and where they might be clarified.
- Gallery walk: Students leave their representations on their desks and are invited to walk around to view other students’ work, looking for representational aspects that were particularly clear or opened up fresh ideas.
Re-representing in a different mode is a powerful learning strategy and can be undertaken outside of hands-on investigations. For instance, students can be challenged to compare and critique different representations in books (e.g. of the water cycle) and come up with their own version, or they can be challenged to create a stop-motion video, or a cartoon sequence, of a scientific process in a book such as particle models of evaporation.
Discuss with your colleagues
Consider the sequence of representations in the fast plant experiment (Figure 1).
- Identify the key features of each representation.
- Contrast (the differences) the key features and the way each approach develops students’ ability to measure and record plant growth.
- Identify strategies/questions that could be used to support students in making a meaningful link between measurements shown in pictures, tables, and graphs.
Develop a sequence of representational challenges appropriate for the next teaching sequence for your students. An example you could use includes:
- Experience and represent different degrees of ‘hotness’ of objects,
- Use thermometers to explore a range of temperatures,
- Compare the rate of cooling of warm water in different cups.
References
Tytler, R., & Prain, V. (2022). Interdisciplinary Mathematics and Science – a guided inquiry approach to enhance student learning. Teaching Science, 68(1), 31-43.
Carolan, J., Prain, V., & Waldrip, B. (2008). Using representations for teaching and learning in science. Teaching Science, 54(1), 18-23.
Tytler, R., Haslam, F., Prain, V., & Hubber, P. (2009). An explicit representational focus for teaching and learning about animals in the environment. Teaching Science, 55(4), 21-27
Here's where you'll find:
- Deep dives into high impact teaching practices.
- Discussion questions for you to explore with your colleagues.
- Links to related lessons in our teaching sequences.
Mystery box
The mystery box activity is designed to support students’ understanding of how scientists base their conclusions on available evidence in the form of observations.
Mystery box
The mystery box activity is designed to support students’ understanding of how scientists base their conclusions on available evidence in the form of observations.
A series of starter comments for observations include:
I see…
I hear…
I smell…
I feel…
I taste… (rarely used in a science classroom)
Once students have outlined their observations, they can infer what an object is using the starter comment “I think…”
As more evidence/observations become available, the inference may be revised or extended.
Preparation
The mystery box(s) should be prepared before the activity. It should be an opaque container, bag or cardboard box that contains a mystery object. This may include a piece of fruit (apple or banana), toy (car or building blocks) or office supplies (pen or pencil).
For older students, consider objects that roll or slide, or that have different weights. For a particular challenge, place a marble in a tin can and tape it (open side down) to the bottom of the box.
Before the mystery box activity
Encourage students to reflect on how they make observations. Prompt students to use the observation starters.
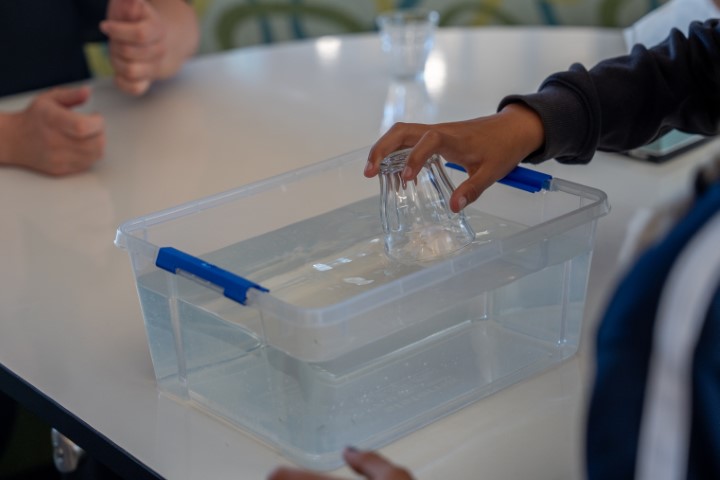
The mystery box activity
- Invite students to sit in groups of 4, in a class circle.
- Introduce the ‘Mystery Box’ (container/tub/bag). Explain that it has mystery objects inside and that the students will close their eyes and try to work out what the mystery objects are.
- Explain that:
- each group will have a different mystery object to identify.
- for the game to work, we must not call out the name of the object. For example, even if we think it is an apple, we need to use describing words such as smooth, hard, heavy (not the word ‘apple’).
- Invite the first group to stand up (or sit in the special chairs) and close their eyes. Place the mystery object in the first group member’s hands. Remind students not to look at the object yet.
- Student 1 shakes the box and describes “I hear…” (number of objects, the sounds of it/them moving/sliding/hard bump/rolling)
- Student 2 describes what the object feels like to the class (“I feel…), then passes it to student 3.
- Student 3 is allowed to open their eyes, and describe how the item looks (“I see…shape/colour”), then pass it to student 4.
- Student 4 guesses the name of the item (“I think…”).
- Repeat steps 5 to 8 with each group of four students around the circle, using a different mystery object each time.
Alternative: Ask the entire class to close their eyes. Then, if the fourth group member is unable to identify the item correctly, call on other members of the class to infer what it is.
After the mystery box activity
Prompt students to consider how their ideas changed as they received more information. Compare this to the way science ideas may be revised or consolidated as more information becomes available.
Discuss with your colleagues
Set up your own mystery box activity for your colleagues.
Reflect on the process of identifying an object.
- Were questions repeated?
- What hints could have helped you without giving the answer?
- What properties could you have used to help narrow down possible answers (i.e. sliding vs rolling)?
Here's where you'll find:
- Deep dives into high impact teaching practices.
- Discussion questions for you to explore with your colleagues.
- Links to related lessons in our teaching sequences.
Lesson 1 • Solid, liquid or gas?
This lesson introduces the context and content of this teaching sequence: exploring solids, liquids and gases, the scientific theory that explains their behaviour (the particle model), and the substances that are sometimes difficult to categorise.
Communicating matters
View Sequence overviewStudents will:
- demonstrate curiosity and ask questions about substances that are difficult to classify as solid, liquid or gas.
- classify substances as solid, liquid or gas.
Students will represent their understanding as they:
- participate in class discussions about solids, liquids and gases.
- create a diagrammatic and written explanation of what’s ‘inside’ materials/substances.
In the Launch phase, assessment is diagnostic.
Take note of:
- student ideas about solids, liquids and gases. Can they confidently identify substances/objects that belong in one, two or all three categories? Which category do they have difficulty with? Can they identify substances/objects that are tricky to categorise?
- the vocabulary students use to describe solids, liquids and gases.
- students’ understanding of the particle model. Do they include particles in their representations of solids, liquids and gases?
Whole class
Class science journal (digital or hard-copy)
A large clear container or tray containing a mixture of cornflour and water mixed at a ratio of approximately 2:1 (twice as much cornflour to water)
Demonstration copy of Solid, liquid or gas? Resource sheet
A variety of texts, at a suitable level for your students, that explain science concepts in a way they can understand.
The following websites are trusted resources with age-appropriate videos and texts.
- Curious by the Australian Academy of Science
- Behind The News by the ABC
- Science by ABC Education
Each group
40g of corn flour
20mls of water
Small bowl
Spoon for mixing
Eight different samples of various objects/materials/substances in clear plastic containers. Each group needs the same set of samples. Samples might include:
- some that can be easily classified as solid (stones, scissors etc.), liquid (water, oil) and gas (a small container of air).
- some that may be more difficult to classify such as playdough (a soft solid), paper (a flexible solid), elastic bands (a stretchy solid), washing powder (a powdered or pourable solid), honey (a very viscous liquid), or a sponge (a solid interspersed with pockets of gas/air).
Safety note
It is important to make it clear to students that it is not safe to taste any samples as part of their observations, even if they think the sample is a foodstuff. This may need to be reiterated repeatedly throughout the sequence.
Each student
Individual science journal (digital or hard-copy)
Solid, liquid or gas? Resource sheet
Lesson
The Launch phase is designed to increase the science capital in a classroom by asking questions that elicit and explore students’ experiences. It uses local and global contexts and real-world phenomena that inspire students to recognise and explore the science behind objects, events and phenomena that occur in the material world. It encourages students to ask questions, investigate concepts, and engage with the Core Concepts that anchor each unit.
The Launch phase is divided into four routines that:
- ensure students experience the science for themselves and empathise with people who experience the problems science seeks to solve (Experience and empathise)
- anchor the teaching sequence with the key ideas and core science concepts (Anchor)
- elicit students’ prior understanding (Elicit)
- and connect with the students’ lives, languages and interests (Connect).
Students arrive in the classroom with a variety of scientific experiences. This routine provides an opportunity to plan for a common shared experience for all students. The Experience may involve games, role-play, local excursions or yarning with people in the local community. This routine can involve a chance to Empathise with the people who experience the problems science seeks to solve.
When designing a teaching sequence, consider what experiences will be relevant to your students. Is there a location for an excursion, or people to talk to as part of an incursion? Are there local people in the community who might be able to talk about what they are doing? How could you set up your classroom to broaden the students’ thinking about the core science ideas? How could you provide a common experience that will provide a talking point throughout the sequence?
Read more about using the LIA FrameworkMystery mixture
Optional demonstration: Before the lesson begins, in a large clear tray or bowl, prepare a cornflour and water mixture using approximately twice as much cornflour to water. This mixture is often referred to as ‘oobleck’, but in this lesson you will simply refer to it as a ‘mystery mixture’. Oobleck behaves like a solid when force is applied, so you should be able to punch it, tap it or even walk over it. However, if you rest your fist, the point of your finger, or stand on the mixture, it will behave like a liquid, and your hand/foot will sink into it.
Demonstrate this to students, showing them how the mixture sometimes behaves like a solid, and at other times like a liquid.
In collaborative teams, students will observe and explore the properties of a cornflour and water mixture before it is mixed (when it is still separate ingredients), during (what happens as the ingredients are being mixed), and after the ingredients have been mixed.
Provide teams with the necessary equipment to make their own mystery mixture.
Some questions they might explore are:
- Can it be stirred or poured?
- Can I bounce my eraser off it?
- Can I rest my eraser on top of it?
You might ask students to record their observations in their science journals, video record their exploration and ideas to compare their thoughts at the end of the sequence, or record the class discussion in the class science journal (or any combination of these).
Using oobleck, a non-Newtonian fluid, as starting point for this sequence
Pique students’ interest and curiosity by starting with a mixture that behaves as both a solid and a liquid.
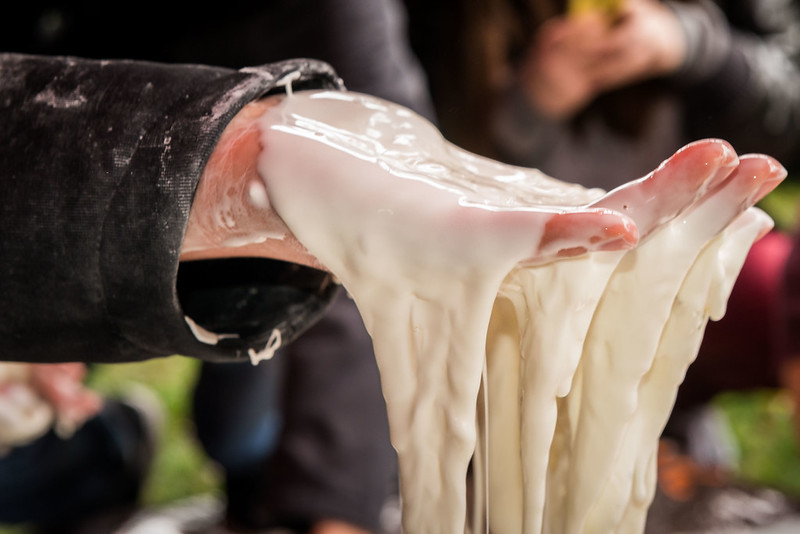
Oobleck, made using approximately twice as much cornflour as water, is an example of a non-Newtonian fluid. By examining oobleck as a starting point for this teaching sequence, students’ curiosity is piqued as they are introduced to a situation where typically accepted explanations do not apply. This will generate interest, as students attempt to understand and explain what a solid and a liquid are, and why a substance might behave as both.
Read the Particles and particle theory professional learning embedded in the What are particles? step of this lesson for more information on non-Newtonian fluids.
Core concepts and key ideas
When planning for teaching in your classroom, it can be useful to see where a sequence fits into the larger picture of science.

When planning for teaching in your classroom, it can be useful to see where a sequence fits into the larger picture of science. This unit is anchored to the Science understanding core concepts for Chemical sciences.
- The chemical and physical properties of substances are determined by their structure at a range of scales.
In Year 5, students have already examined the properties of natural and made materials including fibres, metals, glass and plastics and consider how these properties influence their use (Year 4). In this teaching sequence, students explain the observable properties of solids, liquids and gases by modelling the motion and arrangement of particles.
This core concept is linked to the key science ideas:
- Energy moves through and can cause observable changes to systems (Energy and Matter).
- Stability might be disturbed either by sudden changes or gradual changes over time (Stability and change).
When your students next progress through this core concept, they will use particle theory to describe the arrangement of particles in a substance, including the motion of and attraction between particles, and relate this to the properties of the substance (Year 7).
Alternative conceptions
What alternative conceptions might students hold about solids, liquids and gases?

Students are strongly influenced by everyday language, and can use the term ‘solid’ to denote something as hard or large. They tend to use it as an adjective rather than to describe a set of substances. They might have difficulty understanding that a rubber ball or a thin plastic sheet is solid in terms of how scientists use this word. ‘Solid’ is also recognised as an adjective denoting something ‘good’ or ‘great’ in some Australian English dialects.
Students might have difficulty recognising crushed or powdered solids as being solids, particularly since they might identify liquids through their ability to pour. Pouring is a consequence of flowing, which is the property of a fluid, but it is also possible to ‘pour’ small solids (beans) or powders. The difference is that when powders are poured they land in a heap and need to be shaken to settle, whereas liquids flow under the effect of gravity to take on the shape of the container.
Some students identify all liquids with water, and the most common liquids identified by students are water-based, such as dishwashing liquid, milk, seawater, cordial and lemonade. Viscous liquids such as oil, paraffin and honey, are less commonly identified as liquid. Students might also assume that all liquids contain water and that melting involves a substance turning to water.
Students might not have many conceptions about gas. When asked about gases they might provide examples of uses of gas, for example, ‘gas flame’, rather than examples of gases, for example, methane. Some students identify gas as dangerous or flammable and do not recognise that air is a gas.
The Launch phase is designed to increase the science capital in a classroom by asking questions that elicit and explore students’ experiences. It uses local and global contexts and real-world phenomena that inspire students to recognise and explore the science behind objects, events and phenomena that occur in the material world. It encourages students to ask questions, investigate concepts, and engage with the Core Concepts that anchor each unit.
The Launch phase is divided into four routines that:
- ensure students experience the science for themselves and empathise with people who experience the problems science seeks to solve (Experience and empathise)
- anchor the teaching sequence with the key ideas and core science concepts (Anchor)
- elicit students’ prior understanding (Elicit)
- and connect with the students’ lives, languages and interests (Connect).
The Elicit routine provides opportunities to identify students’ prior experiences, existing science capital and potential alternative conceptions related to the Core concepts. The diagnostic assessment allows teachers to support their students to build connections between what they already know and the teaching and learning that occurs during the Inquire cycle.
When designing a teaching sequence, consider when and where students may have been exposed to the core concepts and key ideas in the past. Imagine how a situation would have looked without any prior knowledge. What ideas and thoughts might students have used to explain the situation or phenomenon? What alternative conceptions might your students hold? How will you identify these?
The Deep connected learning in the ‘Pedagogical Toolbox: Deep connected learning’ provides a set of tools to identify common alternative conceptions to aid teachers during this routine.
Read more about using the LIA FrameworkWhat do students think they know?
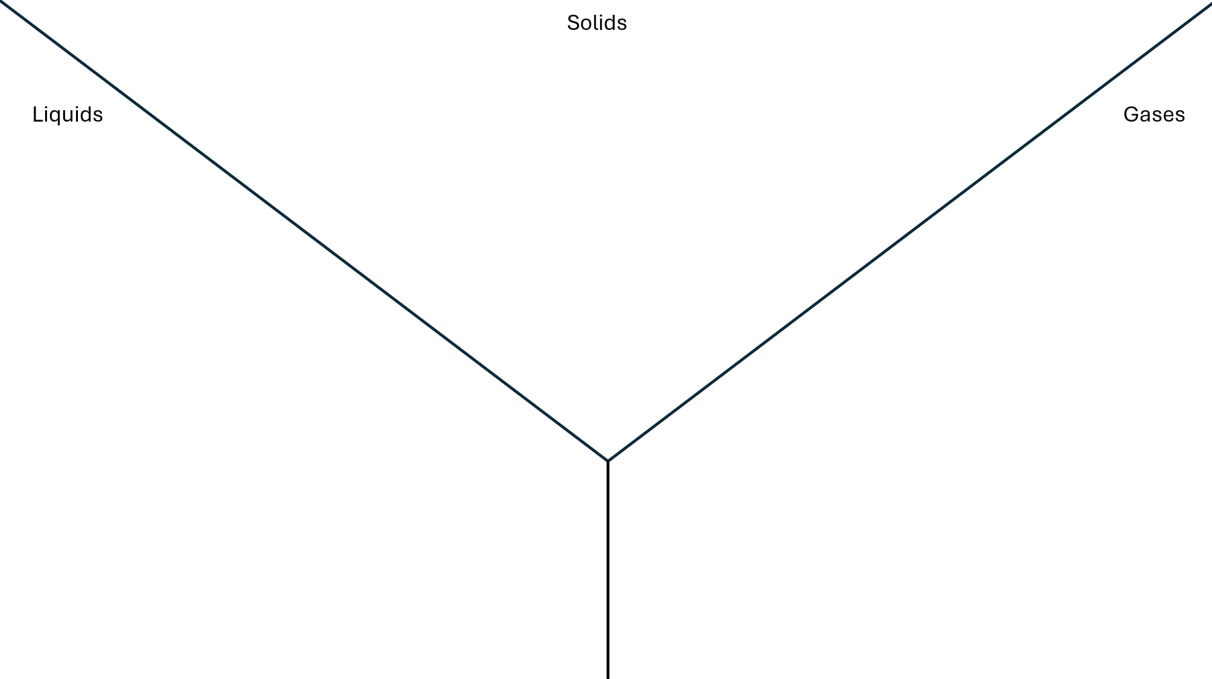
Display the terms ‘solid’, ‘liquid’, and ‘gas’.
Students brainstorm what they know about each. Record using a Y-chart or table in the class science journal.
Provide collaborative teams with a variety of samples in clear plastic containers that are solid, liquid, and gas. In their teams, students examine the contents of each container, as well as re-examining the cornflour and water mixture. Using the Solid, liquid, or gas? Resource sheet (or they might create their own), students make a claim as to whether each sample is a solid, liquid, or gas. Students working in the same team may have different ideas, so at this stage, they should record their thinking individually. Encourage students to provide reasons for their claims.
Cumulatively record claims about the nature of each sample by tallying student votes. Record the cumulative tally on a demonstration copy of the Solid, liquid, or gas? Resource sheet (or create your own) in the class science journal.
Discuss students’ reasoning for categorising something as a solid, liquid, or gas, and any samples they found difficult to categorise, like the oobleck. If needed, also discuss the terms ‘substance’ and ‘object’. Encourage students to refer to the ‘substance’ that the sample is made of if possible, for example, metal as opposed to scissors, or paper as opposed to a page. Note that there may be instances where students don't know the name of the material/s that make up a sample being examined, and in those instances, they can describe it as best they can.
Record any new words/phrases students use to describe solids, liquids, and gases in the Y chart in the class science journal. For example, students might describe solids as strong, firm/hard, or holdable, liquids as flowing or pourable, and gases as airy.
Using the bottom of the Solid, liquid, or gas? Resource sheet (or in their science journal), challenge students to represent, through drawing and description, what they think makes something solid, liquid, or gas. At this stage it is acceptable that students create a wide variety of different representations, including different representations for varying 'solids'.
- What do you think makes up the substances you looked at?
- What do you think is ‘inside’ the substance?
- What might you ‘see’ if you were shrunk down to a small enough size to fit in a grain of sand, or a drop of water. What about the samples we have examined today?
Language usage: material v. substance
These terms have specific meanings, and it’s important to be aware of their usage.
In Year 4, students would have examined the properties of natural and man-made materials and how this influences their use. The Australian Curriculum: Science defines ‘material’ as a ‘substance with particular qualities or that is used for specific purposes’. In Year 5, students observe and classify substances as solids, liquids, and gases and use the particle model to explain their properties. As such, the term ‘substance’ will be used in this unit to define what objects are made of. For example, a window (object) is made from glass (substance) and a soft drink bottle (object) is made from plastic (substance).
Students however might use the name of the object (window, soft-drink bottle) and the substance it is made of interchangeably, or the name of the object exclusively if they don't know the substance an object is made of, for example, a wall.
Substances are what make materials. They may be pure, for example, oxygen, or a mixture, for example air, which is made up of a number of different substances, and may include oxygen, nitrogen, argon, water vapour, pollen and dust.
Representational challenge
By asking students to write about and draw what they think 'makes up' a solid, liquid or gas, you present them with a representational challenge.

By asking students to write about and draw what they think 'makes up' a solid, liquid or gas, you present them with a representational challenge. This challenge will provide you with insight into what, if anything, students already know about the particle model of matter. Students who draw particles can be questioned further as to why they drew them, and what they think might be between each particle.
Students will refer back to these initial representations throughout the sequence, determining if they still think they are valid, or if they would like to make additions and changes to them. Tracking these additions and changes supports students and teachers to see the development of their understanding.
The Launch phase is designed to increase the science capital in a classroom by asking questions that elicit and explore students’ experiences. It uses local and global contexts and real-world phenomena that inspire students to recognise and explore the science behind objects, events and phenomena that occur in the material world. It encourages students to ask questions, investigate concepts, and engage with the Core Concepts that anchor each unit.
The Launch phase is divided into four routines that:
- ensure students experience the science for themselves and empathise with people who experience the problems science seeks to solve (Experience and empathise)
- anchor the teaching sequence with the key ideas and core science concepts (Anchor)
- elicit students’ prior understanding (Elicit)
- and connect with the students’ lives, languages and interests (Connect).
Science education consists of a series of key ideas and core concepts that can explain objects, events and phenomena, and link them to the experiences encountered by students in their lives. The purpose of the Anchor routine is to identify the key ideas and concepts in a way that builds and deepens students’ understanding. During the Launch phase, the Anchor routine provides a lens through which to view the classroom context, and a way to frame the key knowledge and skills students will be learning.
When designing a teaching sequence, consider the core concepts and key ideas that are relevant. Break these into small bite-sized pieces that are relevant to the age and stage of your students. Consider possible alternative concepts that students might hold. How could you provide activities or ask questions that will allow students to consider what they know?
What are particles?
Introduce the term ‘particles’ to the students: very small pieces, or atoms, that make up all substances.
Explain that, based on evidence collected over hundreds of years of investigations, scientists think that every substance is made up of particles, and it’s what these particles are doing—or how they are behaving—that determines if something is solid, liquid or gas.
Explain that in this sequence students will:
- explore solids, liquids and gases.
- explore how scientists explain the behaviour of particles, to see if they agree.
- determine if these explanations are enough to categorise every substance.
- determine if sometimes there are substances that might behave like, for example, a solid and a liquid, as in the case of the oobleck/mystery mixture (and other samples where students might not have agreed upon its state).
They will then communicate their ideas/understanding about these scientific explanations to others.
Particles and particle theory
All matter is made up of very small particles called atoms.
All matter is made up of very small particles called atoms. These atoms are made up of sub-atomic particles called protons, neutrons and electrons. Atoms can join together to form molecules.
The way atoms and molecules are arranged in a material will affect its state—that is whether it is a solid, liquid or gas.
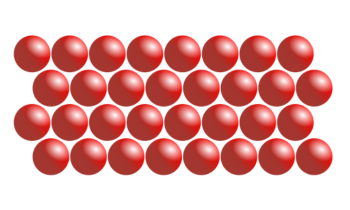
Particles in a solid are held closely together with strong, rigid bonds. They vibrate in place, but do not change position significantly. For this reason, solids maintain a constant volume and shape, do not flow, and cannot be significantly compressed.
Particles in a liquid are held together with weaker bonds that allow the particles to slide past each other. They still hold closely together, so maintain a constant volume, but the force of gravity means the particles will flow over one another when poured, and take the shape of the container they’re poured in to. They have a flat, featureless surface when still.
The bonds between the particles in a gas are very weak and therefore will spread out to fill the available space or container. Because there is ‘space’ between the particles, a gas can be compressed.
Non-Newtonian fluids, such as oobleck, are difficult to classify. This is because non-Newtonian fluids change their viscosity (or flow behaviour) under stress. In some cases, such as with the cornflour and water mixture, the particles lock together under stress and behave like a solid. In other cases, such as when you’re shaking the last of the tomato sauce out of a bottle, the particles loosen under stress and behave more like a liquid.
It's important to note it is not necessary at this stage to introduce this terminology to students.
All matter is made up of very small particles called atoms. These atoms are made up of sub-atomic particles called protons, neutrons and electrons. Atoms can join together to form molecules.
The way atoms and molecules are arranged in a material will affect its state—that is whether it is a solid, liquid or gas.
Particles in a solid are held closely together with strong, rigid bonds. They vibrate in place, but do not change position significantly. For this reason, solids maintain a constant volume and shape, do not flow, and cannot be significantly compressed.
Particles in a liquid are held together with weaker bonds that allow the particles to slide past each other. They still hold closely together, so maintain a constant volume, but the force of gravity means the particles will flow over one another when poured, and take the shape of the container they’re poured in to. They have a flat, featureless surface when still.
The bonds between the particles in a gas are very weak and therefore will spread out to fill the available space or container. Because there is ‘space’ between the particles, a gas can be compressed.
Non-Newtonian fluids, such as oobleck, are difficult to classify. This is because non-Newtonian fluids change their viscosity (or flow behaviour) under stress. In some cases, such as with the cornflour and water mixture, the particles lock together under stress and behave like a solid. In other cases, such as when you’re shaking the last of the tomato sauce out of a bottle, the particles loosen under stress and behave more like a liquid.
It's important to note it is not necessary at this stage to introduce this terminology to students.
The Launch phase is designed to increase the science capital in a classroom by asking questions that elicit and explore students’ experiences. It uses local and global contexts and real-world phenomena that inspire students to recognise and explore the science behind objects, events and phenomena that occur in the material world. It encourages students to ask questions, investigate concepts, and engage with the Core Concepts that anchor each unit.
The Launch phase is divided into four routines that:
- ensure students experience the science for themselves and empathise with people who experience the problems science seeks to solve (Experience and empathise)
- anchor the teaching sequence with the key ideas and core science concepts (Anchor)
- elicit students’ prior understanding (Elicit)
- and connect with the students’ lives, languages and interests (Connect).
Each student comes to the classroom with experiences made up from science-related knowledge, attitudes, experiences and resources in their life. The Connect routine is designed to tap into these experiences and that of their wider community. It is also an opportunity to yarn with community leaders (where appropriate) to gain an understanding of the student’s lives, languages and interests. In the Launch phase, this routine identifies and uses the science capital of students as the foundation of the teaching sequence so students can appreciate the relevance of their learning and its potential impact on future decisions. In short, this routine moves beyond scientific literacy and increases the science capital in the classroom and science identity of the students.
When planning a teaching sequence, take an interest in the lives of your students. What are their hobbies, how do they travel to and from school? What might have happened in the lives of your students (i.e. blackouts) that might be relevant to your next teaching sequence? What context might be of interest to your students?
Read more about using the LIA FrameworkWhat science communicators do
Discuss the purpose of science communication, and what a science communicator does:
- A common goal of science communication is to explain tricky ideas and concepts in a way that non-experts can understand.
- A science communicator is someone who designs texts: written, visual, multi-media.
Read/examine a variety of texts, at a suitable level for your students, that explain science concepts in a way they can understand. You might complete an example as a whole class, and/or utilise reading groups as an opportunity to reinforce these ideas.
Identify the features that science communicators have used in these texts, such as:
- factual information and vocabulary
- visual representations such as diagram, models and video
- storytelling
- emotive and persuasive language
- metaphors to make connections
Discuss how students might apply the techniques employed by science communicators to convey their learning about solids, liquids and gases, to the audience they will present to in the Act phase (see Preparing for this sequence for advice about selecting this audience). Record their ideas in the class science journal.
Communicating science ideas
The goal of science communication is to explain tricky ideas and concepts in a way that non-experts can understand.
The goal of science communication is to explain tricky ideas and concepts in a way that non-experts can understand.
Science communicators work hard to effectively communicate science ideas to all, raise public awareness of and interest in science, and to engage diverse communities with science. They use a variety of literary techniques, including persuasion, storytelling, humour and metaphors to connect with an audience’s interests and values.
By thinking about how they might communicate science ideas effectively, and engage potentially disinterested people in science, students are not only building their own science capital, but potentially the science capital of those around them.
The Launch phase is designed to increase the science capital in a classroom by asking questions that elicit and explore students’ experiences. It uses local and global contexts and real-world phenomena that inspire students to recognise and explore the science behind objects, events and phenomena that occur in the material world. It encourages students to ask questions, investigate concepts, and engage with the Core Concepts that anchor each unit.
The Launch phase is divided into four routines that:
- ensure students experience the science for themselves and empathise with people who experience the problems science seeks to solve (Experience and empathise)
- anchor the teaching sequence with the key ideas and core science concepts (Anchor)
- elicit students’ prior understanding (Elicit)
- and connect with the students’ lives, languages and interests (Connect).
Identifying and constructing questions is the creative driver of the inquiry process. It allows students to explore what they know and how they know it. During the Inquire phase of the LIA Framework, the Question routine allows for past activities to be reviewed and to set the scene for the investigation that students will undertake. The use of effective questioning techniques can influence students’ view and interpretation of upcoming content, open them to exploration and link to their current interests and science capital.
When designing a teaching sequence, it is important to spend some time considering the mindset of students at the start of each Inquire phase. What do you want students to be thinking about, what do they already know and what is the best way for them to approach the task? What might tap into their curiosity?
Read more about using the LIA FrameworkWhat do we want to know?
Referring to the Y-chart or table brainstorm created earlier in the lesson, ask students to name the substances they would confidently identify as solids, liquids and gases, and some that they think people might consider trickier to categorise. Record the students’ claims on the Y-chart or a table in the class science journal.
You might provide students with sticky notes and ask them to contribute at least one idea to each category, writing their name on the back of the sticky note so they can compare their thoughts at the end of the teaching sequence.
Alternatively, you might share ideas in a class discussion, and record students’ names next to each idea as it is offered.
Ask students to ponder the following question before the next science lesson—thinking about it every time they brush their teeth: Is toothpaste a solid or a liquid?
Reflect on the lesson
You might:
- begin a class word wall related to substances and classifying them as solid, liquid or gas.
- begin a class TWLH chart about solids, liquids and gases.
TWLH charts
One of the key aspects of a TWLH chart is its ability to guide a student in metacognitive processes.
One of the key aspects of a TWLH chart is its ability to guide a student in metacognitive (the ability to think about your thinking) processes. By focus on what we think we know, students are encouraged to see learning as journey, where new scientific evidence and experiences might change your thinking. This is a very important aspect of thinking scientifically
In this instance, students are considering their initial knowledge of solids, liquids and gases. In this phase of learning, students should be encouraged to populate the T and W sections of the chart.
For you
Materials
Cultivating a questioning culture
Students’ questions can be expressions of their existing knowledge, reasoning, assumptions, doubts, curiosity and wonder, and interest and motivation to learn.
Cultivating a questioning culture
Why cultivate a questioning culture?
The Primary Connections approach to the teaching of science emphasises the important role of students’ questions as a creative driver of the inquiry process. Students are encouraged and scaffolded to identify and construct questions in response to real-world experiences and contexts.
Students’ questions can be expressions of their existing knowledge, reasoning, assumptions, doubts, curiosity and wonder, and interest and motivation to learn. As such, they can provide useful diagnostic information to teachers about students’ current beliefs and perspectives, and gaps and inconsistencies in their knowledge. Students’ questions are useful for driving dialogue, engaging students in the social construction of new understanding.
Students are more likely to ask questions when:
- they have been explicitly taught what questions sound like, look like, and how to ask questions.
- they are learning in an environment of psychosocial safety, in which it is assumed that they do not know everything, that they can express doubt and curiosity, and are encouraged to explore problems before solving them.
- their questions are welcomed and treated as genuine requests to express wonder, extend their understanding, resolve doubt, or solve problems.
- there are plenty of opportunities for students to ask questions; spontaneous, planned, and ongoing.
Students are less likely to ask questions when:
- there is no space or time to ask questions.
- the vast majority of questions asked are asked by the teacher rather than the students.
- they are generally expected to know the answers to questions asked in the classroom.
- their questions are regularly dismissed or ignored.
How do we cultivate a questioning culture in the classroom?
It is important to value students’ questions, and as appropriate, scaffold students to explore and identify resolutions. Sometimes students ask questions when there is no space or time to resolve them; questions can be “parked” and returned to when space and time is available. Here are some suggestions for strategies to cultivate a questioning culture in the classroom:
- Use a TWLH process for documenting learning across an inquiry.
- Make space and time for questions by scheduling time during and around lessons for questions.
- Develop criteria with students around “good” or “useful” questions and recognise and reward these questions.
- Model questions and questioning. A Q-matrix provides question stems that can help students who may be struggling to develop questions of their own.
- Stimulate questions by providing prompts and provocations that target specific learning goals and contexts. The Question Formulation Technique provides a method for generating and improving questions using stimuli.
- Give feedback to questions, at the right time and in appropriate formats for students’ ages and learning context.
- Ask “what questions do you have?” instead of “do you have any questions?”
- Provide spaces for questions, such as parking lots on desks or on the wall, a question mailbox by the door, or include opportunities for questions in classroom exit procedures.
Remember that students are more likely to ask more questions, and improve the quality of their questions, when they feel that their questions will be welcomed and treated with respect.
Discuss with your colleagues
Describe a time when students asked a lot of questions in the classroom.
Describe a time when students struggled to ask questions in the classroom.
Compare the classroom conditions in both situations. How were the two situations the same/different?
Discuss:
- How could/do you make time for questions in your classroom?
- How could/do you respond to questions that need an immediate answer?
- What types of questions need an immediate answer?
- How could/do you respond when you receive several questions at once?
- How could you encourage students to ask more questions?
References
Chin, C. & Osborne, J. (2008). Students' questions: A potential resource for teaching and learning science <https://www.tandfonline.com/doi/full/10.1080/03057260701828101>. Studies in Science Education, 44(1), 1-39.
Herranen, J., & Aksela, M. (2019). Student-question-based inquiry in science education <https://www.tandfonline.com/doi/abs/10.1080/03057267.2019.1658059>. Studies in Science Education, 55(1), 1-36.
Santana, L. & Rothstein, D. (2018). The Question Formulation Technique. Retrieved from http://rightquestion.org/. Massachusetts: The Right Question Institute.
Wiederhold, C. W. & Kagan, S. (2007) Cooperative learning & higher-level thinking: the Q-matrix <https://www.kaganaustralia.com.au/shop/cooperative-learning/cooperative-learning-higher-level-thinking/>. Hawker Brownlow Education.
Here's where you'll find:
- Deep dives into high impact teaching practices.
- Discussion questions for you to explore with your colleagues.
- Links to related lessons in our teaching sequences.
Chemical science conceptions
The chemical sciences involve the study of the composition and properties of substances. This involves classifying substances, exploring physical changes (changes of state or dissolving) and how chemical changes result in the production of new substances.

Core concepts
When exploring the natural world, the wide expanse of knowledge leads us to develop the big ideas or core concepts of science. Teachers and students can use these to explain and make predictions about a range of related phenomena in the natural world. Through the curriculum, these concepts are introduced and developed according to the age and stage of the students.
| The chemical and physical properties of substances are determined by their structure at a range of scales | Substances change and new substances are produced by rearranging atoms; these changes involve energy transfer and transformation | |
| F | Recognise that objects can be composed of different materials and describe the observable properties of those materials | Concept not covered at this year level |
| Y1 | Concept not covered at this year level | Concept not covered at this year level |
| Y2 | Concept not covered at this year level | Recognise that materials can be changed physically without changing their material composition and explore the effect of different actions on materials including bending, twisting, stretching and breaking into smaller pieces |
| Y3 | Investigate the observable properties of solids and liquids and how adding or removing heat energy leads to a change of state | Investigate the observable properties of solids and liquids and how adding or removing heat energy leads to a change of state |
| Y4 | Examine the properties of natural and made materials including fibres, metals, glass and plastics and consider how these properties influence their use | Concept not covered at this year level |
| Y5 | Explain observable properties of solids, liquids and gases by modelling the motion and arrangement of particles | Concept not covered at this year level |
| Y6 | Concept not covered at this year level | Compare reversible changes, including dissolving and changes of state, and irreversible changes, including cooking and rusting that produce new substances |
References
AITSL. (n.d.). Resource. AITSL. https://www.aitsl.edu.au/tools-resources/resource/dispelling-scientific-misconceptions-illustration-of-practice
Allen, M. (2019). Misconceptions in Primary Science 3e. McGraw-hill education (UK).
Ideas for Teaching Science: Years 5-10. (2014, April 14). Resources for Teaching Science. https://blogs.deakin.edu.au/sci-enviro-ed/years-5-10/
Pine, K., Messer, D., & St. John, K. (2001). Children's misconceptions in primary science: A survey of teachers' views. Research in Science & Technological Education, 19(1), 79-96.
Redhead, K. (2018). Common Misconceptions. Primary Science Teaching Trust. https://pstt.org.uk/resources/common-misconceptions/
University of California. (2022, April 21). Correcting misconceptions - Understanding Science. Understanding Science - How Science REALLY Works... https://undsci.berkeley.edu/for-educators/prepare-and-plan/correcting-misconceptions/
This section is about core concepts and alternative conceptions:
- The core concepts of science are framed by the six overarching ideas identified by ACARA.
- Addressing alternative conceptions in the core concepts requires teachers to plan discussions and investigations that allow students to question their prior assumptions and understanding of the core concepts and key ideas.
Chemical and physical properties
Alternative conceptions
The chemical and physical properties of substances are determined by their structure at a range of scales.
This list of alternative conceptions is not meant to be comprehensive, but instead aims to provide a starting point.
Alternative conception | Accepted conception |
| Humans make chemicals. | All matter is made of atoms and molecules (chemicals). |
| Air is weightless or has negative weight. | Air has mass and can be affected by gravity. Therefore, air has weight. |
| There is air between air particles/molecules. | There is empty space, not air between particles. |
| The particles in the air are not moving. | Air is made up of gas particles that are constantly moving (have kinetic energy). |
| The only gas we breathe out is carbon dioxide. | The air we breathe is 21% oxygen, 78% nitrogen (and small amounts of carbon dioxide, neon and hydrogen). We use approximately 3% of the oxygen we breathe in. This is why CPR works (18% oxygen in each breath out). |
| Liquids can be compressed. | Only gas can be compressed. |
| Gas means the gas we use in barbeques or cooking. | Gas is a state of matter where particles can fill any size or shape container. |
| A conductor is something that keeps things warm. | Conductors allow energy (heat and electricity) to be transferred. |
| Metals attract cold better than wooden objects. | Metals are good conductors of heat. Touching metal in a cold room will conduct the heat away from your body (making your hand feel cold). Wood does not conduct heat as well as metal. This keeps the heat in your hand (feels warmer than metal). |
| Atoms are solid spheres. | Atoms are made up of mostly space that contains sub-atomic particles (protons, neutrons, and electrons). |
| Atoms have the same properties as their bulk material. For example, iron atoms can melt. | Atoms have different properties than the bulk substance. |
| All liquids boil at 100 degrees Celsius. | All materials have different boiling points. |
| A hard material is strong. | Hardness is an inability to be scratched or deformed. Strength is the amount of force applied to a material before it breaks. |
References
AITSL. (n.d.). Resource. AITSL. https://www.aitsl.edu.au/tools-resources/resource/dispelling-scientific-misconceptions-illustration-of-practice
Allen, M. (2019). Misconceptions in Primary Science 3e. McGraw-hill education (UK).
Ideas for Teaching Science: Years 5-10. (2014, April 14). Resources for Teaching Science. https://blogs.deakin.edu.au/sci-enviro-ed/years-5-10/
Pine, K., Messer, D., & St. John, K. (2001). Children's misconceptions in primary science: A survey of teachers' views. Research in Science & Technological Education, 19(1), 79-96.
Redhead, K. (2018). Common Misconceptions. Primary Science Teaching Trust. https://pstt.org.uk/resources/common-misconceptions/
University of California. (2022, April 21). Correcting misconceptions - Understanding Science. Understanding Science - How Science REALLY Works... https://undsci.berkeley.edu/for-educators/prepare-and-plan/correcting-misconceptions/
This section is about core concepts and alternative conceptions:
- The core concepts of science are framed by the six overarching ideas identified by ACARA.
- Addressing alternative conceptions in the core concepts requires teachers to plan discussions and investigations that allow students to question their prior assumptions and understanding of the core concepts and key ideas.
Changing substances
Alternative conceptions
Substances change and new substances are produced by rearranging atoms; these changes involve energy transfer and transformation.
This list of alternative conceptions is not meant to be comprehensive, but instead aims to provide a starting point.
Alternative conception | Accepted conception |
| Heating a substance always means raising its temperature. | When a substance is undergoing a change in its state (ice to water), it does not immediately change its temperature. |
| Bubbles in boiling water contain air. | Bubbles in boiling water contain water vapour (gas form of water). |
| Steam is water gas | Steam is a very small collection of condensed liquid water suspended in the air. |
| Melting and dissolving are the same. | Melting is a change in state from solid to liquid. Dissolving occurs when a substance (solid) breaks into such small components that they cannot be seen in a solution. |
| Dissolved substances do not take up space. | The volume of water will change when salt is added. |
| When water in a container evaporates, the water has soaked into the container. | Liquid water evaporates and becomes water vapour in the air. |
| Boiling water makes steam which becomes clouds. | Liquid water evaporates and becomes water vapour in the air. As the water vapour cools, it condenses into small collections of liquid water (steam or clouds). |
| Cold water leaks through a glass of water making it wet on the outside. | Water vapour in the air condenses against the cold glass of water forming droplets. |
| An evaporated substance will become lighter if it turns into a gas. | Matter is conserved at all states and its mass does not change. |
| Chemical reactions are irreversible. | Some chemical reactions have an equilibrium where they can be reversed to achieve a balance. |
| Chemical reactions are caused by mixing substances. | Some chemical reactions require energy (usually in the form of heat) to be initiated. Other chemical reactions are spontaneous. |
| Energy is used up in a chemical reaction. | Energy and matter are always conserved in chemical reactions. |
| Matter disappears in a chemical reaction (i.e. fire). | Matter is always conserved in a chemical reaction. |
| Energy/heat/sound is a form of matter | Matter has mass and takes up space. Energy is a quantitative property of a system that can be transferred or transformed. |
| Atoms change during a chemical reaction. | Matter (atoms) are conserved. |
| Smoke is a gas. | Smoke is a combination of small solid particles (often carbon) suspended in the air. |
| The fuel all turns into smoke or carbon dioxide. | The general formula of combustion reactions is fuel + oxygen → carbon dioxide + water |
References
AITSL. (n.d.). Resource. AITSL. https://www.aitsl.edu.au/tools-resources/resource/dispelling-scientific-misconceptions-illustration-of-practice
Allen, M. (2019). Misconceptions in Primary Science 3e. McGraw-hill education (UK).
Ideas for Teaching Science: Years 5-10. (2014, April 14). Resources for Teaching Science. https://blogs.deakin.edu.au/sci-enviro-ed/years-5-10/
Pine, K., Messer, D., & St. John, K. (2001). Children's misconceptions in primary science: A survey of teachers' views. Research in Science & Technological Education, 19(1), 79-96.
Redhead, K. (2018). Common Misconceptions. Primary Science Teaching Trust. https://pstt.org.uk/resources/common-misconceptions/
University of California. (2022, April 21). Correcting misconceptions - Understanding Science. Understanding Science - How Science REALLY Works... https://undsci.berkeley.edu/for-educators/prepare-and-plan/correcting-misconceptions/
This section is about core concepts and alternative conceptions:
- The core concepts of science are framed by the six overarching ideas identified by ACARA.
- Addressing alternative conceptions in the core concepts requires teachers to plan discussions and investigations that allow students to question their prior assumptions and understanding of the core concepts and key ideas.
Earth and space science conceptions
The Earth and Space sciences involve the study of the dynamic interdependent nature of Earth’s systems and how it is part of a larger astronomical system. Interactions between Earth’s systems and astronomical systems can be explored over a range of time scales.

Core concepts
When exploring the natural world, the wide expanse of knowledge leads us to develop the big ideas or core concepts of science. Teachers and students can use these concepts to explain and make predictions about a range of related phenomena in the natural world. Through the curriculum, these concepts are introduced and developed according to the age and stage of the students.
| Earth is part of an astronomical system; interactions between Earth and celestial bodies influence the Earth system | The Earth system comprises dynamic and interdependent systems; interactions between these systems cause continuous change over a range of scales | |
| F | Earth and space sciences not covered at this year level | Earth and space sciences not covered at this year level |
| Y1 | Concept not covered at this year level | Describe daily and seasonal changes in the environment and explore how these changes affect everyday life |
| Y2 | Recognise Earth is a planet in the solar system and identify patterns in the changing position of the sun, moon, planets and stars in the sky | Concept not covered at this year level |
| Y3 | Concept not covered at this year level | Compare the observable properties of soils, rocks and minerals and investigate why they are important Earth resources |
| Y4 | Identify sources of water and describe key processes in the water cycle, including movement of water through the sky, landscape and ocean; precipitation; evaporation; and condensation | Concept not covered at this year level |
| Y5 | Concept not covered at this year level | Describe how weathering, erosion, transportation and deposition cause slow or rapid change to Earth’s surface |
| Y6 | Describe the movement of Earth and other planets relative to the sun and model how Earth’s tilt, rotation on its axis and revolution around the sun relate to cyclic observable phenomena, including variable day and night length | Concept not covered at this year level |
This section is about core concepts and alternative conceptions:
- The core concepts of science are framed by the six overarching ideas identified by ACARA.
- Addressing alternative conceptions in the core concepts requires teachers to plan discussions and investigations that allow students to question their prior assumptions and understanding of the core concepts and key ideas.
Astronomical systems
Alternative conceptions
Earth is part of an astronomical system; interactions between Earth and celestial bodies influence the Earth system.
This list of alternative conceptions is not meant to be comprehensive, but instead aims to provide a starting point.
Alternative conception | Accepted conception |
| Air is weightless or has negative weight. | Air has mass and can be affected by gravity. Therefore, air has weight. |
| There is air between air particles/molecules. | There is space, not air between particles. |
| The sun goes around the earth. | The Earth orbits the sun. |
| The moon only comes out at night. | The moon orbits the Earth every 27.3 days. The Earth rotates so that the moon is above the horizon for approximately 12 hours each 24 hours (not always at night). |
| Summer is hot because the earth is closer to the sun. | During summer, there are more hours of direct sunlight to heat the earth, which then heats the air. European summer occurs when the sun is at the furthest point from the sun. |
| The earth revolves around the Sun every day. | The Earth rotates on its axis every 24 hours. The Earth orbits the sun every 365.25 days. |
| The 'man in the moon' watches us. | The moon rotates on its axis at a similar rate to its orbit around the Earth. This means that we only see the same face of the moon. |
| There is a dark side of the moon. | The Moon rotates on its axis every 29.5 days. This means the length of a Moon day is 29.5 days. |
| The Moon shines its light on Earth at night. | The Moon reflects the light of the Sun. |
| The Moon is made of cheese that is eaten each night. | The Moon has phases because of the position of the Sun shining light on half the Moon. |
| The Earth's shadow causes the phases of the Moon. | When the Moon is between the Earth and the Sun, the Sun’s light shines on the far side of the Moon. The Earth sees a ‘new moon’. |
| The Earth's spin causes gravity. | Gravity is a result of Earth’s mass distorting space and time. |
| Rockets can be launched at any time. | All the planets and stars are constantly moving in space. The orbits of each need to be calculated to ensure the rocket pathway is clear. |
| Rockets travel in straight lines. | Rockets are affected by the gravitation forces that are caused by all celestial bodies. |
| Weightlessness means there is no gravity. | There is microgravity in space. Astronauts on the international space station experience weightlessness because they (and the space station) are constantly falling at the same rate that they are moving forward. This is the reason that they are orbiting the Earth. |
| Jets can fly to space. | Jets need atmospheric air to move over the wings to provide lift. Space no atmospheric air. |
| All lights in the sky are stars. | The Moon and some planets (Venus) reflect the light of the Sun in the night sky. |
| You can scream in space. | Sound requires particles to move and bump into each other. Any particles in space are too far apart to pass on sound energy. |
| All planets are the same as Earth. | Jupiter, Saturn, Uranus, and Neptune are gas planets. |
| A planet's orbit is circular. | Most planets have elliptical orbits. |
| Pluto is a planet. | Planets are spherically shaped, orbit the sun and, clear the space in their orbit from other objects. Pluto is thought to have not cleared the space in its orbit. |
| Moons are smaller than planets. | Pluto is 2/3 the size of Earth’s Moon. The diameter of both is less than the length of Australia. |
| All planets take the same time to orbit the Sun. | The further away from the Sun, the longer the orbit. |
References
AITSL. (n.d.). Resource. AITSL. https://www.aitsl.edu.au/tools-resources/resource/dispelling-scientific-misconceptions-illustration-of-practice
Allen, M. (2019). Misconceptions in Primary Science 3e. McGraw-hill education (UK).
Ideas for Teaching Science: Years 5-10. (2014, April 14). Resources for Teaching Science. https://blogs.deakin.edu.au/sci-enviro-ed/years-5-10/
Pine, K., Messer, D., & St. John, K. (2001). Children's misconceptions in primary science: A survey of teachers' views. Research in Science & Technological Education, 19(1), 79-96.
Redhead, K. (2018). Common Misconceptions. Primary Science Teaching Trust. https://pstt.org.uk/resources/common-misconceptions/
University of California. (2022, April 21). Correcting misconceptions - Understanding Science. Understanding Science - How Science REALLY Works... https://undsci.berkeley.edu/for-educators/prepare-and-plan/correcting-misconceptions/
This section is about core concepts and alternative conceptions:
- The core concepts of science are framed by the six overarching ideas identified by ACARA.
- Addressing alternative conceptions in the core concepts requires teachers to plan discussions and investigations that allow students to question their prior assumptions and understanding of the core concepts and key ideas.
Earth's systems
Alternative conceptions
The Earth system comprises dynamic and interdependent systems; interactions between these systems cause continuous change over a range of scales.
This list of alternative conceptions is not meant to be comprehensive, but instead aims to provide a starting point.
Alternative conception | Accepted conception |
| The particles in the air are not moving. | Air is made up of gas particles that are constantly moving (have kinetic energy). |
| When water in a container evaporates, the water has soaked into the container. | Liquid water evaporates and becomes water vapour in the air. |
| Boiling water makes steam which becomes clouds. The Sun boils the sea to make clouds. | Liquid water evaporates and becomes water vapour in the air. As the water vapour cools, it condenses into small collections of liquid water (clouds). |
| Thunder is because of God(s)/angels/bowling balls in the sky. | The moving air/clouds cause a separation of charged particles in the sky (static electricity). Lightning is the spark of electricity that allows the charges to move together. This rapidly heats and expands the air causing thunder. |
| We sweat more on a humid day. | Less water evaporates on a humid day. |
| Rain is caused by clouds being too full of water or bursting. Rain comes from holes in the clouds. | As water vapour cools, it condenses into water droplets that combine and become a drop. When the air is saturated, rain will fall. |
| Soil has always been present. | Soil is the product of weathering, erosion and decomposition. |
| Soil is made up of dead things. | Soil is the product of weathering, erosion and decomposition. |
| Rocks are always heavy. | Some rocks (pumice) contain pockets of air. |
| Mountains and valleys have always been present. | Mountains and valleys are formed by a combination of tectonic plate movement, volcanoes, weathering, erosion and deposition. |
| Volcanic lava comes from the centre of the earth. | The centre of the earth is solid surrounded by molten magma. When magma leaves the earth’s surface it is called lava. |
| The greenhouse effect is bad. | The greenhouse effect traps heat in the atmosphere and helps us avoid the extremes of temperatures that occurs on the Moon or in space. |
| It is hotter in the city this summer and that is global warming. | Global warming is measured over large areas (Earth) and time scales (many years) to show the trend. |
| The atmosphere is oxygen and carbon dioxide. | The atmosphere is a mixture of gases including 78% nitrogen. |
References
AITSL. (n.d.). Resource. AITSL. https://www.aitsl.edu.au/tools-resources/resource/dispelling-scientific-misconceptions-illustration-of-practice
Allen, M. (2019). Misconceptions in Primary Science 3e. McGraw-hill education (UK).
Ideas for Teaching Science: Years 5-10. (2014, April 14). Resources for Teaching Science. https://blogs.deakin.edu.au/sci-enviro-ed/years-5-10/
Pine, K., Messer, D., & St. John, K. (2001). Children's misconceptions in primary science: A survey of teachers' views. Research in Science & Technological Education, 19(1), 79-96.
Redhead, K. (2018). Common Misconceptions. Primary Science Teaching Trust. https://pstt.org.uk/resources/common-misconceptions/
University of California. (2022, April 21). Correcting misconceptions - Understanding Science. Understanding Science - How Science REALLY Works... https://undsci.berkeley.edu/for-educators/prepare-and-plan/correcting-misconceptions/
This section is about core concepts and alternative conceptions:
- The core concepts of science are framed by the six overarching ideas identified by ACARA.
- Addressing alternative conceptions in the core concepts requires teachers to plan discussions and investigations that allow students to question their prior assumptions and understanding of the core concepts and key ideas.
Physical science conceptions
The physical sciences involve the study of forces and motion, and matter and energy. How an object moves is influenced by a range of contact forces (friction) and non-contact forces (magnetic, gravitational and electrostatic). Energy can come in many forms (heat, light, sound, electricity) and can be transferred between objects or transformed from one form to another.
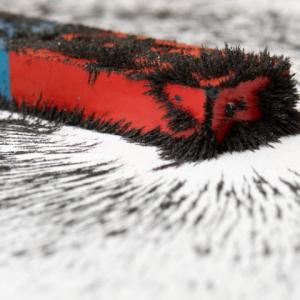
Core concepts
When exploring the natural world, the wide expanse of knowledge leads us to develop the big ideas or core concepts of science. Teachers and students can use these concepts to explain and make predictions about a range of related phenomena in the natural world. Through the curriculum, these concepts are introduced and developed according to the age and stage of the students.
| Forces affect the motion and behaviour of objects | Energy can be transferred and transformed from one form to another and is conserved within systems | |
| F | Describe how objects move and how factors including their size, shape or material influence their movement | Concept not covered at this year level |
| Y1 | Describe pushes and pulls in terms of strength and direction and predict the effect of these forces on objects’ motion and shape | Concept not covered at this year level |
| Y2 | Concept not covered at this year level | Explore different actions to make sounds and how to make a variety of sounds, and recognise that sound energy causes objects to vibrate |
| Y3 | Concept not covered at this year level | Identify sources of heat energy and examine how temperature changes when heat energy is transferred from one object to another |
| Y4 | Identify how forces can be exerted by one object on another and investigate the effect of frictional, gravitational and magnetic forces on the motion of objects | Concept not covered at this year level |
| Y5 | Concept not covered at this year level | Identify sources of light, recognise that light travels in a straight path and describe how shadows are formed and light can be reflected and refracted |
| Y6 | Concept not covered at this year level | Investigate the transfer and transformation of energy in electrical circuits, including the role of circuit components, insulators and conductors |
This section is about core concepts and alternative conceptions:
- The core concepts of science are framed by the six overarching ideas identified by ACARA.
- Addressing alternative conceptions in the core concepts requires teachers to plan discussions and investigations that allow students to question their prior assumptions and understanding of the core concepts and key ideas.
Energy
Alternative conceptions
Energy can be transferred and transformed from one for to another and is conserved within systems.
This list of alternative conceptions is not meant to be comprehensive, but instead aims to provide a starting point.
Alternative conception | Accepted conception |
| Energy is used up. | Energy may be transformed or transferred but it is always conserved. |
| Energy is a ‘thing’ | Materials and objects can have energy transferred to them. |
| Energy and force are interchangeable | A force is an external effect that can cause an object to change its speed, shape, or direction. Leaning on a desk applies a push force on the desk. This force exists even if the desk does not move (it could cause change if the net force was unbalanced). Force is applied to an object, not transferred. Energy is a property of a system associated with the extent of movement of an object or the amount of heat within it. Energy changes from one form to another can be tracked. |
| Only living things have energy. | Energy can be transferred between objects. Batteries have chemical energy, cars have kinetic/motion energy. |
| Only objects in motion have energy. | Potential energy is the energy stored in a coiled spring, in a battery (chemical energy), or in an object that can fall. |
| Loudness and pitch are the same thing. | Pitch is how high or low a note is, while loudness is how loud or soft the note is. |
| Sound moves faster in the air than solids. | Sound needs particles to be transmitted. The closer together the particles (solid) the faster the sound will move. |
| You can see and hear an object far away at the same time. | Light travels faster than sound. |
| You can scream in space. | Sound requires a medium (with particles close enough to bump together) to be transmitted. This does not occur in space. |
| Heat is a kind of substance. | Heat is a form of energy that can be transferred or transformed. |
| Things expand when heated to make room for heat. | When objects are heated, they particles gain kinetic/movement energy. This faster movement means they take up more space and the object can expand. |
| Heat travels like fluid through objects. | Heat travels by conduction, convection, or radiation. |
| Objects in the same room can be at different temperatures (metals will be colder than wood). | Metals are good conductors of heat. Touching metal in a cold room will conduct the heat away from your body (making your hand and the metal feel cold). Wood does not conduct heat as well as metal. This keeps the heat in your hand (wood feels warmer than metal). |
| Things wrapped in an insulator will warm up. | An insulator maintains the heat in an object. A heat source is needed for an object to ‘warm up’. |
| The eyes produce light (cartoon-like) so we can see objects. | Light is a form of energy that comes from a source (not human eyes). |
| We see an object when light shines on it. | We see objects when the light bounces off an object and reaches our eyes. |
| White light is a colour. | The primary colours of light are green, blue, and red. When these are mixed, they produce white light. |
| A prism adds colour to light. | The different wavelengths of visible light bend in different amounts as they pass through a prism. This spreads the colours/wavelengths and produces a rainbow. |
| The grass is green because it produces green light. | The green leaves of grass reflect most of the green light (and absorb other colours). This is why we see the green colour. |
| The primary colours of light are the same as paint. | The primary colours of light are green, blue, and red. Mixing red and green light produces yellow light. |
| When light moves through a coloured filter, the filter adds the colour to the light. | A coloured filter selectively absorbs some colours and lets others through. For example, a red filter only lets red light through. |
| Light from a bulb only extends out a certain distance and then stops. | Light is spread over a greater area as it moves away from the source. This means there is less that reaches our eyes. |
| A mirror reverses everything. | Mirrors reverse images left to right (not up and down) |
| Light does not reflect from dull surfaces. | We see an object because it is a light source or the light has been reflected from its surface. |
| Light from a bright light travels further than light from a dim light. | The brightness of a light indicates the number of photons (packets of light) that are able to travel from the source to your eye. The light always travels the same distance but spreads out. More photons will reach your eye even when far away. |
| Static electricity and current electricity are two different things. | Both static and current involve electrically charged particles. In static electricity, the charged particles do not have a pathway to move. Current electricity has a pathway (usually wire). |
| Energy in an electric circuit is used by a light globe | Electrical energy is transformed at the globe to light and heat energy. |
| Batteries store electrical energy. | Batteries store chemicals (chemical energy) that react to produce electricity in connecting wires. |
| You only need 1 wire to make a circuit. | Electricity must be able to flow from the negative terminal of a battery to the positive terminal. Most electrical cords that plug into the mains power contain at least 2 wires to complete a circuit. |
| The plastic in the wires keeps the electricity in (like water in a pipe). | Wires do not need plastic coating for the electrical current to flow. It does prevent potential short circuits. |
| Current is ‘used up’ in a circuit | The current stays the same value in all locations of a series circuit. |
| The current moves from one end of the battery to the light. | When the battery is connected to a circuit, the current starts flowing in all parts of the circuit at the same time. |
| Positive current leaves one end of the battery and negative current leaves the other end, these clash at the light bulb. | When the battery is connected to a circuit, the current (electrons from negative to positive terminals) starts flowing around the circuit at the same time. |
| Voltage is energy. | Voltage is a measure of the electrical potential energy in a circuit. |
| Touching a high-voltage wire will kill you. | Birds are able to sit on a high voltage wire. If an object was to touch a high voltage wire at the same time they were touching the ground, current would flow through them and cause damage. |
| The bigger the battery, the more voltage. | The voltage provided by the battery is determined by the manufacturer. Button batteries can be 3 v, while AAA batteries are 1.5 v. |
| Alternating current (AC) moves all the way around a circuit and back again. | When the battery is connected to a circuit, the current (electrons from negative to positive terminals) starts flowing round the circuit at the same time. Alternative current changes direction 50 times/second. |
References
AITSL. (n.d.). Resource. AITSL. https://www.aitsl.edu.au/tools-resources/resource/dispelling-scientific-misconceptions-illustration-of-practice
Allen, M. (2019). Misconceptions in Primary Science 3e. McGraw-hill education (UK).
Ideas for Teaching Science: Years 5-10. (2014, April 14). Resources for Teaching Science. https://blogs.deakin.edu.au/sci-enviro-ed/years-5-10/
Pine, K., Messer, D., & St. John, K. (2001). Children's misconceptions in primary science: A survey of teachers' views. Research in Science & Technological Education, 19(1), 79-96.
Redhead, K. (2018). Common Misconceptions. Primary Science Teaching Trust. https://pstt.org.uk/resources/common-misconceptions/
University of California. (2022, April 21). Correcting misconceptions - Understanding Science. Understanding Science - How Science REALLY Works... https://undsci.berkeley.edu/for-educators/prepare-and-plan/correcting-misconceptions/
This section is about core concepts and alternative conceptions:
- The core concepts of science are framed by the six overarching ideas identified by ACARA.
- Addressing alternative conceptions in the core concepts requires teachers to plan discussions and investigations that allow students to question their prior assumptions and understanding of the core concepts and key ideas.
Force
Alternative conceptions
Forces affect the motion and behaviour of objects.
This list of alternative conceptions is not meant to be comprehensive, but instead aims to provide a starting point.
Alternative conception | Accepted conception |
| Energy and force are interchangeable | A force is an external effect which causes an object to change its speed, shape or direction. Leaning on a desk applies a push force on the desk even if the desk does not move because the desk pushes back (it could cause change if the net force was unbalanced). Force is applied to an object, not transferred. Energy is a property of a system associated with the extent of movement of an object or the amount of heat within it. Energy changes from one form to another can be tracked. |
| Forces cause motion | An unbalanced force will cause a change in motion (acceleration or direction). |
| Faster objects have more force | An object moving fast has a larger amount of kinetic energy. Energy and force are different entities. |
| Everything that moves, will eventually stop. Rest in the ‘natural’ state of all objects. | Forces need to be unbalanced for motion to change. Things come to a stop when there is a higher friction force than push/pull force. |
| A continuous force is needed for continuous motion. | Forces need to be unbalanced for motion to change. Once an object is moving, it will keep moving at a constant speed without any additional force. If friction or air resistance is present, then this will need to be balanced with a continuous push or pull force to maintain speed. |
| An object is hard to push because it is heavy. | Large objects resist a change in motion (inertia). This will depend on the amount of friction between the object and the surface. |
| Friction is not a force. | Friction is a force that resists the movement of one surface over another. |
| Friction is only present when something is moving. | Friction force resists movement in a stationary object if there is a force trying to move it (eg pushing on a large stationary rock). |
| Friction always needs to be removed from a system. | The friction between car tyres and the road allows the car to move forwards. |
| Friction gradually uses up the forward push or pull. | An object moving at a constant speed and direction will have a net force of zero (the friction can balance the push/pull force). |
| Heavier objects fall faster than light objects. | The rate an object falls depends on its size (air resistance). Dropping a medicine ball and a basketball, they will both hit the ground at the same time. |
| Gravity is due to air pressure or the earth’s spin. | Gravity is proportional to the mass of an object. The larger the mass, the greater the distortion of space and time that is gravity. |
| Gravity is weaker under water. | The buoyancy of water is a push force that is in the opposite direction of the pull force of gravity. The gravitational force is not weaker. |
| Objects speed up as they fall because gravity gets stronger closer to earth. | While pull of gravity is marginally smaller on a mountain (a 75 kg person at sea level will weigh 74.75 kg on Mt Everest), objects speed up as they fall due to the acceleration caused by gravity. |
| There is zero gravity in space | Although it is very small, there is microgravity in space. Astronauts appear weightless because they are in freefall as they orbit the Earth. |
| An object at rest has no forces acting on it. | An object at rest has no net force acting on it. The gravitational force of a book resting on a table is balanced by the opposite force of the table pushing up on the book. |
| If an object is moving then it has a net force acting on it. | An object moving at a constant speed and direction will have a net force of zero. |
| If an aircraft is climbing at a steady rate, then the lift force up will be greater than the downwards force from gravity. | An object moving at a constant speed and direction will have a net force of zero. |
| Rocket propulsion is due to the exhaust gases pushing on something behind the rocket. | The combustion of fuel releases a gas from the base of the rocket. This push out of gas causes the air at the base to push back and move the rocket upwards. |
| All magnets are made of iron | Magnets are made of Ferromagnetic metals including nickel, iron and cobalt. |
| Larger magnets are stronger that small magnets | The magnetic strength does not depend on size |
| The magnetic and geographic poles are located at the same place. | The magnetic pole is continually shifting. |
| The magnetic north pole of the Earth is at the north pole. | The magnetic pole is continually shifting. A magnet’s north points to the north pole. This means the geographic north pole is a magnetic south. |
| All metals are attracted to a magnet. | Aluminium (for example) is not attracted to a magnet. |
References
AITSL. (n.d.). Resource. AITSL. https://www.aitsl.edu.au/tools-resources/resource/dispelling-scientific-misconceptions-illustration-of-practice
Allen, M. (2019). Misconceptions in Primary Science 3e. McGraw-hill education (UK).
Ideas for Teaching Science: Years 5-10. (2014, April 14). Resources for Teaching Science. https://blogs.deakin.edu.au/sci-enviro-ed/years-5-10/
Pine, K., Messer, D., & St. John, K. (2001). Children's misconceptions in primary science: A survey of teachers' views. Research in Science & Technological Education, 19(1), 79-96.
Redhead, K. (2018). Common Misconceptions. Primary Science Teaching Trust. https://pstt.org.uk/resources/common-misconceptions/
University of California. (2022, April 21). Correcting misconceptions - Understanding Science. Understanding Science - How Science REALLY Works... https://undsci.berkeley.edu/for-educators/prepare-and-plan/correcting-misconceptions/
This section is about core concepts and alternative conceptions:
- The core concepts of science are framed by the six overarching ideas identified by ACARA.
- Addressing alternative conceptions in the core concepts requires teachers to plan discussions and investigations that allow students to question their prior assumptions and understanding of the core concepts and key ideas.