

Shelter in a storm
View Sequence overviewStudents will:
- identify that a shelter frame needs to support itself.
- test whether a frame shape can stand by itself.
- explain which material is best for a frame to withstand wind.
- describe simple ways to help a shelter stay still in wind.
Students will represent their understanding as they:
- build a shelter frame.
- participate in discussion to recount observations and experiences relating to the different materials used to build the frames.
- record observations in a simple worksheet or drawing.
In this lesson, assessment is formative.
Feedback might focus on students’ ability to:
- construct a simple frame that fits over their chosen toy character.
- recognise whether their frame is self-supporting.
- observe and describe what wind does to the frame.
- explain which material is best for the frame.
- suggest a practical improvement, such as making the base wider, making the frame shorter, strengthening joints, adding weight to the base or securing the base to the ground.
Whole class
Class science journal (digital or hard-copy)
Wooden skewer or pop sticks
Tissue
Paper spoon used in Lesson 3
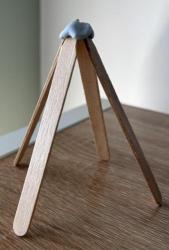
A simple self-supporting structure, such as four pop-sticks or skewers joined together with masking tape or blu-tac
Demonstration copy of the Frame testing Resource sheet
Electric fan
3 x objects with different weights that can be balanced on top of the constructed frames, e.g. a piece of paper, a small book, and a thin piece of wood.
Each group
One set of frame pieces made from one of the following material types:
- 10 x playground sticks
- 10 x wooden skewers
- 10 x pipe cleaners
Distribute the three types of material evenly among the groups (i.e. three groups use sticks, three use skewers, three use pipe cleaners). Alternatively, you may choose to have each group build and test using the same type of material, then test each other’s frames, then build and test using the next material, and so on.
Masking tape strips
Frame testing Resource sheet
Access to the toy characters used in the sequence
Lesson
The Inquire phase allows students to cycle progressively and with increasing complexity through the key science ideas related to the core concepts. Each Inquire cycle is divided into three teaching and learning routines that allow students to systematically build their knowledge and skills in science and incorporate this into their current understanding of the world.
When designing a teaching sequence, it is important to consider the knowledge and skills that students will need in the final Act phase. Consider what the students already know and identify the steps that need to be taken to reach the level required. How could you facilitate students’ understanding at each step? What investigations could be designed to build the skills at each step?
Read more about using the LIA FrameworkRe-orient
Revisit the word wall, class science journal and learning from Lesson 3. Discuss how students described materials using the words “stiff” and “bendy”.
Remind students that materials have properties, which are the ways the materials look or behave when they are tested by scientists.
- What is an object?
- A thing that we can see, touch or use.
- What is a material?
- What an object is made from.
- What is a property?
- How a material looks or behaves.
- What property words did we use in the last lesson?
- Stiff and bendy.
- Can an object be made from more than one material?
- Yes. For example, a ruler can be made from metal, plastic or wood.
The Inquire phase allows students to cycle progressively and with increasing complexity through the key science ideas related to the core concepts. Each Inquire cycle is divided into three teaching and learning routines that allow students to systematically build their knowledge and skills in science and incorporate this into their current understanding of the world.
When designing a teaching sequence, it is important to consider the knowledge and skills that students will need in the final Act phase. Consider what the students already know and identify the steps that need to be taken to reach the level required. How could you facilitate students’ understanding at each step? What investigations could be designed to build the skills at each step?
Read more about using the LIA FrameworkIdentifying and constructing questions is the creative driver of the inquiry process. It allows students to explore what they know and how they know it. During the Inquire phase of the LIA Framework, the Question routine allows for past activities to be reviewed and to set the scene for the investigation that students will undertake. The use of effective questioning techniques can influence students’ view and interpretation of upcoming content, open them to exploration and link to their current interests and science capital.
When designing a teaching sequence, it is important to spend some time considering the mindset of students at the start of each Inquire phase. What do you want students to be thinking about, what do they already know and what is the best way for them to approach the task? What might tap into their curiosity?
Read more about using the LIA FrameworkFraming the investigation
Remind students of the tests they watched in the previous lesson (involving the stiff material and a tissue) that showed that stiff materials can hold things up, but bendy materials cannot. Repeat the demonstration if necessary.
Ask students to consider whether they think a tissue on a skewer could be called a “shelter”, and why or why not.
Ask students to think about any shelters built for people that they have seen/identified, such as umbrellas, tents, cubbies and shade shelters. Use images from earlier lessons to support students’ comments or ideas.
Discuss how these shelters are different from a tissue on a skewer. Identify what makes a shelter stand up by itself, and ask students to consider what might make a shelter fall over in the wind. Record ideas in the class science journal.
As part of the conversation, guide students towards the following ideas:
- A frame needs a shape.
- A frame needs a base.
- A frame needs to be big enough to fit a living thing, but not too tall, particularly in comparison to the size of the base.
- The joins between materials need to be strong.
- The frame needs to be weighted or attached to the floor or ground.
- What does it mean if something “stays up”?
- It stands by itself and does not fall over.
- Is a tissue on a skewer a shelter? Why do you think that?
- What does a tissue on a skewer have in common with a shelter? How are they different?
- The skewer is a basic frame and it holds up the tissue.
- The skewer is not wide enough to make the tissue “spread out”, so there’s no room to shelter under it.
- What might help the skewer stay up by itself?
- How can we get the tissue to stay “spread out” so it could shelter something?
- What is a shelter frame?
- The part that provides a supporting structure and holds up the cover.
- Does the frame have to be big enough for the toy?
- Yes.
- Would a very tall frame be better? Does something that is tall and very skinny stand up easily by itself?
- No, it might wobble or fall. You can demonstrate this by building a tall, skinny tower and a wider tower of the same height using non-interlocking blocks.
- Why might a shelter fall over in wind?
- The wind might be very strong, the frame might be too tall, the joints might be weak or the base might be narrow.
Demonstrate for students that the number of pieces in a frame matters too, using a few loose materials. For example, place one stick upright and show that it falls over, and/or show how two sticks joined together cannot stand up on their own. Then show the simple joined structure (prepared as part of the materials list) and discuss whether it stands more easily and why. Explain that shape matters, not just material: a triangular base made with three skewers, or a square base made with four skewers, will stand up by themselves.
Ask: What might help a frame stay still in wind? Students may suggest a wide base, strong joints, a lower height, a weighted base or being secured to the ground.
Try out student suggestions to explore the stability of a narrow base compared with a wide base and secure joints compared with insecurely linked joints.
Pose the question: What are the best shapes and materials to help a shelter stay up by itself?
The Inquire phase allows students to cycle progressively and with increasing complexity through the key science ideas related to the core concepts. Each Inquire cycle is divided into three teaching and learning routines that allow students to systematically build their knowledge and skills in science and incorporate this into their current understanding of the world.
When designing a teaching sequence, it is important to consider the knowledge and skills that students will need in the final Act phase. Consider what the students already know and identify the steps that need to be taken to reach the level required. How could you facilitate students’ understanding at each step? What investigations could be designed to build the skills at each step?
Read more about using the LIA FrameworkThe Investigate routine provides students with an opportunity to explore the key ideas of science, to plan and conduct an investigation, and to gather and record data. The investigations are designed to systematically develop content knowledge and skills through increasingly complex processes of structured inquiry, guided inquiry and open inquiry approaches. Students are encouraged to process data to identify trends and patterns and link them to the real-world context of the teaching sequence.
When designing a teaching sequence, consider the diagnostic assessment (Launch phase) that identified the alternative conceptions that students held. Are there activities that challenge these ideas and provide openings for discussion? What content knowledge and skills do students need to be able to complete the final (Act phase) task? How could you systematically build these through the investigation routines? Are there opportunities to build students’ understanding and skills in the science inquiry processes through the successive investigations?
Read more about using the LIA FrameworkA strong frame
Explain that students will now build and test a shelter frame for one of the toy characters discussed earlier in the sequence.
Work with students to list the things that will make a good frame. For example:
- The toy will fit inside the frame.
- The frame will stand up by itself.
- The frame will stay still in the wind.
Explain that today the class is only testing whether the frame structure works as it is supposed to. Explain that teams will build their frame and test it by:
- fitting the toy inside the frame.
- making sure the frame stands up on its own.
- making sure the frame doesn’t blow away in the wind, by placing it in front of an electric fan to replicate the wind in a storm.
Give each team the required equipment: one toy, one type of frame material, and masking tape strips.
Model how to make a square pyramid as an example of a shape that teams could use for their frame. Keep the modelling brief so students still do the building themselves. Emphasise that the frame does not need a cover yet.
Model how to record students’ ideas and testing results using a demonstration copy of the Frame testing Resource sheet.
Teams build their frames. Encourage them to test whether the toy fits inside and whether the frame stands up by itself as they build. Encourage students to make adjustments to ensure their frame meets these two criteria as they go. Teams record the results of these two tests on the Frame testing Resource sheet.
The Inquire phase allows students to cycle progressively and with increasing complexity through the key science ideas related to the core concepts. Each Inquire cycle is divided into three teaching and learning routines that allow students to systematically build their knowledge and skills in science and incorporate this into their current understanding of the world.
When designing a teaching sequence, it is important to consider the knowledge and skills that students will need in the final Act phase. Consider what the students already know and identify the steps that need to be taken to reach the level required. How could you facilitate students’ understanding at each step? What investigations could be designed to build the skills at each step?
Read more about using the LIA FrameworkFollowing an investigation, the Integrate routine provides time and space for data to be evaluated and insights to be synthesized. It reveals new insights, consolidates and refines representations, generalises context and broadens students’ perspectives. It allows student thinking to become visible and opens formative feedback opportunities. It may also lead to further questions being asked, allowing the Inquire phase to start again.
When designing a teaching sequence, consider the diagnostic assessment that was undertaken during the Launch phase. Consider if alternative conceptions could be used as a jumping off point to discussions. How could students represent their learning in a way that would support formative feedback opportunities? Could small summative assessment occur at different stages in the teaching sequence?
Read more about using the LIA FrameworkThe best material
In the following Integrate routine, students are guided to link their experiences of building and testing their frames with the science concept being explored: stiff materials are more suitable than bendy materials for building a strong frame. Through modelling, questioning and discussion, students should come to a consensus that:
|
When all teams have assembled their frames, test each one using an electric fan to simulate wind so that students can observe whether each team’s shelter stays stable. Use the same fan setting, and place the frames at approximately the same distance away from the fan so the test is as fair as possible. Encourage students to watch each frame test carefully and describe what happens.
Allow teams time to record the results of their wind test on their Frame testing Resource sheet.
Discuss each frame and why it did or did not stay stable.
Note: Sensitivity may be required here, as younger students may take feedback as personal criticism. Discuss with students beforehand how an important aspect of working like a scientist is testing ideas and making improvements. Including positive feedback, as well as areas for improvement, can help students feel less overwhelmed when their frames are tested.
- Does your frame fit over the toy?
- Yes/not yet/it is too small.
- Can your frame stand by itself—is it self-supporting?
- Yes/no/only a little.
- What happened when the wind blew on it?
- It stayed still/wobbled/tipped over/moved.
- Why do you think that happened?
- It was too tall/the base was too small/the joints were weak/the material was too bendy.
- What is the shape of your frame?
- A square pyramid has a point at the top with a square base underneath.
- Did all frame materials behave in the same way?
- No.
- Which material feels stiff? Which feels bendy?
- A pipe cleaner frame is likely to be bendy, while a stick or skewer frame is likely to be stiff.
- What could you change to make your frame more stable?
- Make the base wider/make the frame shorter/use stronger joints/add weight to the base/tape it down.
Look at each of the materials used to make a frame and ask students if they think the material could hold up something heavy and why they think that.
Show students some objects that can act as weights, including some that are light and some that are heavier, and ask if they think each object would be able to balance on each frame without the frame bending or breaking.
Optional: Test some of the students’ frames to see if they can hold up the different objects.
Identify which part of a shelter the weight represents (the cover).
Compare what students noticed across the different material groups and help them to identify patterns. For example:
- Some materials bend more easily.
- Some frames stand well until the fan is turned on.
- Some frames are too tall and tip over.
- Some frames need stronger joints or a wider base.
- Did all frames work in the same way?
- Which frames stood by themselves most easily?
- Which frames moved most in the wind?
- Why does frame shape matter?
- Why do strong joints matter?
- Why is a wide base useful?
- Why are we not choosing a cover yet?
- How can this help us make a better shelter later?
Record a statement based on the class’s observations to answer each of the following questions about the ideal frame:
- The best frame material is ____ because ____?
- Why does the ideal frame need to fit over the toy?
- Why does the ideal frame need to stand up?
- Why does the ideal frame need to stay still in the wind?
- What kind of base does the ideal frame need? Why?
Reinforce that the frame needs to do all these things before a cover is added, because the frame is needed to hold up the cover and make it wide enough for something to shelter under. Connect this to real shelters and umbrellas: the structure underneath (the frame) is important.
Co-construct a class statement such as: A good shelter frame needs to fit the toy, stand by itself, and stay steady in the wind.
Discuss and record practical improvements students could make before the final shelter testing. These may include:
- making the base wider.
- making the frame shorter.
- strengthening the joints.
- adding weight to the base.
- securing the base to the ground.
Reflect on the lesson
You might:
- review the class science journal.
- revisit the meaning of “frame”, “self-supporting” and “stable”.
- add new words and any related drawings or photos to the word wall.
- review what students have learned about wide bases, lower heights, strong joints and stable shapes.
- discuss which materials were easiest or hardest to build with.
- ask students to show or explain one change they would make to improve their frame.