Making sense of changes
View Sequence overviewStudents will:
- collect and sort solids and liquids based on observable properties.
Students will represent their understanding as they:
- provide a reason why they think an item is a solid or a liquid.
- contribute to a class Venn diagram of the properties of solids and liquids.
In this lesson, assessment is formative.
Feedback might focus on:
- the properties that students associate with solids and liquids.
- Do they recognise the scientific definition of solids, rather than only the use of ‘solid’ as an adjective to denote something as ‘hard’ or ‘large’? Do they recognise all the liquids, including viscous liquids such as honey and oil?
- students’ ability to differentiate between liquids and pourable solids.
- Do they recognise that pourable solids will mound and require shaking to become level, whereas liquids will level on their own over time?
- students’ recognition that water can be in both solid and liquid states, and it can change from one to the other.
Whole class
Class science journal (digital or hard-copy)
Solid and liquid search Resource sheet printed and cut into individual pieces. Modify the descriptions to suit your context and the items in your classroom.
Various solids and liquids placed around the classroom to provide variety during the solid and liquid search, including some items students may find hard to classify as ‘solid’ or ‘liquid’. For example: a jar of honey, a squishy ball, soft toys, cooking oil, sauce, pourable solids such as rice, flour or washing powder.
Solid and liquid statements Resource sheet printed and cut into individual pieces
Optional: 2 x hula hoops, ropes or skipping ropes to make the outline of a physical Venn diagram
Optional: Digital device for taking photos
If undertaking the tests in the Integrate step as a whole class demonstration
Containers of different shapes and sizes, transparent if possible
Container of water
Container/s of a pourable solid, for example small blocks, dried beans, rice, flour, sugar, sand. This solid will be used to demonstrate that pourable solids ‘mound’ when poured, and have to be manipulated to flatten out (unlike liquids). How noticeable this ‘mounding’ is depends on the type of pourable solid used and the size of the tray it is being poured into. Lighter, finer solids (like flour or fine salt/sugar) will mound more quickly in a smaller space and in lesser amounts when poured. Larger, heavier items (like rice) will be needed in larger amounts and will require a larger area before students see a noticeable ‘mound’ when poured. Test the demonstration first so you know how much you will need of the pourable solid you will need.
2 x trays to pour the water and pourable solid into
Re-frozen ice monsters from the previous lesson
Optional: coloured water and a variety of additional containers, for students to explore water volume
If undertaking the tests in the Integrate step in collaborative teams
Containers of different shapes and sizes, transparent if possible
Container of water
Container/s of a pourable solid, for example small blocks, dried beans, rice, flour, sugar, sand. This solid will be used to demonstrate that pourable solids ‘mound’ when poured, and have to be manipulated to flatten out (unlike liquids). How noticeable this ‘mounding’ is depends on the type of pourable solid used and the size of the tray it is being poured into. Lighter, finer solids (like flour or fine salt/sugar) will mound more quickly in a smaller space and in lesser amounts when poured. Larger, heavier items (like rice) will be needed in larger amounts and will require a larger area before students see a noticeable ‘mound’ when poured. Test the demonstration first so you know how much you will need of the pourable solid you will need.
2 x trays to pour the water and pourable solid into
Individual science journals (digital or hard-copy)
Lesson
Re-orient
Redistribute ice monsters back to students now that they have been re-frozen.
Discuss how the ice monsters have changed, and if the predictions students made at the end of the previous lesson were accurate.
- Do the ice monsters look the same or different from how they looked when you saw them last? How?
- How has the shape of them changed?
- Why did that happen?
- What could you say about the ‘shape’ of water as a result?
- Is this what we predicted would happen at the end of last lesson?
The Inquire phase allows students to cycle progressively and with increasing complexity through the key science ideas related to the core concepts. Each Inquire cycle is divided into three teaching and learning routines that allow students to systematically build their knowledge and skills in science and incorporate this into their current understanding of the world.
When designing a teaching sequence, it is important to consider the knowledge and skills that students will need in the final Act phase. Consider what the students already know and identify the steps that need to be taken to reach the level required. How could you facilitate students’ understanding at each step? What investigations could be designed to build the skills at each step?
Read more about using the LIA FrameworkIdentifying and constructing questions is the creative driver of the inquiry process. It allows students to explore what they know and how they know it. During the Inquire phase of the LIA Framework, the Question routine allows for past activities to be reviewed and to set the scene for the investigation that students will undertake. The use of effective questioning techniques can influence students’ view and interpretation of upcoming content, open them to exploration and link to their current interests and science capital.
When designing a teaching sequence, it is important to spend some time considering the mindset of students at the start of each Inquire phase. What do you want students to be thinking about, what do they already know and what is the best way for them to approach the task? What might tap into their curiosity?
Read more about using the LIA FrameworkSolid to liquid
Revise students’ ideas collected last lesson about the terms solid and liquid.
Ask students: How might you describe the difference between solids and liquids to an alien?
Jointly construct a definition of each term, prompting students to include mention of the ‘shape’. These definitions will be built upon as the sequence progresses.
Pose the question: What in this room is solid, and what in this room is liquid?
Solids and liquids
What makes something a solid or a liquid?

Matter
All matter is made up of very small particles called atoms. These atoms can join or bond with other atoms to form molecules. When similar atoms or molecules combine, they form a material. The type of atoms or molecules, and how they are bonded together, can determine the properties of the material (how they behave in particular conditions). For example, gold is made up of gold atoms only. Liquid water or solid ice both consist of water molecules, a combination of hydrogen and oxygen atoms (H2O). How easily the atoms or molecules move around each other and their level of attraction to each other will determine their state of matter.
States of matter—solid or liquid?
A material might be found in different states, with the most familiar being solid, liquid or gas. Other states of matter are now recognised, such as plasma and liquid crystal, but these will not be dealt with in this sequence.
The amount of energy the atoms or molecules of a material have determines its state of matter; for example, the individual molecules in solid chocolate have less energy than those in melted chocolate.
- Solids have atoms or molecules that are held together with strong bonds. The atoms vibrate in place, but they do not change position. This means that a solid holds its shape and does not flow, nor can it be significantly compressed.
- Liquids have atoms or molecules that are held together with weaker bonds. They stay close together and so occupy a constant volume of space. Thus, a liquid can only be compressed a little bit, if at all. However, the bonds are loose enough to let atoms or molecules slide past each other. Due to the force of gravity, a liquid flows and takes the shape of the container base into which it is poured.
- Gases are not considered in this teaching sequence. They are not included in the ACARA Year 3 Science Understanding content description. For students of this age, the properties of gases (high-energy molecules that take up all the available volume) are considered conceptually difficult to understand.
The Inquire phase allows students to cycle progressively and with increasing complexity through the key science ideas related to the core concepts. Each Inquire cycle is divided into three teaching and learning routines that allow students to systematically build their knowledge and skills in science and incorporate this into their current understanding of the world.
When designing a teaching sequence, it is important to consider the knowledge and skills that students will need in the final Act phase. Consider what the students already know and identify the steps that need to be taken to reach the level required. How could you facilitate students’ understanding at each step? What investigations could be designed to build the skills at each step?
Read more about using the LIA FrameworkThe Investigate routine provides students with an opportunity to explore the key ideas of science, to plan and conduct an investigation, and to gather and record data. The investigations are designed to systematically develop content knowledge and skills through increasingly complex processes of structured inquiry, guided inquiry and open inquiry approaches. Students are encouraged to process data to identify trends and patterns and link them to the real-world context of the teaching sequence.
When designing a teaching sequence, consider the diagnostic assessment (Launch phase) that identified the alternative conceptions that students held. Are there activities that challenge these ideas and provide openings for discussion? What content knowledge and skills do students need to be able to complete the final (Act phase) task? How could you systematically build these through the investigation routines? Are there opportunities to build students’ understanding and skills in the science inquiry processes through the successive investigations?
Read more about using the LIA FrameworkClassifying things around us
Distribute the descriptions on the Solid and liquid search Resource sheet between pairs of students. Students work together to undertake a search around the classroom to find an object or objects that match their description.
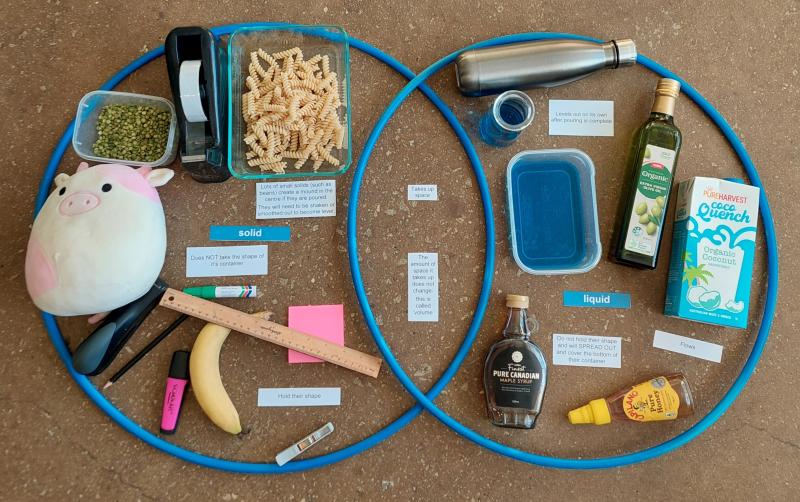
After students have located their items, build a class Venn diagram with one circle representing solids, one representing liquids, and with the overlapping section for items students think might be both. You can build the Venn diagram in a few different ways:
- draw two overlapping circles in the class science journal and write the names of items students believe belong in each section.
- take photographs of items and build a digital Venn diagram.
- build a physical representation by placing two hula hoops on the ground, or make large circles using ropes. Place items in the relevant sections.
Each team presents their item/s, explains how/why it fits the descriptive word or phrase and where they would place it in the Venn diagram.
After all items have been added to the Venn diagram, discuss if students would move any of the items around, and why.
Finally, ask students where they would place the ice monster in the Venn diagram and why. Ask if they think it might belong in different parts of the diagram at different times.
The Inquire phase allows students to cycle progressively and with increasing complexity through the key science ideas related to the core concepts. Each Inquire cycle is divided into three teaching and learning routines that allow students to systematically build their knowledge and skills in science and incorporate this into their current understanding of the world.
When designing a teaching sequence, it is important to consider the knowledge and skills that students will need in the final Act phase. Consider what the students already know and identify the steps that need to be taken to reach the level required. How could you facilitate students’ understanding at each step? What investigations could be designed to build the skills at each step?
Read more about using the LIA FrameworkFollowing an investigation, the Integrate routine provides time and space for data to be evaluated and insights to be synthesized. It reveals new insights, consolidates and refines representations, generalises context and broadens students’ perspectives. It allows student thinking to become visible and opens formative feedback opportunities. It may also lead to further questions being asked, allowing the Inquire phase to start again.
When designing a teaching sequence, consider the diagnostic assessment that was undertaken during the Launch phase. Consider if alternative conceptions could be used as a jumping off point to discussions. How could students represent their learning in a way that would support formative feedback opportunities? Could small summative assessment occur at different stages in the teaching sequence?
Read more about using the LIA FrameworkSorting it out
In this Integrate step, guide students to link their experiences in the investigation to the science concept being explored—in this instance, the observable properties of solid and liquids. Through demonstration, exploration and discussion, students should come to a consensus that:
|
Read and discuss the following statements, found on the Solid or liquid statements? Resource sheet. As a class, decide if each statement best describes things that are solid, things that are liquid, or if it could describe both. Add the statement to the appropriate section of the Venn diagram.
- Do not change their shape easily.
- Do not take the shape of the container they’re in.
- Take up space.
- Flow.
- Change their shape easily and will take the shape of the container they’re in.
Leave the following two statements aside for now:
- Level out on their own after being poured.
- Lots of small solids create a mound when they are poured. They will need to be shaken or smoothed out to become level.
Carry out the following two tests, which explore the difference between liquids and pourable solids, as a class demonstration. Alternatively students working in collaborative teams can be provided with the necessary materials to experience pouring liquids and pourable solids between containers, stopping at opportune intervals to discuss what students have observed.
Test 1: Liquids
Test the statement Liquids change their shape easily and will take the shape of the container they are in by pouring a set amount of water between containers of different sizes and shapes and asking students to describe what they observe. Discuss how the shape of the liquid changes to suit the width and height of the container.
Pour the water back into its original container and discuss how the volume of water has remained the same, even though it looks different in all the containers.
Examine the statement above to see if students agree that liquids change shape and are the shape of the container they're in.
Test 2: Pourable solids
Compare the liquid you were just observing with a pourable solid (without introducing the term ‘pourable solid’ yet).
Discuss what students observe about the new substance, and whether they think it is a liquid or a solid and why. You might refer them to the statements about liquids to support them, asking questions such as Do you think this substance will flow/pour?, Will it change shape easily? and Will it take the shape of the container it’s poured into (like the liquids did)?
Ask students to predict what will happen when the water and the new substance are poured from their containers and into a tray, both in terms of how smoothly they will ‘move’ and how they might settle when they hit the bottom of the tray.
One at a time, pour the water and new substance into the trays and make observations.
Through discussion, determine that the liquid settled flat on its own when poured into the tray, whereas the other substance created a mound when poured. Demonstrate how the new substance will ‘flatten’ out only after the tray is shaken, or hands are used to move it around.
Revisit students’ opinions on whether they thought this substance was a liquid or a solid, and if the demonstration has changed or confirmed their thinking.
Introduce the term ‘pourable solids’ and confirm that the substance is actually made up of tiny solids. Although it might act a bit like a liquid because the solids are so small it can be poured, and may change its shape easily, it is still considered a solid.
If needed demonstrate pouring the small solids multiple times, to show students how they don't ‘flow’ as freely as the liquid.
Ask students to name other things that would be considered pourable solids and write a list of these in the class science journal. For example: salt, sugar, sand, washing powder, rice, dried beans/lentils, flour. This list can be added to as the sequence progresses if students come across new pourable solids.
Optional: Demonstrate using different-sized pourable solids to compare how size may impact the appearance of ‘flow’, and how bigger pourable solids won’t actually take up all the space in the container they are poured into, so can't really be considered as ‘changing shape’. You might use flour, sugar, salt, lentils, rice, dried beans, MAB cubes etc.
After demonstrating these two tests, or allowing teams time to observe and discuss the differences between liquids and pourable solids, read the two statements held aside earlier. Determine which statement is describing a solid and which is describing a liquid, and add them to the Venn diagram.
Return to the definitions of solid and liquid constructed at the beginning of the lesson and ask students if they want to amend or add to the definitions based on what they have done and seen in the lesson.
If you have made a physical Venn diagram, photograph it for the word wall or class science journal.
Using a think, pair, share strategy, ask students to consider how they could use solids and liquids to create a sensory experience. Record ideas in the class science journal. Some prompts you might use to stimulate their thinking include:
- Would shaking a container of rice sound different from shaking a container of flour?
- How would flour and rice feel different between your fingers?
- What about dishwashing liquid and honey?
- Would they have a smell?
- What experiences could you design that would be interesting to the senses?
Re-collect ice monsters in bags/jars, as you will need some samples of them again in Lessons 3 and/or 4. Store them at room temperature.
Reflect on the lesson
You might:
- add to the class word wall any vocabulary related to the properties of solids and liquids.
- discuss the ice monsters further. At what points were they solid or liquid? How do we know? What liquid properties of the melted ice monster did we observe? What solid properties did we observe?
- discuss how students were thinking and working like scientists during the lesson, making detailed observations about the items, and classifying them according to those observations.
- revisit the words ‘melt’ and ‘freeze’ in the class science journal from Lesson 1 in the Launch phase, and make additions using a different colour pen/texta.
Think, pair, share
How and why should I use the think, pair, share strategy?
Within a classroom there are often students who raise their hands and offer ideas readily, as well as those who are less confident to share their ideas. The think, pair, share strategy can encourage more students to get involved because it allows thinking time and removes fear of being wrong, as students can offer ideas they have agreed upon with their partner.
In the strategy:
- Students are prompted with a question, topic, claim or idea.
- They are given time to think, typically between 10 and 20 seconds. The time can be extended for complex questions or topics.
- Students pair up with someone near them to discuss their answers and ideas.
- Invite students to share with the class, starting with "(Student's name) and I discussed/thought/talked about..."
You can also add the step ‘square’ where pairs team up with another pair to discuss further before sharing. This can be helpful to expose students to a wider range of ideas and vocabulary.