Making sense of changes
View Sequence overviewStudents will:
- explore water in its solid/frozen state (ice) and its liquid/melted state (water), and what it looks like in between those states (melting).
- observe sensory experiences that use a variety of solids, liquids, melting and freezing.
Students will represent their understanding as they:
- predict changes that will occur to the ice monster over time.
- draw a labelled diagram of their ice monster.
- contribute to discussions about melting and freezing.
In the Launch phase, assessment is diagnostic.
Take note of:
- students’ understanding of the terms solid and liquid.
- students’ understanding of the terms melt and freeze.
- Do they describe the changes that occurred to their ice monsters using descriptions such as ‘hard’ and ‘runny’, or by using terms such as ‘melt’ and ‘freeze’?
- students’ understanding of physical changes.
- Have they described how adding or removing heat leads to change? Have they been able to predict changes and explain how to reverse the changes?
Whole class
Class science journal (digital or hard-copy)
Each group
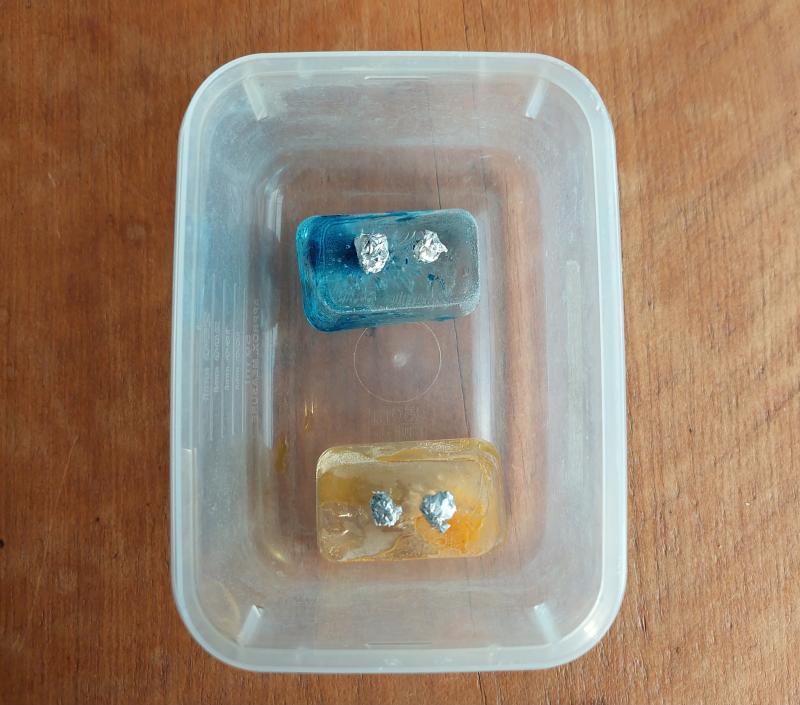
1-2 ice cubes (prepared at least a day in advance). You may choose to add food colouring to colour the water (if so, take appropriate measures to ensure students’ hands and clothes are not stained as the ice cubes melt) and/or add beads or small solids before freezing. Leave the actual ice cubes in the freezer until they are to be decorated (partway through the first step of the lesson).
2 x small solid ‘eyes’ per ice cube (these could be googly eyes, aquarium stones, aluminium foil etc.)
Other solid materials students might use to decorate their ice-monster, for example: feathers, pipe cleaners, paper and cardboard, fabric.
Clear container (resealable bags, glass jar or plastic takeaway food container)
Texta
Optional: iPad
A collection of short videos showing sensory experiences, including some related to melting and freezing. See A sensory experience below for included examples.
Each student
Individual science journal (digital or hard-copy)
Ice monster Resource sheet (or make their own)
Lesson
The Launch phase is designed to increase the science capital in a classroom by asking questions that elicit and explore students’ experiences. It uses local and global contexts and real-world phenomena that inspire students to recognise and explore the science behind objects, events and phenomena that occur in the material world. It encourages students to ask questions, investigate concepts, and engage with the Core Concepts that anchor each unit.
The Launch phase is divided into four routines that:
- ensure students experience the science for themselves and empathise with people who experience the problems science seeks to solve (Experience and empathise)
- anchor the teaching sequence with the key ideas and core science concepts (Anchor)
- elicit students’ prior understanding (Elicit)
- and connect with the students’ lives, languages and interests (Connect).
Students arrive in the classroom with a variety of scientific experiences. This routine provides an opportunity to plan for a common shared experience for all students. The Experience may involve games, role-play, local excursions or yarning with people in the local community. This routine can involve a chance to Empathise with the people who experience the problems science seeks to solve.
When designing a teaching sequence, consider what experiences will be relevant to your students. Is there a location for an excursion, or people to talk to as part of an incursion? Are there local people in the community who might be able to talk about what they are doing? How could you set up your classroom to broaden the students’ thinking about the core science ideas? How could you provide a common experience that will provide a talking point throughout the sequence?
Read more about using the LIA FrameworkIce monsters
This activity is best completed over the course of a school day. Working in collaborative teams, students will create ‘ice monsters’ by decorating ice cubes with various solid materials (see List of materials). The ice monsters will then be placed in clear plastic containers and stored around the classroom and students will periodically observe their monsters over the course of the day, until they are completely melted (or as close to as possible).
Before creating the ice monsters
Show students the various materials available for decorating their ice monsters. Teams plan how they will decorate their ice monster/s and each student draws a labelled diagram on their Ice monster Resource sheet. Remind students to include a pair of eyes on their ice-monster so you can ensure that all students have one identical point of reference to compare.
Each team selects a place in the classroom where they will leave their ice monsters for the day, giving a reason for their choice. Each student makes a prediction about the changes they think might happen to the ice monsters over time and why they think that, and records this on their Ice monster Resource sheet.
Creating the ice monsters
Teams collect the required equipment and make/decorate their ice monsters. If their ice cubes contain small solids or food colouring (that were added before freezing), students should add these to their diagrams.
Students make their first observation of their ice monsters by drawing a diagram and writing notes to record what they see, hear, feel and smell, and what, if any, changes they think are happening to it, and why they are happening.
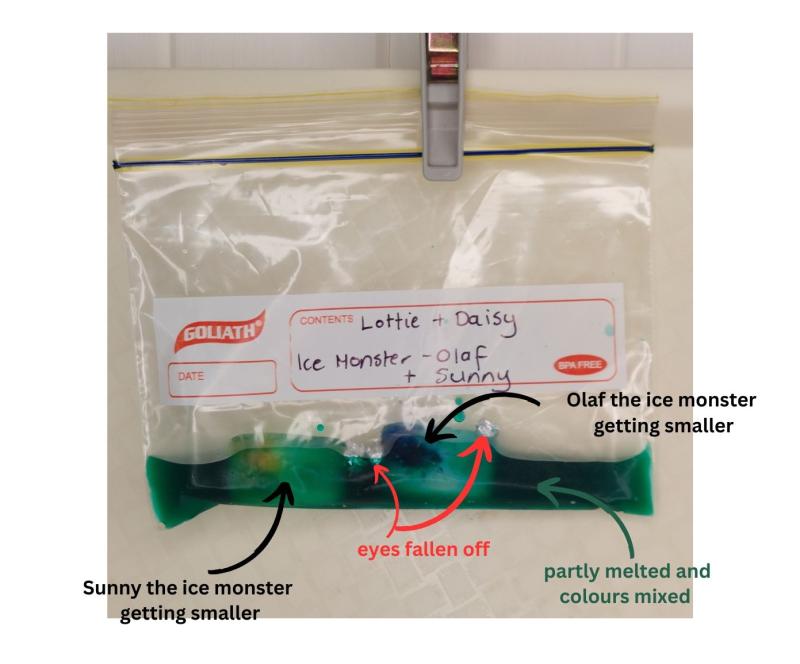
They place their ice monsters in a clear container or resealable bag, label it with their names and place it in their chosen location in the classroom.
Optional: Photograph the ice monsters with iPads, to document their starting state.
Observing the ice monsters
As a class, discuss students’ predictions about how the ice monsters will look in half an hour and at the end of the day, and why they think that. Record their ideas in the class science journal.
Over the course of the day, students return to make further observations about the changes happening to their ice monsters. Select observation intervals as appropriate for the current context—on a hot day, or in a warm location (e.g. windowsill on a sunny day), the ice monsters will melt more rapidly and intervals between observations will need to be shorter.
Optional: Undertake an observation walk to allow students to view other teams’ decorated ice monsters and consider their chosen location in the classroom.
Optional: Take photographs of the ice monsters during each observation and create a time-lapse to show the changes that occurred over the course of the day.
Once the ice monsters are fully melted (or have been left for as long as possible), continue by sharing and discussing students’ observations.
- How would you describe your ice monster when you first created it?
- How did it change across the day?
- How would you describe it at the end of the day?
- Would you describe the different ‘pieces’ of the monster in different ways? For example, how would you describe the body of the monster, compared to its eyes or other decorations?
Core concepts and key ideas
Where does this sequence fit into the larger picture of science and the science curriculum?
When planning for teaching in your classroom, it can be useful to see where a sequence fits into the larger picture of science. This unit is anchored to the Science understanding core concepts for Chemical sciences.
- The chemical and physical properties of substances are determined by their structure at a range of scales.
- Substances change and new substances are produced by rearranging atoms; these changes involve energy transfer and transformation.
By Year 3, students have already recognised that solid objects can be made of different materials and have described the observable properties of those materials, such as colour, hardness, texture and flexibility (Foundation). They have also explored how materials can be changed physically without changing their material composition, through actions such as bending, twisting, stretching and breaking. See our Year 2 teaching sequence Take, shape, and create.
In Year 3, students also learn about heat energy and how temperature changes when it is transferred from an object/substance containing more heat energy to one that contains less heat energy. See our Year 3 teaching sequence Scorching swings and slides. If students have already undertaken this learning, their depth of knowledge may be greater than if they have not.
In this teaching sequence, students explain the observable properties of solids and liquids and how adding or removing heat energy leads to a change of state.
This core concept is linked to the key science ideas:
- Heat energy can be transferred between objects. (Energy and Matter)
- The observable form of non-living things can change over time, as a result of energy and forces. (Form and Function)
- Change is described and measured in terms of differences over time. (Stability and change)
- Standard units of measurement are used and can enable comparisons to be made. (Scale and Measurement)
- Similarities and differences can be used to sort and classify solids and liquids. (Patterns, order and organisation)
When your students next progress through this core concept, they will explore how the properties of natural and made materials influence their use (Year 4), and how the motion and arrangement of particles are different for solids, liquids and gases (Year 5).
Alternative conceptions
What alternative conceptions might students hold about solids, liquids and change of state? How does this sequence address them?
Solids
Students are strongly influenced by everyday language and may use the term ‘solid’ to denote something as hard or large. They tend to use ‘solid’ as an adjective rather than to classify a set of substances. They might have difficulty understanding that the same material can be solid or liquid depending on the temperature. ‘Solid’ is also recognised as an adjective denoting something ‘good’ or ‘great’ in some Australian English dialects.
Crushed solids
Students might have difficulty recognising crushed or powdered solids as being solids, particularly since they might identify liquids as substances that are ‘pourable’. Pouring is a consequence of flowing, which is the property of a fluid, but it is also possible to ‘pour’ small solids (e.g. beans) or powders. The difference is that when powders are poured, they land in a heap and need to be shaken to settle, whereas liquids flow under the effect of gravity to take on the shape of the bottom of the container.
Liquids
Some students identify all liquids with water, and the most common liquids identified by students are water-based, such as dishwashing liquid, milk, seawater, cordial and lemonade. More viscous liquids, such as oil, paraffin, and honey, are less commonly identified as liquids. Students might also assume that all liquids contain water and that melting involves a substance turning to water.
Change of state
A change of state occurs when heat energy is added to or removed from an object.
Some students might associate melting with ‘turning to water’. When an ice cube melts, it is not turning into water—it is solid water changing into liquid water. The water (H2O) is changing state. Any molten substance has the same chemical composition as its solid substance, just in a different state of matter.
In this sequence, students explore solids and liquids and determine the properties that make them different, specifically that solids hold their shape and liquids take the shape of the container base they are in. Students also explore how adding and removing heat from liquids and solids can affect their properties and change their state, and that these changes are reversible.
The Launch phase is designed to increase the science capital in a classroom by asking questions that elicit and explore students’ experiences. It uses local and global contexts and real-world phenomena that inspire students to recognise and explore the science behind objects, events and phenomena that occur in the material world. It encourages students to ask questions, investigate concepts, and engage with the Core Concepts that anchor each unit.
The Launch phase is divided into four routines that:
- ensure students experience the science for themselves and empathise with people who experience the problems science seeks to solve (Experience and empathise)
- anchor the teaching sequence with the key ideas and core science concepts (Anchor)
- elicit students’ prior understanding (Elicit)
- and connect with the students’ lives, languages and interests (Connect).
Science education consists of a series of key ideas and core concepts that can explain objects, events and phenomena, and link them to the experiences encountered by students in their lives. The purpose of the Anchor routine is to identify the key ideas and concepts in a way that builds and deepens students’ understanding. During the Launch phase, the Anchor routine provides a lens through which to view the classroom context, and a way to frame the key knowledge and skills students will be learning.
When designing a teaching sequence, consider the core concepts and key ideas that are relevant. Break these into small bite-sized pieces that are relevant to the age and stage of your students. Consider possible alternative concepts that students might hold. How could you provide activities or ask questions that will allow students to consider what they know?
The Elicit routine provides opportunities to identify students’ prior experiences, existing science capital and potential alternative conceptions related to the Core concepts. The diagnostic assessment allows teachers to support their students to build connections between what they already know and the teaching and learning that occurs during the Inquire cycle.
When designing a teaching sequence, consider when and where students may have been exposed to the core concepts and key ideas in the past. Imagine how a situation would have looked without any prior knowledge. What ideas and thoughts might students have used to explain the situation or phenomenon? What alternative conceptions might your students hold? How will you identify these?
The Deep connected learning in the ‘Pedagogical Toolbox: Deep connected learning’ provides a set of tools to identify common alternative conceptions to aid teachers during this routine.
Read more about using the LIA FrameworkEveryday melting & freezing
Display the words ‘solid’ and ‘liquid’ and invite students to share their knowledge about them. Record their ideas in the class science journal.
- Can you give an example of something that is solid? Liquid?
- How would you describe a solid? A liquid?
- When something is solid, how does it feel? Can you describe it in terms of your senses?
- When something is liquid, how does it feel? Can you describe it in terms of your senses?
Display the words ‘melt’ and ‘freeze’ and invite students to share their knowledge about them. Record their ideas in the class science journal.
- What things have you seen melting/freezing?
- Why do things melt/freeze?
- What is happening when things melt/freeze?
- When do you/don’t you want things to melt/freeze?
- Can everything melt or freeze? Can you give examples and explain why you think that?
- Do you have any questions about melting and freezing?
- When something is melted, or melting, how does it feel? Can you describe it in terms of your senses?
- When something is freezing or frozen, how does it feel? Can you describe it in terms of your senses?
The Launch phase is designed to increase the science capital in a classroom by asking questions that elicit and explore students’ experiences. It uses local and global contexts and real-world phenomena that inspire students to recognise and explore the science behind objects, events and phenomena that occur in the material world. It encourages students to ask questions, investigate concepts, and engage with the Core Concepts that anchor each unit.
The Launch phase is divided into four routines that:
- ensure students experience the science for themselves and empathise with people who experience the problems science seeks to solve (Experience and empathise)
- anchor the teaching sequence with the key ideas and core science concepts (Anchor)
- elicit students’ prior understanding (Elicit)
- and connect with the students’ lives, languages and interests (Connect).
Each student comes to the classroom with experiences made up from science-related knowledge, attitudes, experiences and resources in their life. The Connect routine is designed to tap into these experiences and that of their wider community. It is also an opportunity to yarn with community leaders (where appropriate) to gain an understanding of the student’s lives, languages and interests. In the Launch phase, this routine identifies and uses the science capital of students as the foundation of the teaching sequence so students can appreciate the relevance of their learning and its potential impact on future decisions. In short, this routine moves beyond scientific literacy and increases the science capital in the classroom and science identity of the students.
When planning a teaching sequence, take an interest in the lives of your students. What are their hobbies, how do they travel to and from school? What might have happened in the lives of your students (i.e. blackouts) that might be relevant to your next teaching sequence? What context might be of interest to your students?
Read more about using the LIA FrameworkA sensory experience
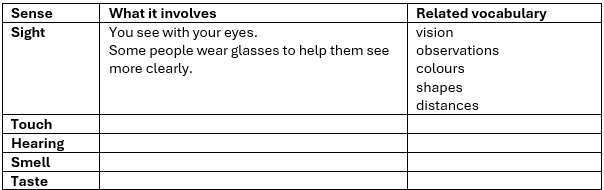
Discuss the five primary senses—sight, touch, hearing, sound and taste—and which senses the students used during the ice monster activity. Describe what the senses involve and any vocabulary students know that relate to them, and record these in a table in the class science journal.
- What are the five main senses that humans have?
- Which senses did you use today? How did you use them?
- How would you describe the senses?
- What parts of the body do each use?
- Can you think of any related vocabulary?
- Why are senses so important to us? To scientists?
Ask students to describe what they think or understand a ‘sensory experience’ is, including any they may have taken part in. If necessary, explain what a sensory experience is—an experience where we use multiple different senses to interact with and interpret the environment.
Ask how an ice monster could be part of a sensory experience. What senses would people be using as they observed an ice monster? What would they see, feel, smell etc.?
Using short reels as stimulus, discuss the senses used in each of the following videos and whether the sensory experience would be enjoyable. Some examples include:
- painting yellow curves on canvas (sight, touch)
- ice sensory play (sight, touch, hearing)
- playing at a sand table (sight, touch, hearing)
- bubble wrap (sight, touch, hearing)
- slime (sight, touch, hearing)
- person with flowers (sight, smell, touch)
Explain to students that at the end of the sequence they will design and create a sensory experience that involves a combination of solids, liquids, things that melt etc. Watch some more reels that include these and discuss the senses used in those and if they would be enjoyable.
- Easy hack to melt chocolate without burning it
- Dog eating ice cubes (requires sound)
- Babies first taste of ice cream
- Melting ice cream time lapse
Discuss when it is and isn’t safe to taste items during a science investigation, and determine why it would not be appropriate to include taste as a part of the sensory experience they will be designing.
Optional: Introduce the idea of a sensory table to the students, and invite them to bring along items that provide an interesting sensory experience, such as rice through a funnel, squishy toys, sand.
Note: If there are interesting and relevant questions that lead to a suitable investigation, consider adding it to the sequence.
Place the ice monsters, still inside their resealable bags/containers, into the freezer. The re-frozen ice monsters will be used in the next lesson.
Ask students to share the prediction they made on their Ice monster Resource sheet about what they think will happen when the ice monsters are placed back into the freezer.
Reflect on the lesson
You might:
- begin a class word wall related to solids, liquids, melting, freezing.
- take a walk around the school and collect items to begin a sensory table such as safe solids and liquids including water, leaves, flowers, stones and twigs.
Building a sensory table
What is a sensory table and why should you build one?
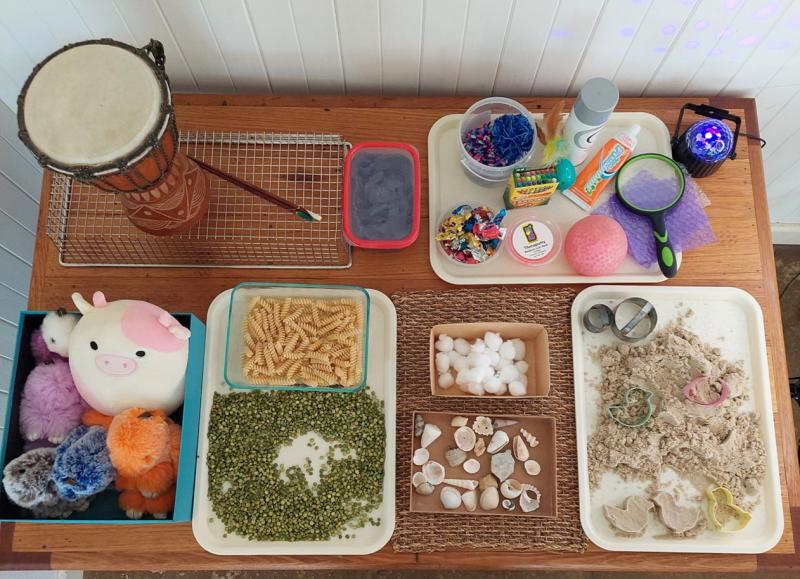
A sensory table contains samples collected by students and teachers that provide a sensory experience, involving touch, hearing, sight or smell (excluding taste for safety reasons). Items can vary but might include pourable small solids such as dried beans, sand and Lego, liquids of varying viscosity such as water and vegetable oil, or other interesting items such as clay, playdough, flowers or perhaps scent tubs with slit lids containing cotton balls dripped with vanilla essence.
Sensory tables can be intriguing to many students and something they can all experience success contributing to. They provide an opportunity for students to:
- explore using multiple senses.
- notice similarities and differences in materials.
- develop an appreciation that in science we use all our senses to learn about the world around us.
- share their knowledge and experiences, reinforcing that we value them and their understandings.
In this sequence, the building of a sensory table will also link directly to the Act phase, where students use their understanding of solids, liquids, and adding or removing heat from materials to design a sensory experience for junior students. The collection of materials on the sensory table provides inspiration to expand on.
Special items may need to be returned to students—a collection of small boxes/tubs/trays can help to keep those items sorted and named while on the table.
As a class, ensure everyone knows which items they are allowed to touch. It can be simpler to only permit items onto the table that can be touched by everyone, to encourage free exploration.
Sensory experiences
What are the benefits of planning and participating in sensory experiences?
All living things use their senses to gather information about the world around them by detecting and interpreting external stimuli.
Primary school students will be familiar with 5 primary senses: sight, sound, smell, taste, and touch.
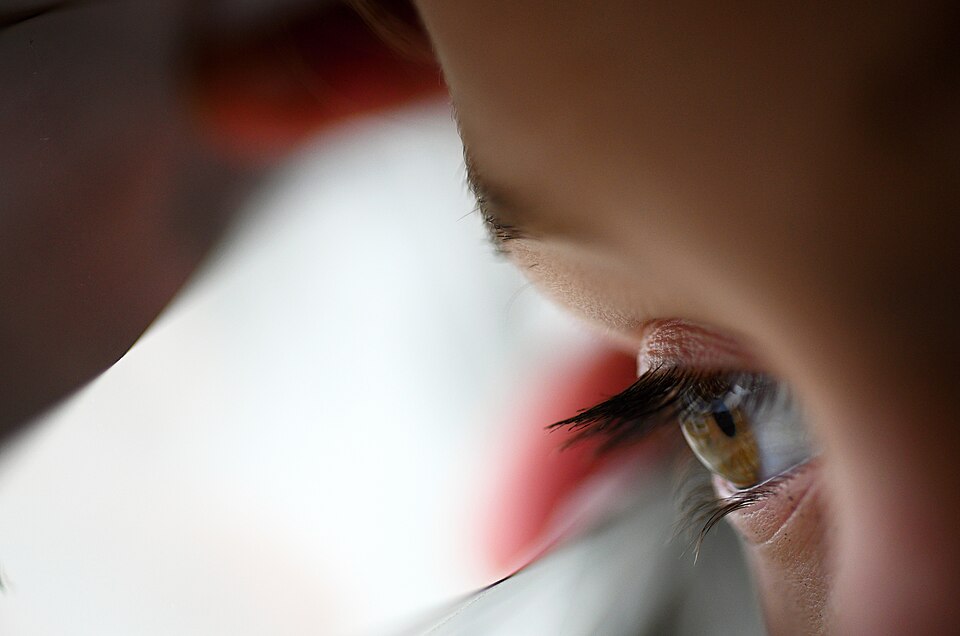
- Sight: Our eyes perceive light and colours, which our brain interprets as shapes, shadows, and movement.
- Sound: Our ears perceive sound waves and can interpret different noises, including pitch, volume, and tones.
- Smell: Our nose perceives the presence (odours) of airbourne chemicals.
- Taste: Our tongues perceive different flavours by detecting chemicals in food. The main tastes are sweet, salty, sour, bitter, and umami.
- Touch: Our skin contains receptors that can detect changes in pressure, temperature, and pain.
Sensory experiences can strengthen neural pathways that are crucial for learning and development, enhance the ability to retain information and lay the groundwork for future learning experiences.
Planning and participating in a sensory experience relating to solids, liquids and what happens to them when heat is added and removed provides students with an opportunity to build a solid foundational understanding about these concepts. This could in turn support students in later years as they learn more complex chemical sciences concepts.
By considering solids, liquids and change of state in light of the 5 primary senses students have the opportunity to look at different things in ways they might never have considered, thus gaining a deeper understanding of the properties of solids and liquids. For example, students might consider the difference, if any, in the taste of water and ice, or the difference between how they sound when shaken inside a container. They may consider how melted chocolate is not as pleasant to eat, but when combined with liquid, like milk for example, it is pleasant to drink.
All living things use their senses to gather information about the world around them by detecting and interpreting external stimuli.
Primary school students will be familiar with 5 primary senses: sight, sound, smell, taste, and touch.
- Sight: Our eyes perceive light and colours, which our brain interprets as shapes, shadows, and movement.
- Sound: Our ears perceive sound waves and can interpret different noises, including pitch, volume, and tones.
- Smell: Our nose perceives the presence (odours) of airbourne chemicals.
- Taste: Our tongues perceive different flavours by detecting chemicals in food. The main tastes are sweet, salty, sour, bitter, and umami.
- Touch: Our skin contains receptors that can detect changes in pressure, temperature, and pain.
Sensory experiences can strengthen neural pathways that are crucial for learning and development, enhance the ability to retain information and lay the groundwork for future learning experiences.
Planning and participating in a sensory experience relating to solids, liquids and what happens to them when heat is added and removed provides students with an opportunity to build a solid foundational understanding about these concepts. This could in turn support students in later years as they learn more complex chemical sciences concepts.
By considering solids, liquids and change of state in light of the 5 primary senses students have the opportunity to look at different things in ways they might never have considered, thus gaining a deeper understanding of the properties of solids and liquids. For example, students might consider the difference, if any, in the taste of water and ice, or the difference between how they sound when shaken inside a container. They may consider how melted chocolate is not as pleasant to eat, but when combined with liquid, like milk for example, it is pleasant to drink.