

What‘s great for growth?
View Sequence overviewStudents will:
- work in teams to plan and conduct an investigation to explore the effect of temperature on yeast growth.
Students will represent their understanding as they:
- contribute to discussions about the effect of temperature on yeast growth.
- write a statement, supported with evidence, describing the ideal temperature for growing yeast.
In this lesson, assessment is formative.
Feedback might focus on :
- students’ recognition that temperature affects yeast growth.
- students’ understanding that warm temperatures provide ideal growing conditions for yeast.
- students’ understanding that cold or hot temperatures are not ideal growing conditions for yeast.
- the generalisations students make, relating the temperature needs of yeast to the needs of other species.
Whole class
Class science journal (digital or hard-copy)
Demonstration copy of the Variables grid Resource sheet
Water at different temperatures—from the fridge, at room temperature, and warm (but not hot)
Each group
Thermometer (if available)
2 x clear jars or cups
Ruler
1 x teaspoon
1 x permanent marker
2 x teaspoons of yeast
1 x teaspoon of sugar (or best food source identified in the previous lesson)
2 x 100ml of water at different temperatures, one cooler, one warmer
- The ideal temperature for yeast is between 25–35°C. One of the water samples should sit within this temperature range. The other sample can either be approximately 5°C cooler than this range, or 5°C warmer than this range.
- You might also give teams all three temperature ranges to investigate (i.e. one sample ~20°C, one sample in the range of 25–35°C, and one sample ~40°C).
Timing device
Each student
Individual science journal (digital or hard-copy)
Changing temperature investigation planner Resource sheet
Lesson
The Inquire phase allows students to cycle progressively and with increasing complexity through the key science ideas related to the core concepts. Each Inquire cycle is divided into three teaching and learning routines that allow students to systematically build their knowledge and skills in science and incorporate this into their current understanding of the world.
When designing a teaching sequence, it is important to consider the knowledge and skills that students will need in the final Act phase. Consider what the students already know and identify the steps that need to be taken to reach the level required. How could you facilitate students’ understanding at each step? What investigations could be designed to build the skills at each step?
Read more about using the LIA FrameworkRe-orient
Recall the previous lesson and discuss the best food sources for encouraging yeast growth.
- Is yeast a plant, animal, or fungus?
- How could we tell whether yeast is growing?
- What physical conditions help yeast grow best?
- How is yeast useful in making bread and other foods?
- What food did the yeast prefer in the last lesson? How did we know this?
The Inquire phase allows students to cycle progressively and with increasing complexity through the key science ideas related to the core concepts. Each Inquire cycle is divided into three teaching and learning routines that allow students to systematically build their knowledge and skills in science and incorporate this into their current understanding of the world.
When designing a teaching sequence, it is important to consider the knowledge and skills that students will need in the final Act phase. Consider what the students already know and identify the steps that need to be taken to reach the level required. How could you facilitate students’ understanding at each step? What investigations could be designed to build the skills at each step?
Read more about using the LIA FrameworkIdentifying and constructing questions is the creative driver of the inquiry process. It allows students to explore what they know and how they know it. During the Inquire phase of the LIA Framework, the Question routine allows for past activities to be reviewed and to set the scene for the investigation that students will undertake. The use of effective questioning techniques can influence students’ view and interpretation of upcoming content, open them to exploration and link to their current interests and science capital.
When designing a teaching sequence, it is important to spend some time considering the mindset of students at the start of each Inquire phase. What do you want students to be thinking about, what do they already know and what is the best way for them to approach the task? What might tap into their curiosity?
Read more about using the LIA FrameworkPreferred temperatures
Recall the discussion from Lesson 1 where students indicated their preference for a specific season/temperature range. Review the temperature conditions they preferred and why, and ask them to consider if they think yeast also has preferred temperature conditions.
- Can you remember the time of year/season you preferred, as we discussed in Lesson 1? What temperature conditions did you choose and why?
- Why might living things, like yeast, also have preferred temperature conditions?
- Based on your experience, what do you think yeast might need to grow well?
- What might happen to yeast if it is too cold? What about if it is too hot?
- How could we design an experiment to find out what temperature yeast prefers?
Pose the question: What temperature does yeast prefer?
Ideal yeast growth temperature
In what temperature does yeast grow best?
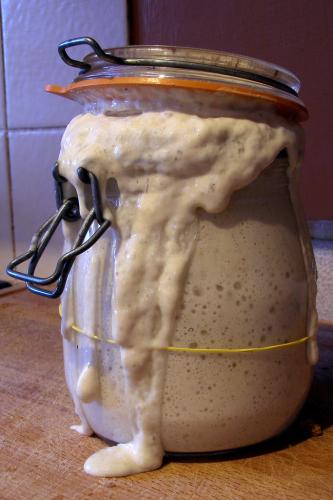
Yeast, most commonly Saccharomyces cerevisiae, grows best in warm but not hot conditions. The ideal temperature range for active growth and fermentation is typically around 25-35°C.
At these temperatures, yeast enzymes work efficiently, allowing the cells to break down sugars and release energy through fermentation.
If the temperature is too low (for example, in ice, a fridge or a cold room), yeast activity slows significantly. The cells remain alive but become much less active, producing little gas. If the temperature is too high (typically above 40-45°C), the chemical molecules (proteins and enzymes) inside the yeast can be damaged, and the cells may stop functioning or die. Boiling water temperatures will kill yeast completely, as does baking bread.
Yeast, most commonly Saccharomyces cerevisiae, grows best in warm but not hot conditions. The ideal temperature range for active growth and fermentation is typically around 25-35°C.
At these temperatures, yeast enzymes work efficiently, allowing the cells to break down sugars and release energy through fermentation.
If the temperature is too low (for example, in ice, a fridge or a cold room), yeast activity slows significantly. The cells remain alive but become much less active, producing little gas. If the temperature is too high (typically above 40-45°C), the chemical molecules (proteins and enzymes) inside the yeast can be damaged, and the cells may stop functioning or die. Boiling water temperatures will kill yeast completely, as does baking bread.
The Inquire phase allows students to cycle progressively and with increasing complexity through the key science ideas related to the core concepts. Each Inquire cycle is divided into three teaching and learning routines that allow students to systematically build their knowledge and skills in science and incorporate this into their current understanding of the world.
When designing a teaching sequence, it is important to consider the knowledge and skills that students will need in the final Act phase. Consider what the students already know and identify the steps that need to be taken to reach the level required. How could you facilitate students’ understanding at each step? What investigations could be designed to build the skills at each step?
Read more about using the LIA FrameworkThe Investigate routine provides students with an opportunity to explore the key ideas of science, to plan and conduct an investigation, and to gather and record data. The investigations are designed to systematically develop content knowledge and skills through increasingly complex processes of structured inquiry, guided inquiry and open inquiry approaches. Students are encouraged to process data to identify trends and patterns and link them to the real-world context of the teaching sequence.
When designing a teaching sequence, consider the diagnostic assessment (Launch phase) that identified the alternative conceptions that students held. Are there activities that challenge these ideas and provide openings for discussion? What content knowledge and skills do students need to be able to complete the final (Act phase) task? How could you systematically build these through the investigation routines? Are there opportunities to build students’ understanding and skills in the science inquiry processes through the successive investigations?
Read more about using the LIA FrameworkTesting temperature
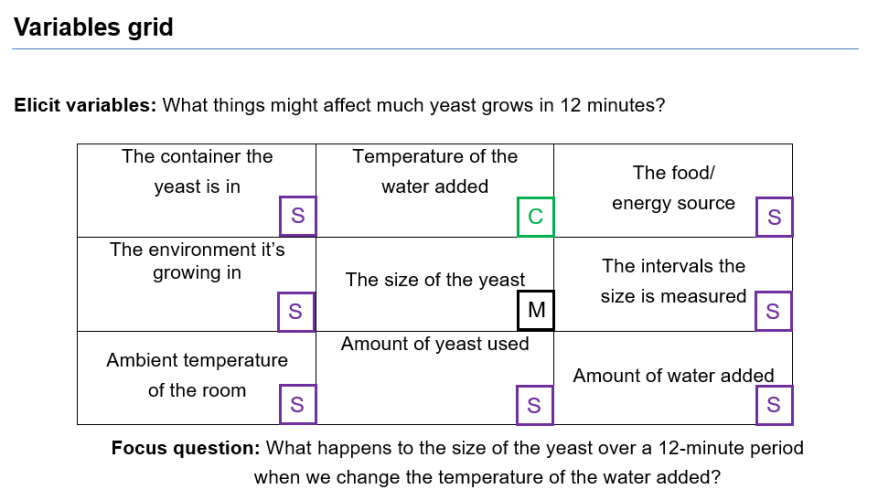
Using a demonstration copy of the Variables grid Resource sheet, record the variables that could affect yeast growth. Identify that the variable that will be measured (M) during the investigation is the growth of yeast.
Brainstorm other variables in the surrounding columns/rows, such as the food type available to the yeast, the amount of food available, the amount of water, and the temperature of the water. Sections can be added or removed as required.
Identify that the goal of today’s investigation is to measure how changing temperature affects yeast growth, and so all teams will be investigating the same variable. Use the question stem to write a question for investigation: What happens to (thing to be measured/dependent variable) when we change (factor that will be changed/independent variable). What happens to the height of the yeast in the jar/cup when we change the temperature of the water?
Discuss how the investigation will be conducted and how data will be collected and recorded.
- How will we measure yeast growth?
- What temperature water might we use?
- How will we measure the water temperature? How do we use a thermometer?
- How will we maintain a stable temperature throughout the investigation?
- How will you know if the temperature of your yeast culture is better than other temperatures used by other groups?
In collaborative teams, allow students time to plan their investigation planners using the Changing temperature investigation planner Resource sheet, then conduct the investigation and discuss and record results.
Suggested investigation steps are:
- Label the jars to indicate the water temperature that will be put into each one.
- Add the following ingredients to two jars and stir.
- Jar 1: 1 teaspoon yeast, 1 teaspoon sugar (or other effective food source), 100ml water in the ideal range of 25–35°C.
- Jar 2: 1 teaspoon yeast, 1 teaspoon sugar (or other effective food source), 100ml water that is a different temperature from Jar 1.
- See the Materials list for more information on the water temperatures that should be used for this investigation.
- Mark the jars at the top of the mixture with a permanent marker.
- Measure and record the height from the bottom of the jar to the marks.
- Leave the jars sitting on a bench for two minutes.
- Measure how much the yeast mixtures have grown by using a ruler to measure the height from the bottom of the jar to the top of the froth.
- Repeat these measurements every two minutes for 12 minutes.
Adapting to your context
How can you extend students’ learning?
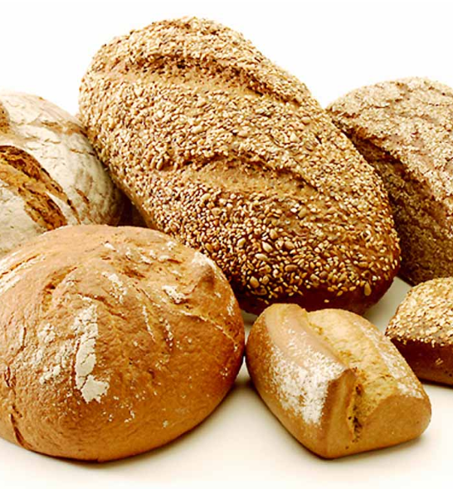
This investigation involves growing yeast culture at different temperatures in jars. It can be extended or modified to include the effect of temperature on bread rising and the finished results—how bubbly or dense the finished bread is. Bread can be baked in a regular oven, slow cooker, BBQ, air fryer or solar oven.
Studying ideal conditions for yeast growth provides an opportunity for students to explore real-life applications by visiting a bakery, sourdough bakery or pizza restaurant and hearing directly from an expert in the industry. Many of these facilities maintain long-term cultures of the yeast and bacteria required to make the dough. It can lead to interesting discussions regarding how these cultures are regularly fed, the nutrients provided and the physical conditions in which they are maintained.
This investigation involves growing yeast culture at different temperatures in jars. It can be extended or modified to include the effect of temperature on bread rising and the finished results—how bubbly or dense the finished bread is. Bread can be baked in a regular oven, slow cooker, BBQ, air fryer or solar oven.
Studying ideal conditions for yeast growth provides an opportunity for students to explore real-life applications by visiting a bakery, sourdough bakery or pizza restaurant and hearing directly from an expert in the industry. Many of these facilities maintain long-term cultures of the yeast and bacteria required to make the dough. It can lead to interesting discussions regarding how these cultures are regularly fed, the nutrients provided and the physical conditions in which they are maintained.
Hot water in schools
What temperature of water is safe to use in the classroom?

Hot water safety is an important issue in Australian schools. The severity of burns increases rapidly with temperature. At around 68°C, a serious full-thickness scald can occur in as little as one second. At approximately 50°C, the same level of injury may take around five minutes. Although this difference in temperature seems small, it has major implications for safety and can mean the difference between minor discomfort and severe injury requiring hospital treatment, skin grafts, or long-term scarring. In extreme cases, scald injuries can be fatal.
For this reason, plumbing regulations in Australia require that hot water delivered at outlets in schools does not exceed 45°C. This temperature is considered hot enough for bathing but significantly reduces the risk of severe burns.
Active dry yeast is best activated in temps of around 25-35°C.
Many state Departments of Education suggest that permission must be obtained from school leaders to use kettles in a classroom, and that they only contain enough liquid for immediate use.
In the event of a scald injury, immediate first aid is critical. Clothing should be removed quickly unless it is stuck to the skin. The affected area should be placed under cool running water for 20 minutes to stop further tissue damage and reduce pain. Ice, oils, butter, or ointments should not be applied, as they can worsen the injury. The burn should then be covered with a clean, non-stick dressing or cloth, and medical attention should be sought if the burn is larger than 3 cm, involves blistering, or affects sensitive areas such as the face or hands.
Hot water safety is an important issue in Australian schools. The severity of burns increases rapidly with temperature. At around 68°C, a serious full-thickness scald can occur in as little as one second. At approximately 50°C, the same level of injury may take around five minutes. Although this difference in temperature seems small, it has major implications for safety and can mean the difference between minor discomfort and severe injury requiring hospital treatment, skin grafts, or long-term scarring. In extreme cases, scald injuries can be fatal.
For this reason, plumbing regulations in Australia require that hot water delivered at outlets in schools does not exceed 45°C. This temperature is considered hot enough for bathing but significantly reduces the risk of severe burns.
Active dry yeast is best activated in temps of around 25-35°C.
Many state Departments of Education suggest that permission must be obtained from school leaders to use kettles in a classroom, and that they only contain enough liquid for immediate use.
In the event of a scald injury, immediate first aid is critical. Clothing should be removed quickly unless it is stuck to the skin. The affected area should be placed under cool running water for 20 minutes to stop further tissue damage and reduce pain. Ice, oils, butter, or ointments should not be applied, as they can worsen the injury. The burn should then be covered with a clean, non-stick dressing or cloth, and medical attention should be sought if the burn is larger than 3 cm, involves blistering, or affects sensitive areas such as the face or hands.
The Inquire phase allows students to cycle progressively and with increasing complexity through the key science ideas related to the core concepts. Each Inquire cycle is divided into three teaching and learning routines that allow students to systematically build their knowledge and skills in science and incorporate this into their current understanding of the world.
When designing a teaching sequence, it is important to consider the knowledge and skills that students will need in the final Act phase. Consider what the students already know and identify the steps that need to be taken to reach the level required. How could you facilitate students’ understanding at each step? What investigations could be designed to build the skills at each step?
Read more about using the LIA FrameworkFollowing an investigation, the Integrate routine provides time and space for data to be evaluated and insights to be synthesized. It reveals new insights, consolidates and refines representations, generalises context and broadens students’ perspectives. It allows student thinking to become visible and opens formative feedback opportunities. It may also lead to further questions being asked, allowing the Inquire phase to start again.
When designing a teaching sequence, consider the diagnostic assessment that was undertaken during the Launch phase. Consider if alternative conceptions could be used as a jumping off point to discussions. How could students represent their learning in a way that would support formative feedback opportunities? Could small summative assessment occur at different stages in the teaching sequence?
Read more about using the LIA FrameworkDiscussing results
In the following Integrate routine, students are guided to link their experiences and observations at the micro level in investigating the growth rate of yeast at different temperatures to the science at a macro level—that is, that changing conditions can affect an organism's growth rate and chance of successful survival. Through questioning and discussion, students should come to a consensus that:
|
Share and discuss findings as a class, creating an appropriate representation/record of data such as a data table.
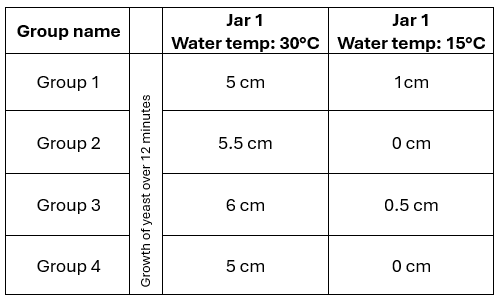
Encourage students to seek further information and clarification from other teams using the Science Question Starters.
- What temperature did your group test?
- What did you see happening with the yeast?
- What do you notice when we compare results with other groups?
- Do any results look very different from others at the same temperature?
- Can we see any patterns or trends in the data?
- At which temperature did the yeast grow the most?
- What happened at low temperatures? What about high temperatures?
- Was there a temperature where the yeast stopped growing?
- How does this connect to things like baking bread?
- Was the test fair for all groups?
- What could we do better next time?
- What do you think would happen to the yeast if we put it in very cold/freezing water, or very hot/boiling water?
- Explain that yeast in very cold temperatures (<10°C) will “go to sleep”. Its metabolism slows down or stops completely, and it doesn’t consume the food source. Putting bread dough in the fridge to rise slows down the rising process, so the bread can develop more flavour.
- Yeast in very hot temperatures (<approximately 45°C) will start to die, and a temperature of 55°C is fatal to yeast. This is why we use warm water to activate yeast, and why we let bread dough sit and prove before we put it in the oven—so it can create the bubbles to make the bread rise before we kill it by baking.
Allow time for students to write a statement to describe the ideal temperature for growing yeast.
Determine with students what they have learned on a micro level, and how it might apply from a macro perspective. Record these in the class science journal. See the Step purpose section at the beginning of this step for details that might guide your discussion.
Reflect on the lesson
You might:
- add to the class word-wall or glossary any relevant words and images related to temperature
- add to the L and H sections of the TWLH chart, completing the L and H sections with what they have learned about yeast and temperature.
- discuss any challenges students faced during the investigation, and how they might overcome them in the future.
- consider what questions a non-expert might ask them about temperature and yeast growth.