

What‘s great for growth?
View Sequence overviewStudents will:
- plan and set up an investigation to determine factors that affect mould fungi growth.
- observe and record results.
- explore the risks associated with eating bread from a loaf that has visible mould fungi.
- optional: explore the importance of fungi in forests.
Students will represent their understanding as they:
- use evidence to make a claim about conditions that support mould fungi growth.
- optional: discussions about mould fungi growth investigation and how it relates to forest fungi growth.
In this lesson, assessment is formative.
Feedback might focus on:
- students’ claims about ideal conditions for mould fungi growth.
- students’ discussions and ability to apply mould fungi bread understandings to forest fungi growth.
- the generalisations students make relating the ideal conditions for growing mould to a broader context.
Potential summative assessment
In this lesson, assessment can also be summative.
Students working at the achievement standard for science inquiry should have:
- posed an investigable question.
- planned safe, repeatable investigations to identify patterns, test relationships, and make reasoned predictions.
- identified variables to be changed, measured, and controlled.
- used equipment to generate and record data with appropriate precision.
- used equipment to observe, measure and record data with reasonable precision.
- constructed appropriate representations of this data.
- analysed the data to identify patterns.
- made a claim based on the data/evidence to answer their question.
- communicated their claim/s and evidence clearly.
- compared their methods and findings with others, determining sources of possible error, and where their claims correlate with those of others.
Refer to the Australian Curriculum content links on the Our design decisions tab for further information.
Whole class
Class science journal (digital or hard-copy)
Demonstration copy of Forgotten lunch Resource sheet
Demonstration copy of Variables grid Resource sheet
Access to places with varying amounts of light, such as sunny windowsill and a dark cupboard
Thermometer
Video: Never eat the “clean” part of mouldy bread (3:20)
Optional: Demonstration copy of Fantastic fungi Resource sheet
Each group
2-3 x resealable plastic bags
2-3 x pieces of bread the same size (these could be quarter, half or full slices)
Note: Speak with students with any relevant allergies or health conditions before the investigation and determine/explain appropriate safety precautions.
2-3 x pieces of paper towel
Water
Tape to seal bag closed
Permanent marker
Each student
Individual science journal (digital or hard-copy)
Mould growth investigation planner Resource sheet
Lesson
The Inquire phase allows students to cycle progressively and with increasing complexity through the key science ideas related to the core concepts. Each Inquire cycle is divided into three teaching and learning routines that allow students to systematically build their knowledge and skills in science and incorporate this into their current understanding of the world.
When designing a teaching sequence, it is important to consider the knowledge and skills that students will need in the final Act phase. Consider what the students already know and identify the steps that need to be taken to reach the level required. How could you facilitate students’ understanding at each step? What investigations could be designed to build the skills at each step?
Read more about using the LIA FrameworkRe-orient
Recall the previous lesson, focussing on how changing the temperature of the water affected yeast growth.
Discuss how yeast is a very small fungi that can only be seen under a microscope.
Optional: Revisit the Fantastic fungi Resource sheet and ask students share what they know about other types of fungi, particularly mould.
The Inquire phase allows students to cycle progressively and with increasing complexity through the key science ideas related to the core concepts. Each Inquire cycle is divided into three teaching and learning routines that allow students to systematically build their knowledge and skills in science and incorporate this into their current understanding of the world.
When designing a teaching sequence, it is important to consider the knowledge and skills that students will need in the final Act phase. Consider what the students already know and identify the steps that need to be taken to reach the level required. How could you facilitate students’ understanding at each step? What investigations could be designed to build the skills at each step?
Read more about using the LIA FrameworkIdentifying and constructing questions is the creative driver of the inquiry process. It allows students to explore what they know and how they know it. During the Inquire phase of the LIA Framework, the Question routine allows for past activities to be reviewed and to set the scene for the investigation that students will undertake. The use of effective questioning techniques can influence students’ view and interpretation of upcoming content, open them to exploration and link to their current interests and science capital.
When designing a teaching sequence, it is important to spend some time considering the mindset of students at the start of each Inquire phase. What do you want students to be thinking about, what do they already know and what is the best way for them to approach the task? What might tap into their curiosity?
Read more about using the LIA FrameworkMouldy lunch
Ask students if they have ever accidentally left their lunch box in their schoolbag over the school holidays.
Display a demonstration copy of the Forgotten lunch Resource sheet and discuss what has happened to the forgotten food that was left in the lunchbox over the holidays.
Discuss what students know about where mould likes to grow.
- Where have you seen mould growing before? Was it on food?
- What did the place look like? Was it dry or damp? Light or dark?
- Why do you think mould often appears on food left in a cupboard rather than on a sunny windowsill?
- Can you eat mouldy food?
- Some foods are made with edible moulds that are perfectly safe to eat, such as certain cheeses and cured meats. However, mould growing on other foods indicates that it has started to decompose, and it should not be consumed.
- Can you think of places in your home where mould might grow easily?
- Which place would grow more mould: a wet bathroom corner or a dry classroom shelf? Why?
- Do you think mould would grow faster in the fridge or outside on a warm, damp day? Explain your thinking.
Ask students: What do you think mould fungi need to survive and grow? Record students’ responses, including any questions they might have, as a list in the class science journal.
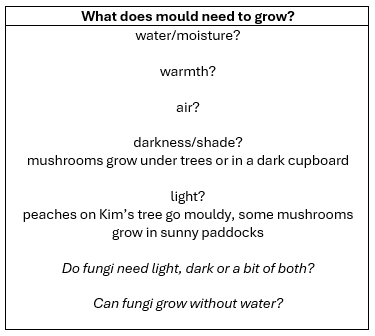
Pose the question: Under what conditions does mould grow best?
The Inquire phase allows students to cycle progressively and with increasing complexity through the key science ideas related to the core concepts. Each Inquire cycle is divided into three teaching and learning routines that allow students to systematically build their knowledge and skills in science and incorporate this into their current understanding of the world.
When designing a teaching sequence, it is important to consider the knowledge and skills that students will need in the final Act phase. Consider what the students already know and identify the steps that need to be taken to reach the level required. How could you facilitate students’ understanding at each step? What investigations could be designed to build the skills at each step?
Read more about using the LIA FrameworkThe Investigate routine provides students with an opportunity to explore the key ideas of science, to plan and conduct an investigation, and to gather and record data. The investigations are designed to systematically develop content knowledge and skills through increasingly complex processes of structured inquiry, guided inquiry and open inquiry approaches. Students are encouraged to process data to identify trends and patterns and link them to the real-world context of the teaching sequence.
When designing a teaching sequence, consider the diagnostic assessment (Launch phase) that identified the alternative conceptions that students held. Are there activities that challenge these ideas and provide openings for discussion? What content knowledge and skills do students need to be able to complete the final (Act phase) task? How could you systematically build these through the investigation routines? Are there opportunities to build students’ understanding and skills in the science inquiry processes through the successive investigations?
Read more about using the LIA FrameworkFungi growing conditions
Discuss how students could measure mould growth by observing the black or green fruiting bodies that are usually visible on the surface of bread.
Use a variables grid to identify the variables that could affect the growth of the mould.
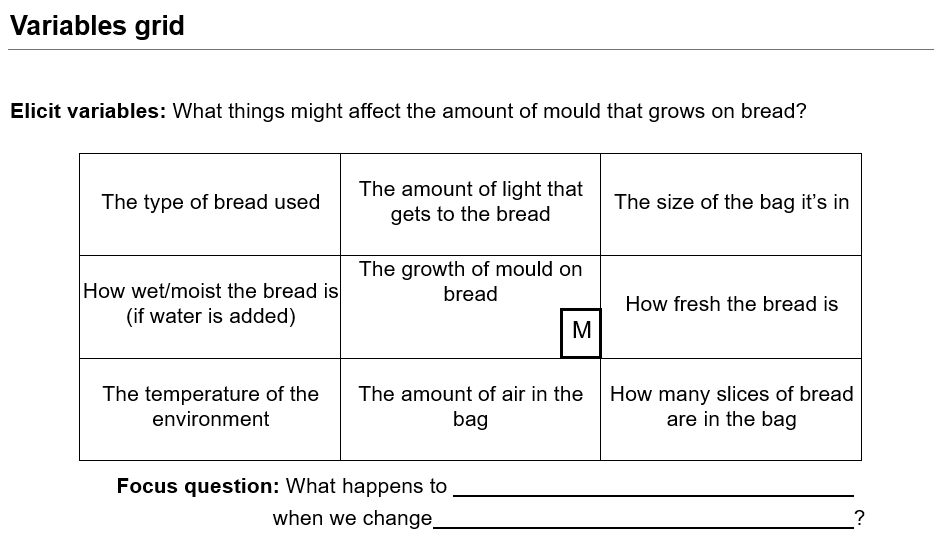
Explain to students that they will all use the same food source for the mould to grow on—bread—and that each slice of bread will be sealed within a bag. This will ensure that every slice will be exposed to the same amount of air (the air that was inside the bag when it was sealed).
Support students to write an investigable question to determine the best conditions for mould growth. If students still require support and scaffolding, or if all students will be changing the same variable, this can be done as a whole class using a demonstration copy of the Variables grid Resource sheet. Otherwise, students can complete this as a team and determine their own question for investigation. For example:
- What happens to mould growth when we change the amount of moisture?
- What happens to mould growth when we change the temperature?
- What happens to mould growth when we change the amount of light?
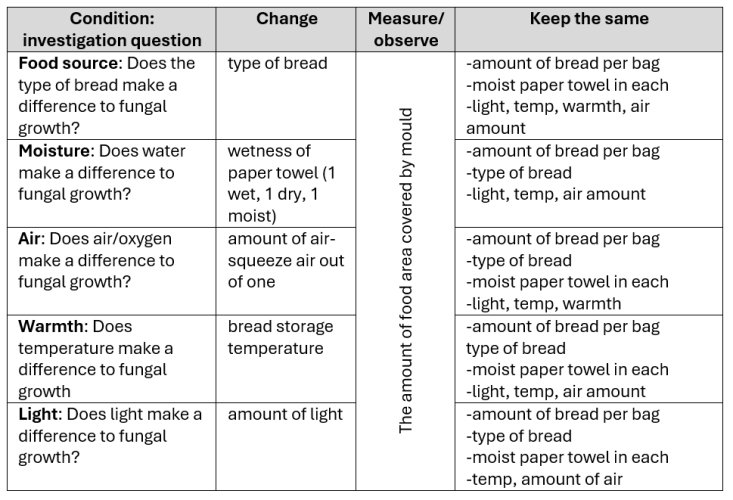
Determine how each variable might be tested, for example:
- To test if moisture makes a difference, wet the bread slices with different amounts of water.
- To test if temperature makes a difference, place the bread slices in different locations, such as on a windowsill, near a heat source, or in the fridge.
- To test if light levels make a difference, place bread slices in different locations such as on a windowsill, in a dark cupboard, or on a bookshelf.
See the table below for more ideas.
Set up a control slice of bread—a slice of bread sealed in a bag, with no added moisture and placed in a location that receives medium/normal levels of light, heat, etc.
Determine an appropriate way to measure mould growth, such as counting the mould spots, estimating/measuring their size, or estimating the percentage of the bread covered in mould. See the embedded professional learning Measuring the amount of mould below for suggestions.
Support groups to plan their investigation using the Mould growth investigation planner Resource sheet.
Before distributing materials and setting up the investigation, write a checklist with key reminders for teams in the class science journal, with a particular focus on safety. This should include:
- Safety: Fungal spores can be dangerous if they are breathed in. This activity is conducted in sealed plastic bags to keep everything enclosed. Do not open the bags, even at the end of the investigation.
- Safety: Some people have allergies or health conditions that can be triggered by bread or its ingredients. Do not eat the bread or its crumbs. Do not pressure other students to eat the bread or its crumbs. Always follow any health or safety advice from the teacher, particularly if students have an allergy or health condition triggered by bread or its ingredients.
Note: Speak with students with any relevant allergies or health conditions before the investigation and determine/explain appropriate safety precautions. - Labels: Ensure all bags are labelled with team members’ names and the contents.
- Air: Leave some air in each bag as moulds are living things and need oxygen from the air to survive (unless a group is investigating whether air makes a difference, in which case they will need to have one bag with no air).
- Double sealed: Ensure bags are well-sealed, then also add tape.
- Temperature: Use a thermometer to check the temperature of the location where the bags will be stored.
Allow time for students to set up their investigation according to the plan set out on their Mould growth investigation planner Resource sheet.
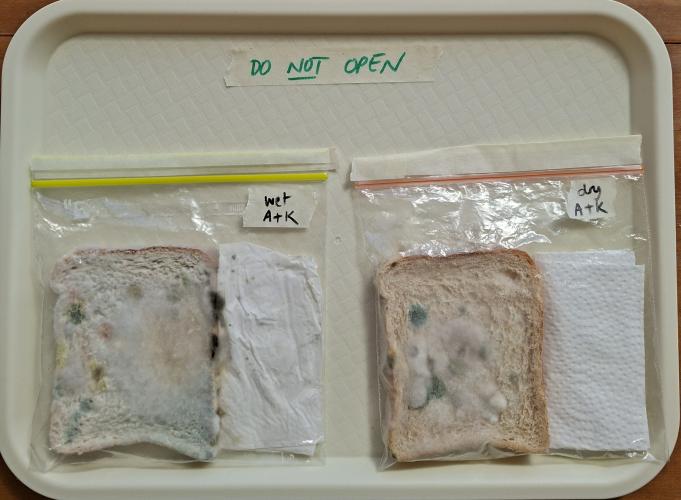
Allow sufficient time for mould to grow, commonly one week, collecting data about mould growth along the way. After this, ask students to make a claim about how the variable they investigated affected the growth of mould.
Mould
What is mould?
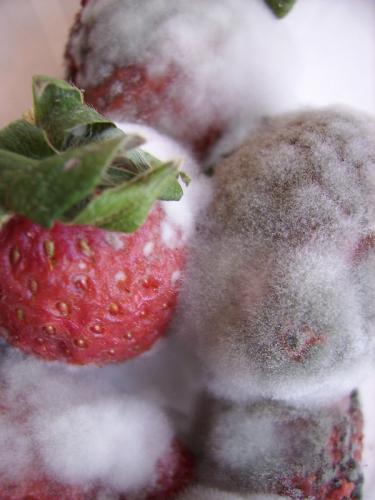
The term “mould” is used to refer to several kinds of fungi that grow on various surfaces. Moulds reproduce by producing spores. Mould spores are commonly found in the air and soil but will only grow into mould when they land somewhere with the right conditions for growth. Spores are very small and don’t contain a supply of food to help them begin to grow like seeds do. They use whatever they land on as food.
Moulds grow best away from direct sunlight in moist, cool-to-warm conditions where there is plenty of plant and animal (organic) matter for them to use as an energy source. A soggy sandwich left in a lunch box over the summer holidays is a mould’s delight. Moulds love bathrooms and sweaty old shoes. They will even grow on books and papers that have not been stored in the right conditions. Direct ultraviolet light (including sunlight) tends to kill moulds, and they don’t grow well in dry environments, or in very cold or very hot conditions.
When mould spores germinate they produce long thin strands called “hyphae”, which give moulds their fluffy appearance. Moulds play an important role in the ecosystem, helping decompose and recycle dead organic materials.
Safety considerations
Mould can be harmful to human health. For further information and mitigation strategies, see Safety consideration for mould in Preparing for this sequence.
The term “mould” is used to refer to several kinds of fungi that grow on various surfaces. Moulds reproduce by producing spores. Mould spores are commonly found in the air and soil but will only grow into mould when they land somewhere with the right conditions for growth. Spores are very small and don’t contain a supply of food to help them begin to grow like seeds do. They use whatever they land on as food.
Moulds grow best away from direct sunlight in moist, cool-to-warm conditions where there is plenty of plant and animal (organic) matter for them to use as an energy source. A soggy sandwich left in a lunch box over the summer holidays is a mould’s delight. Moulds love bathrooms and sweaty old shoes. They will even grow on books and papers that have not been stored in the right conditions. Direct ultraviolet light (including sunlight) tends to kill moulds, and they don’t grow well in dry environments, or in very cold or very hot conditions.
When mould spores germinate they produce long thin strands called “hyphae”, which give moulds their fluffy appearance. Moulds play an important role in the ecosystem, helping decompose and recycle dead organic materials.
Safety considerations
Mould can be harmful to human health. For further information and mitigation strategies, see Safety consideration for mould in Preparing for this sequence.
Measuring the amount of mould
What is the easiest way to measure mould growth, and what safety considerations should you make?
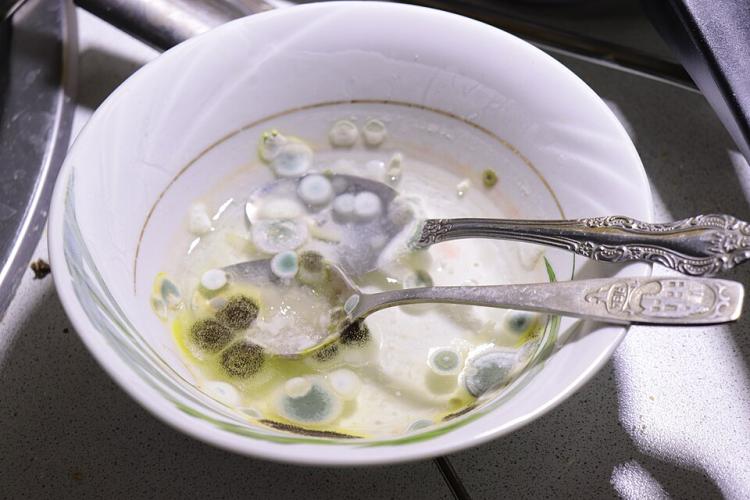
Measuring mould growth can be challenging because fungi spread irregularly and are not easy to quantify using standard units. A simple and effective classroom method is to estimate surface coverage using a grid overlay.
This can be done by photocopying graph squares onto a transparent sheet (photocopiable clear film). This creates a reusable grid that can be placed over student samples without direct contact.
To use this method:
- Keep the bread sealed inside a plastic bag at all times for safety.
- Place the transparent grid sheet over the outside of the plastic bag.
- Count how many squares contain visible mould.
This gives an estimate of how much of the bread surface is covered by mould, allowing for comparisons between samples.
This approach allows students to collect quantitative data that allows a fair comparison between the different physical conditions and provides evidence that supports student claims.
To extend students, count the total number of squares that cover the bread, and calculate the fraction or percentage of the bread covered in mould fungi.
Hygiene and safety considerations
Because mould can produce spores that may cause allergic reactions or irritation:
- students should not open the plastic bags.
- avoid direct contact with the mould at all times.
- after use, clean the transparent grid sheet with a disinfectant spray and allow it to dry before storing for reuse in future classes.
- ensure hands are washed after handling samples.
Measuring mould growth can be challenging because fungi spread irregularly and are not easy to quantify using standard units. A simple and effective classroom method is to estimate surface coverage using a grid overlay.
This can be done by photocopying graph squares onto a transparent sheet (photocopiable clear film). This creates a reusable grid that can be placed over student samples without direct contact.
To use this method:
- Keep the bread sealed inside a plastic bag at all times for safety.
- Place the transparent grid sheet over the outside of the plastic bag.
- Count how many squares contain visible mould.
This gives an estimate of how much of the bread surface is covered by mould, allowing for comparisons between samples.
This approach allows students to collect quantitative data that allows a fair comparison between the different physical conditions and provides evidence that supports student claims.
To extend students, count the total number of squares that cover the bread, and calculate the fraction or percentage of the bread covered in mould fungi.
Hygiene and safety considerations
Because mould can produce spores that may cause allergic reactions or irritation:
- students should not open the plastic bags.
- avoid direct contact with the mould at all times.
- after use, clean the transparent grid sheet with a disinfectant spray and allow it to dry before storing for reuse in future classes.
- ensure hands are washed after handling samples.
The Inquire phase allows students to cycle progressively and with increasing complexity through the key science ideas related to the core concepts. Each Inquire cycle is divided into three teaching and learning routines that allow students to systematically build their knowledge and skills in science and incorporate this into their current understanding of the world.
When designing a teaching sequence, it is important to consider the knowledge and skills that students will need in the final Act phase. Consider what the students already know and identify the steps that need to be taken to reach the level required. How could you facilitate students’ understanding at each step? What investigations could be designed to build the skills at each step?
Read more about using the LIA FrameworkThe Investigate routine provides students with an opportunity to explore the key ideas of science, to plan and conduct an investigation, and to gather and record data. The investigations are designed to systematically develop content knowledge and skills through increasingly complex processes of structured inquiry, guided inquiry and open inquiry approaches. Students are encouraged to process data to identify trends and patterns and link them to the real-world context of the teaching sequence.
When designing a teaching sequence, consider the diagnostic assessment (Launch phase) that identified the alternative conceptions that students held. Are there activities that challenge these ideas and provide openings for discussion? What content knowledge and skills do students need to be able to complete the final (Act phase) task? How could you systematically build these through the investigation routines? Are there opportunities to build students’ understanding and skills in the science inquiry processes through the successive investigations?
Read more about using the LIA FrameworkFungi food and forests
In the following Integrate routine, students are guided to link their experiences surveying the conditions of a habitat with the science concept being explored, that is, that different physical conditions exist within a habitat. Through modelling, questioning and discussion, students should come to a consensus that:
|
Teams share and discuss their findings and claims.
- What changes did you notice on your bread over time?
- What did the mould look like (colour, shape, size)?
- Did all bread samples grow mould fungi in the same way? Why or why not?
- Which sample had the most mould fungi? Which had the least?
- What evidence did you record that shows mould fungi grew over time?
- What evidence supports your claim?
- Did any groups get different results? Why might that have happened?
- How confident are you in your claim? What makes you say that?
- If you could repeat the experiment, what would you do differently?
- What new questions do you have about mould fungi or fungi?
- How could your findings help people prevent mould fungi at home?
Show the video Never eat the “clean” part of mouldy bread (3:20).
Explain to students that:
- mould spores are all around us all the time, floating in the air like specks of dust. When they land on food, they can eventually grow into a fungus, causing the food to decay or go mouldy. Most of the time, the food is consumed before the mould has an opportunity to multiply and rot the food.
- in a warm, humid environment, mould grows well on bread, generally growing within a week. This is because bread is an ideal environment. Mould floating through the air has plenty of opportunity to land on bread while it's mixed, proved, cooled, sliced and stored. It provides the starches and carbohydrates (sugars) that feed the mould, and its soft texture means plenty of moisture is available.
Discuss with students why it is important to know the ideal growing conditions for mould and how this helps us to control its growth. Through questioning, support them to make generalisations about how this applies to other species.
- Which conditions seemed to slow the mould fungi growth down?
- What can we claim about how moisture/sunlight/air/warmth increases or decreases mould fungi growth?
- What evidence supports your claim?
- How could your findings help people prevent mould fungi at home?
- Why would we want to control the growth of mould?
- How would this apply to other species? Why is it important to know the ideal physical conditions for them too?
- Understanding the ideal conditions for a species’ growth helps humans to control that growth—either by promoting it or impeding/stopping it.
- When and why would humans want to help/promote the growth of a species? Can you give an example?
- When and why would humans want to impede/stop the growth of a species? Can you give an example?
- How might this relate to the issue of coral bleaching on the Great Barrier Reef?
- How might it relate to the growth of duckweed?
- If duckweed got out of control in an aquatic environment, what measure could we take to control its growth? How would we know these measures would work?
Determine with students what they have learned on a micro level, and how it might apply from a macro perspective. Record these in the class science journal. See the Step purpose section at the beginning of this step for details that might guide your discussion.
Optional activity: Fungi in the ecosystem
Discuss the important role fungi, as the decomposers and detritivores, play in an ecosystem.
- What important role do fungi play in the world? What would happen if we didn’t have them?
- Students will have learned about the role of decomposers, including mould, in the environment in Year 4. See Lesson 6 Decomposers and detritivores in the Year 4 sequence Sustain the chain for more details and supplementary resources.
- What would happen if fungi didn’t exist?
Optional activity: Fungi in forests
Explore the importance of fungi in forests.
Show the video David Attenborough encounters a symbiotic fungi! | Nature Bites (4:18). Discuss the conditions that support fungi growth in forests, such as:
- food sources, including leaf litter, fallen trees, dead animals, and sugars from the roots of oak trees.
- moisture.
- moderate temperatures.
Compare the optimal conditions for forest fungi and the mould grown on the bread.
Optional activity: Mushrooms and fungi
Show the images of mushrooms on pages 2 and 3 of the Fantastic fungi Resource sheet. Discuss what students think they are and what they know about them.
- What are these?
- Did you know mushrooms were a type of fungus?
- Are all mushrooms edible?
- Why should we not pick mushrooms in the wild to eat?
- While many varieties of mushrooms are perfectly safe to consume, some are highly toxic and can cause severe illness and even death.
- Commercially cultivated mushrooms, such as those you can purchase at supermarkets and fruit and vegetable grocers, are safe for human consumption.
- It is not safe to pick and consume wild mushrooms because you can never be certain what you are getting.
- Some people do pick wild mushrooms, but it requires a great deal of experience to be able to expertly identify what is safe to consume and what isn’t. There is always an inherent risk in picking wild mushrooms.
- Do you think mushrooms are plants?
- If required, explain that fungi have their own classification, distinct from plants and animals.
Reflect on the lesson
You might:
- challenge students to design a bread storage system that slows the growth rate of mould fungi.
- add to the class word wall or glossary any relevant words and images related to mould and other fungi.
- add to the L and H sections of the TWLH chart, completing the L and H sections with what they have learned about ideal physical conditions for mould and other fungi growth.
- discuss safety considerations and why they are important.