Chemistry in the kitchen
View Sequence overviewStudents will:
- investigate the amount of salt required to create a saturated solution.
- consider whether creating the salt solution is a physical or chemical change and whether it is reversible or irreversible.
Students will represent their understanding as they:
- make and discuss claims about dissolving and retrieving the salt.
- (optional) record the mass of salt and water before and after combining.
In this lesson, assessment is formative.
Feedback might focus on:
- students’ explanation of dissolving results and evaporation results.
- the conclusions that students draw about conditions affecting evaporation rates.
Whole class
Class science journal (digital or hard-copy)
Jar/glass of salty water
Glass/cup
Salt
Water
Optional: Digital scales
Optional: Demonstration copy of the Dissolving salt Resource sheet
Optional: Videos on how salt is made and its importance in making and preserving food, for example:
- Separate a saltwater mixture by distillation (4:09)
- Timelapse salt crystal formation (0:39)
- How salt is made – in a greenhouse in New Jersey USA (3:20)
- How sea salt is made – by boiling and heated tanks in Oregon USA (5:13)
- How salt is reclaimed from the sea – 1950 footage in South Australia (2:13)
- Australia’s mega salt mine – started operating 2025 (2:54)
- Why salt is the most important ingredient in history (7:16)
Each group
1 x transparent jar or cup
Salt (approx. 300 g)
Approximately 100 ml of warm water
Dry $\frac{1}{2}$ teaspoon measurement for adding salt
Stirrer such as spoon or pop stick
Optional: Access to digital scales
Marker such as whiteboard or permanent marker
Piece of rough string/wool or pipe cleaner
Pop stick or pencil to tie string to
Paperclip to help the string stay submerged in the water
Each student
Individual science journal (digital or hard-copy)
Dissolving salt Resource sheet
My kitchen observations Resource sheet (ongoing)
Lesson
The Inquire phase allows students to cycle progressively and with increasing complexity through the key science ideas related to the core concepts. Each Inquire cycle is divided into three teaching and learning routines that allow students to systematically build their knowledge and skills in science and incorporate this into their current understanding of the world.
When designing a teaching sequence, it is important to consider the knowledge and skills that students will need in the final Act phase. Consider what the students already know and identify the steps that need to be taken to reach the level required. How could you facilitate students’ understanding at each step? What investigations could be designed to build the skills at each step?
Read more about using the LIA FrameworkRe-orient
Recall the previous lesson, focusing on the observations of the salt and water solution.
The Inquire phase allows students to cycle progressively and with increasing complexity through the key science ideas related to the core concepts. Each Inquire cycle is divided into three teaching and learning routines that allow students to systematically build their knowledge and skills in science and incorporate this into their current understanding of the world.
When designing a teaching sequence, it is important to consider the knowledge and skills that students will need in the final Act phase. Consider what the students already know and identify the steps that need to be taken to reach the level required. How could you facilitate students’ understanding at each step? What investigations could be designed to build the skills at each step?
Read more about using the LIA FrameworkIdentifying and constructing questions is the creative driver of the inquiry process. It allows students to explore what they know and how they know it. During the Inquire phase of the LIA Framework, the Question routine allows for past activities to be reviewed and to set the scene for the investigation that students will undertake. The use of effective questioning techniques can influence students’ view and interpretation of upcoming content, open them to exploration and link to their current interests and science capital.
When designing a teaching sequence, it is important to spend some time considering the mindset of students at the start of each Inquire phase. What do you want students to be thinking about, what do they already know and what is the best way for them to approach the task? What might tap into their curiosity?
Read more about using the LIA FrameworkDissolving
Show students a jar of water with some salt dissolved in it. Before telling them what it is, record students’ observations about what is in the jar.
Identify that the jar contains salty water and explain how you made it salty by dissolving salt into the water. Do not state how much salt has been dissolved into the water.
Discuss the meaning of the word dissolve, defining it for students as required: when a substance breaks down and spreads evenly throughout a liquid.
Ask students how they might identify if water is salty (e.g. it sometimes looks whitish, it might taste salty) and where they might find/use salty water (e.g. the ocean, some inland rivers/lakes, we add salt to water when cooking, sometimes we might gargle with it).
Pose the questions: How much salt can be dissolved in water? and Is there a way to separate the salt from the water again?
Explain to students that they will first undertake an investigation to answer the question How much salt can be dissolved in water?
The Inquire phase allows students to cycle progressively and with increasing complexity through the key science ideas related to the core concepts. Each Inquire cycle is divided into three teaching and learning routines that allow students to systematically build their knowledge and skills in science and incorporate this into their current understanding of the world.
When designing a teaching sequence, it is important to consider the knowledge and skills that students will need in the final Act phase. Consider what the students already know and identify the steps that need to be taken to reach the level required. How could you facilitate students’ understanding at each step? What investigations could be designed to build the skills at each step?
Read more about using the LIA FrameworkThe Investigate routine provides students with an opportunity to explore the key ideas of science, to plan and conduct an investigation, and to gather and record data. The investigations are designed to systematically develop content knowledge and skills through increasingly complex processes of structured inquiry, guided inquiry and open inquiry approaches. Students are encouraged to process data to identify trends and patterns and link them to the real-world context of the teaching sequence.
When designing a teaching sequence, consider the diagnostic assessment (Launch phase) that identified the alternative conceptions that students held. Are there activities that challenge these ideas and provide openings for discussion? What content knowledge and skills do students need to be able to complete the final (Act phase) task? How could you systematically build these through the investigation routines? Are there opportunities to build students’ understanding and skills in the science inquiry processes through the successive investigations?
Read more about using the LIA FrameworkHow salty?
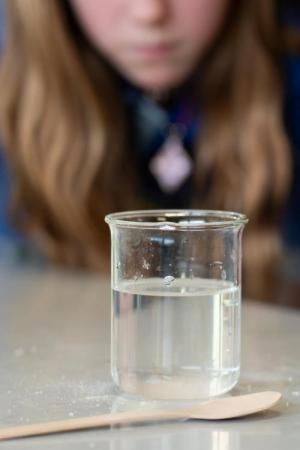
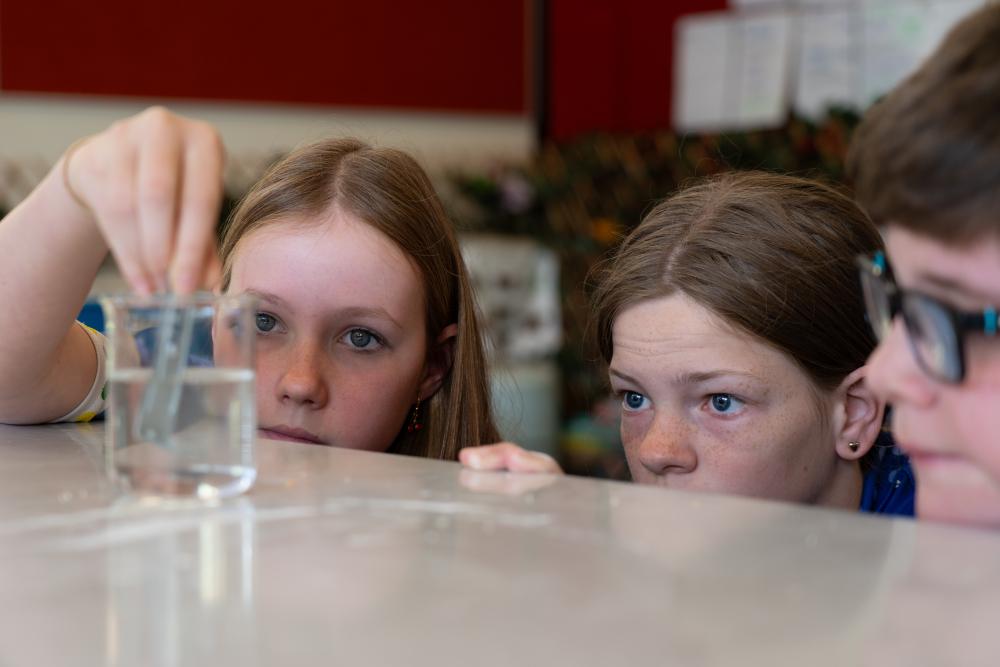
Working in teams, students investigate how much salt can be dissolved in 100 ml of water.
Discuss how students will measure how much salt they are putting into the water, for example:
- by counting how many half teaspoon measures of salt they put into the water before it no longer dissolves.
- by weighing the water before and after adding salt (optional).
Ask students how they will know if the salt is no longer dissolving and discuss the importance of proceeding slowly in stirring and waiting for the salt to dissolve.
Model the process for students:
- Pour 100 ml of water (room temp) into a jar/cup.
- Mark the side of the jar/cup to show the water level.
- Optional: Weigh the jar/cup and record the weight for comparison later.
- Add half a teaspoon of salt at a time, stirring and recording observations on a demonstration copy of the Dissolving salt Resource sheet.
Ask students to give reasoned predictions about how much salt can be dissolved in 100 ml of water and record their predictions and reasons on their Dissolving salt Resource sheet or in their science journals.
Remind students:
- to stir carefully, and it might take time for the salt to dissolve.
- to stop adding salt when they can see it has stopped dissolving.
Allow time for teams to dissolve the salt and complete their observations.
Once students can no longer dissolve any more salt, they can mark the new water level on their jar. If the students also weighed their jar before commencing, they should now weigh their jar again.
Remind students that they should only taste things that you indicate are safe.
Dissolving
What happens when a substance dissolves?
When a solid in a powder form is added to a liquid, it might dissolve. When this happens the particles of the solid completely disperse in the liquid so that they are no longer visible (not to be confused with a suspension of a solid in a liquid, where the particles will eventually settle on the bottom). For example, when table salt is dissolved in water, a liquid solution is formed that contains a dissolved salt. Substances that can dissolve are called ‘soluble’.
Not all substances will dissolve in water; for example, nail polish dissolves in acetone. Some solids will dissolve in water, but not in other liquids; for example, aspirin tablets will not dissolve in oil. Whether or not things dissolve depends on the properties of the liquids and the solids; for example, fats will not dissolve in water.
Cloudy or clear
If the powdered solid is insoluble, it does not dissolve in the liquid. The liquid will appear cloudy when it is stirred and will become clear again when the powder resettles at the bottom. This is because the solid particles block light more effectively than the liquid does.
If a soluble solid is added to a liquid, it might be cloudy when it is first mixed, then become clear. This is because it takes time for solids to dissolve. Stirring helps the process by allowing the water molecules to surround as much of the solid as possible. Properly dissolved solids will not settle at the bottom unless the solution has become saturated.
Saturation, temperature, and pressure
Liquids such as liquid water have a limit of how much of a substance can be dissolved at room temperature and pressure. If more solid continues to be added, it will not be able to ‘fit’ between the water particles. In this case, the liquid solution is said to be ‘saturated’, and the extra solid will fall to the bottom of the solution. You can increase the amount of substance that dissolves in a liquid by increasing the temperature or pressure. Hot water can dissolve more salt crystals than cold water. If a salt solution is saturated when it is hot, the salt particles will form crystals on the bottom of the solution when it cools.
Gases can also dissolve in liquids. Carbonated water used for soft drinks is water in which carbon dioxide gas has been dissolved. The water and gas are put under pressure so that more gas is dissolved in the water than would be the case under normal atmospheric conditions. When the pressure is released by opening a bottle or can, the excess carbon dioxide escapes from the water as bubbles.
Reversing the change
Common salt (solid sodium chloride) can be recovered from salty water by evaporation, then dissolved again to form salty water, in which the sodium and chloride are still present. Sugar crystals can similarly be recovered from sugar-sweetened water without chemical change.
Students’ conceptions
Students might confuse dissolving with melting. Melting is a change of state—a solid substance becomes liquid through a change of pressure or heat. Dissolving is when one substance (solid or gas) combines evenly with a liquid substance.
Students might say that the ‘salt has disappeared’ when salt has dissolved in water. This statement might mean that students believe that the salt is no longer present, or it might mean that they are simply remarking that they can no longer see the salt. The salt is still present, although it is no longer visible, and can be retrieved if the water evaporates from the solution. Weighing the liquid before and after adding the substance can assist students to understand the salt is still present when they can’t see it.
Students might think that the taste of the dissolved substance remains, but not the actual substance. The taste sensation is caused by particles interacting with our taste buds (like the way in which our smell receptors interact with perfume particles). Therefore, the presence of the taste indicates the actual substance is still there.
The Inquire phase allows students to cycle progressively and with increasing complexity through the key science ideas related to the core concepts. Each Inquire cycle is divided into three teaching and learning routines that allow students to systematically build their knowledge and skills in science and incorporate this into their current understanding of the world.
When designing a teaching sequence, it is important to consider the knowledge and skills that students will need in the final Act phase. Consider what the students already know and identify the steps that need to be taken to reach the level required. How could you facilitate students’ understanding at each step? What investigations could be designed to build the skills at each step?
Read more about using the LIA FrameworkFollowing an investigation, the Integrate routine provides time and space for data to be evaluated and insights to be synthesized. It reveals new insights, consolidates and refines representations, generalises context and broadens students’ perspectives. It allows student thinking to become visible and opens formative feedback opportunities. It may also lead to further questions being asked, allowing the Inquire phase to start again.
When designing a teaching sequence, consider the diagnostic assessment that was undertaken during the Launch phase. Consider if alternative conceptions could be used as a jumping off point to discussions. How could students represent their learning in a way that would support formative feedback opportunities? Could small summative assessment occur at different stages in the teaching sequence?
Read more about using the LIA FrameworkComparing results
In this Integrate step, guide students to link their experiences in the investigation to the science concept being explored—in this instance, that solid substances can be changed and dissolved by liquids. Through questioning and discussion, students should come to a consensus that:
|
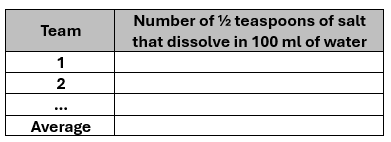
Ask teams to share their results. In the class science journal, record the number of half teaspoons dissolved by each group.
Model how to calculate the average values for each volume of water and discuss the reason for doing so.
- What advantage is there in analysing the results from all groups?
- Comparing groups allows us to know if the result is consistent.
- Why might the results differ across groups?
- Some sources of error might be:
- sampling error, such as a small difference in the amount of salt per half teaspoon or slightly different water quality.
- observation error, for example, one group didn’t notice that the salt had stopped dissolving.
- Some sources of error might be:
- Why would we want to work out the average result across all the groups? How is that helpful?
- It should provide us with a value that is closer to the real value, because it ‘evens out’ some of the errors that may have been made.
Discuss the process of dissolving salt in water, prompting students to explain what they think was happening. Record their ideas in the class science journal.
- What has happened to the salt? Where has it gone?
- Optional: Ask a student/s to taste a glass of water and confirm it is just water. Dissolve a small amount of salt in the water and ask the student to taste it again, describing the difference, and confirming that the salt is still present in the water, even though it can no longer be seen.
- What changes have occurred to the salt in the water?
- What did you observe to know that the water had reached saturation (i.e. that no more salt would dissolve in the water)?
- No more salt will mix into the water, the salt falls to the bottom of the container and stays there.
- Why do you think the salt stops dissolving?
- The water cannot hold any more salt particles.
- Is the salt still in the water? How do you know?
- You can taste it, the water level has risen, the water looks cloudy.
- Why do you think the water now looks ‘cloudy’?
- Because there are solid particles of salt being swirled around.
- Where do the salt crystals go?
- The salt is mixed into the water, and the salt and water particles mix together.
- How do you know when the salt is no longer dissolving in the water and the water is saturated?
- How do your results differ from the predictions you made before the investigation?
- What changes did you observe with the volume/weight? What does this tell us?
- The salt is now ‘in’ the water and hasn’t just ‘disappeared’.
- Note that the final volume of the salty water will be more than the initial volume of the water, but less than the separate starting volumes of salt and water.
Students return to the Dissolving salt Resource sheet, writing an explanation of what they think happened, including a labelled diagram and an evaluation the investigation.
The Inquire phase allows students to cycle progressively and with increasing complexity through the key science ideas related to the core concepts. Each Inquire cycle is divided into three teaching and learning routines that allow students to systematically build their knowledge and skills in science and incorporate this into their current understanding of the world.
When designing a teaching sequence, it is important to consider the knowledge and skills that students will need in the final Act phase. Consider what the students already know and identify the steps that need to be taken to reach the level required. How could you facilitate students’ understanding at each step? What investigations could be designed to build the skills at each step?
Read more about using the LIA FrameworkThe Investigate routine provides students with an opportunity to explore the key ideas of science, to plan and conduct an investigation, and to gather and record data. The investigations are designed to systematically develop content knowledge and skills through increasingly complex processes of structured inquiry, guided inquiry and open inquiry approaches. Students are encouraged to process data to identify trends and patterns and link them to the real-world context of the teaching sequence.
When designing a teaching sequence, consider the diagnostic assessment (Launch phase) that identified the alternative conceptions that students held. Are there activities that challenge these ideas and provide openings for discussion? What content knowledge and skills do students need to be able to complete the final (Act phase) task? How could you systematically build these through the investigation routines? Are there opportunities to build students’ understanding and skills in the science inquiry processes through the successive investigations?
Read more about using the LIA FrameworkSeparating salt from water
Explain to students that in their teams they will now undertake an ongoing investigation to answer the question Is there a way to separate the salt from the water again?
Ask students to suggest actions that might reverse the change they have created and get the salt (and/or water) back.
Explain that teams are going to evaporate the water to see if the salt gets left behind, thus separating the salt and water again. If required, review what evaporation is (students will have learned about this in Year 4, when learning about the water cycle).
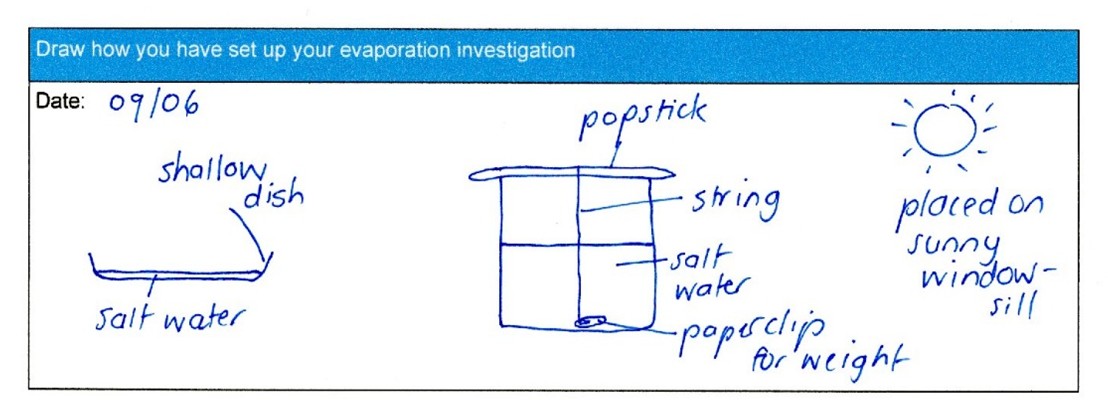
Demonstrate how to set up the investigation:
- Ensure teams have clearly marked their names/initials on the cup/jar containing their salt water solution.
- Students attach string to a pop stick, and place their pop stick across the rim/lip of their cup/jar.
- Alternatively, students can pour an amount of their solution onto a lid/plate/shallow container and place a pop stick with string attached over the top. Students might need to raise the pop stick slightly so the string does not coil in the water, or place the pop stick to one side.
- Ensure the string is sitting in the salty water. A paperclip may be used to weigh the string down.
- Place this set-up in a warm sunny spot, such as a windowsill. You might also use lamps to direct light and heat onto the water if required.
Allow time for teams to:
- set up and name their evaporation trials,
- draw their investigation set up on ‘Part 2 - Reversing the change’ of Dissolving Salt Resource sheet.
Discuss how long students think it will take for the water to evaporate, and what will happen as a result.
Allows students time to observe and record the changes to their salt solutions over the next few days (and potentially weeks).
Ask students to ensure they are making observations about how salt is used in their kitchens at home for their My kitchen observations activity. Discuss and identify ingredients that aren’t ‘salt’ specifically, but often either contain added salt, or have salt involved as part of the process of making it. For example:
- sauces and marinades such as soy, tamari, fish sauce, miso paste, shrimp paste, Worcestershire sauce, and stock.
- cured meats and seafood such as bacon, salami, or anchovies.
- cheeses such as feta, parmesan.
- pickled vegetables such as pickled cucumbers, kimchi, sauerkraut, capers or olives.
- other products such as seaweed/kelp or nutritional yeast.
Optional: Research and discuss why some of these foods can be used in a similar way to salt and how they differ.
Adapting to your context
How can I adapt this activity for my students and/or context?
The salt evaporation experiment used in this step can be adapted to suit the local context and needs of students.
Salt sources
Table salt can be dissolved in warm water (as it is in this lesson), allowing students to appreciate how much salt is contained in a saturated solution. Roughly 85 grams of salt can be dissolved in half a cup of water (125 mL).
Where geographically suitable, sea or salt lake water could be used as an alternative solution.
Epsom salt (magnesium sulfate) can be used to form needle-like crystals, in contrast to the cubic crystals formed by table salt.
Using sugar
The process of dissolving and retrieving salt described in this lesson will also work with sugar. However, using sugar can attract ants and other pests into the classroom. Take this into consideration if using sugar for this investigation.
String alternatives
Students enjoy the process of growing salt crystals onto something, such as:
- rough string (used in this lesson).
- wool.
- pipe cleaners—these can be shaped before being suspended in the solution, to create crystal shapes, hearts and letters.
Super simple
Pouring some saturated salt solution onto a plate, plastic lid or petri dish and placing it somewhere dry will allow the water to evaporate, leaving salt crystals behind. Crystals are visible on surfaces of all colours, but are more visible on coloured surfaces, rather than white.
For the fastest evaporation, the salt water could be simmered on a stovetop in a teacher-led investigation.
The Inquire phase allows students to cycle progressively and with increasing complexity through the key science ideas related to the core concepts. Each Inquire cycle is divided into three teaching and learning routines that allow students to systematically build their knowledge and skills in science and incorporate this into their current understanding of the world.
When designing a teaching sequence, it is important to consider the knowledge and skills that students will need in the final Act phase. Consider what the students already know and identify the steps that need to be taken to reach the level required. How could you facilitate students’ understanding at each step? What investigations could be designed to build the skills at each step?
Read more about using the LIA FrameworkFollowing an investigation, the Integrate routine provides time and space for data to be evaluated and insights to be synthesized. It reveals new insights, consolidates and refines representations, generalises context and broadens students’ perspectives. It allows student thinking to become visible and opens formative feedback opportunities. It may also lead to further questions being asked, allowing the Inquire phase to start again.
When designing a teaching sequence, consider the diagnostic assessment that was undertaken during the Launch phase. Consider if alternative conceptions could be used as a jumping off point to discussions. How could students represent their learning in a way that would support formative feedback opportunities? Could small summative assessment occur at different stages in the teaching sequence?
Read more about using the LIA FrameworkCrystal clear
Conduct this Integrate step once enough time has passed for the water to evaporate and clear salt crystals to have formed on the string.
In this Integrate step, guide students to link their experiences in the investigation to the science concept being explored—in this instance, that the salt water solution can be changed, and the salt and water separated again. Through questioning and discussion, students should come to a consensus that:
|
As a class, observe and consider the salt crystals students are ‘growing’ (or have ‘grown’), as well as how the conditions of your location, such as temperature, humidity or direct sunlight, may have affected how quickly the crystals have grown.
- How has the salt solution changed?
- Where is the salt now?
- Where is the water?
- It has evaporated into the surrounding air over time. It is also possible that it then condensed on a cold surface nearby and became water again.
- Do you agree that this change is reversible? Can you explain what happened to the salt over time?
- This change is reversible because we can separate the salt and water again. The salt dissolved and became part of the water/liquid, but when the water evaporated, it formed crystals again.
- What do the terms reversible and irreversible mean?
- How do you think the temperature/amount of sunlight etc. has impacted how quickly we were able to separate the salt and water?
Discuss how salt is made and the importance of salt in the history of the world, including how its uses in making and preserving food affected the development of human civilisation. Videos that can support and prompt this discussion include:
- Separate a saltwater mixture by distillation (4:09)
- Timelapse salt crystal formation (0:39)
- How salt is made – in a greenhouse in New Jersey USA (3:20)
- How sea salt is made – by boiling and heated tanks in Oregon USA (5:13)
- How Salt is Reclaimed from the Sea – 1950 footage in South Australia (2:13)
- Australia’s mega salt mine – started operating 2025 (2:54)
- Why salt is the most important ingredient in history (7:16)
Reflect on the lesson
You might:
- consider the original questions posed before the investigation: How much salt can be dissolved in water? and Is there a way to separate the salt from the water again? Jointly construct a sentence or two to answer the questions, and record them in the class science journal.
- add to the class word wall of vocabulary.